When transitioning to new creative software, artists often seek familiar tools and functionalities that facilitate their workflow. For many, especially those migrating from programs like Paint Tool SAI, the stabilization feature is a critical component for achieving smooth, controlled lines. This article delves into the intricacies of Clip Studio Paint's stabilization, exploring its settings, potential challenges, and how to effectively utilize it to enhance your digital art.
Understanding Line Stabilization in Digital Art
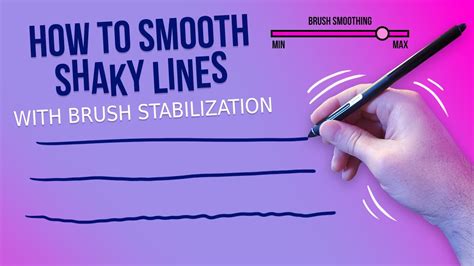
Line stabilization, often referred to as "smoothing" or "anti-aliasing" in digital art software, is a crucial tool for digital artists. Its primary function is to compensate for the inherent shakiness of hand-drawn lines, especially when using a graphics tablet. When you draw a line, even with a steady hand, there can be minute tremors or inconsistencies that result in a jagged or uneven stroke. Stabilization algorithms analyze the input from your stylus in real-time and intelligently adjust the path of the line to create a smoother, more fluid appearance. This process can involve predicting the intended path of the stroke, averaging out minor jitters, and applying subtle curves to create a visually pleasing result. The goal is to mimic the fluidity of traditional media while offering the precision and editability of digital tools.
The effectiveness of stabilization can vary significantly between different software packages. Each program employs its unique algorithms and offers different levels of control over these settings. For artists accustomed to a specific program's stabilization, the transition to another can present a learning curve. This is particularly true when the perceived behavior of the stabilization differs from what the artist expects.
The Clip Studio Paint Stabilization Experience: A Closer Look
For users transitioning from Paint Tool SAI, the perceived difference in stabilization can be a point of contention. As one user noted, "I'm a recent convert from Paint Tool SAI, and I'm loving CSP so far. However, the one thing that keeps me going back to SAI is the stabilization function. I'm finding that the stabilization in CSP is atrocious, to be frank." This sentiment highlights a common experience where the familiar feel of one program's tools doesn't directly translate to another.
In SAI, the stabilization is often described as smoothing out the lines while retaining a "very fine degree of control." This implies a balance where the algorithm corrects wobbles without overly dictating the artist's intended stroke. The user felt that in CSP, "the line just kind of turns out however it wants, and it takes many, many more tries to get a stroke lined up properly." This suggests that the CSP stabilization, at default or certain settings, might be perceived as too aggressive, leading to a loss of direct control and a need for more corrective actions.
It's important to acknowledge that user perception plays a significant role in evaluating software features. What one artist finds to be an intuitive and helpful stabilization, another might find intrusive or overly sensitive. The key often lies in understanding the underlying mechanics and adjusting the settings to match individual preferences and drawing styles.
Navigating Clip Studio Paint's Stabilization Settings
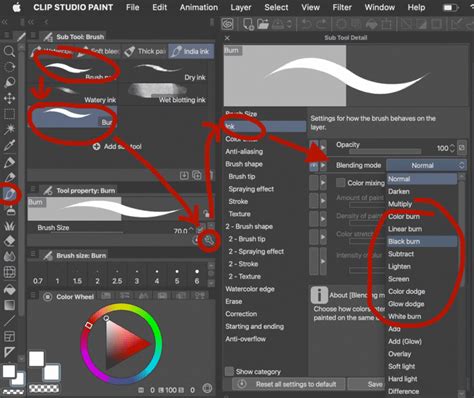
Clip Studio Paint offers a robust set of stabilization options that allow for a high degree of customization. These settings are typically found within the "Tool Properties" palette when a drawing tool, such as the Pen or Pencil, is selected. The primary setting is often labeled "Stabilizer" or "Smoothness."
The "Stabilizer" setting in Clip Studio Paint provides a numerical scale, often from 0 to 100. A lower value (closer to 0) means less stabilization, resulting in lines that more closely follow the raw input from the stylus, with more of the artist's natural tremor. A higher value (closer to 100) means more aggressive stabilization, where the software actively smooths out shaky movements, potentially leading to a more artificial or "digital" feel if set too high.
The user in the provided information mentioned settling on "around 27" after trying "the stabilizer at many settings." This indicates a moderate level of stabilization, suggesting a desire to smooth out minor imperfections without sacrificing too much control. Finding this sweet spot is a process of experimentation.
Beyond the primary "Stabilizer" setting, Clip Studio Paint may offer additional options that influence line quality. These can include:
- Correction Level: This might offer different algorithms or "levels" of stabilization, each with a slightly different feel. Some might prioritize speed and responsiveness, while others focus on maximum smoothness.
- Adjust by Speed: This setting can dynamically alter the stabilization based on how quickly the stylus is moving. Faster strokes might receive less stabilization to preserve spontaneity, while slower strokes get more correction to prevent wobbles.
- Stabilization Amount (Specific Tool Settings): Different brush types or tools within Clip Studio Paint might have their own unique stabilization parameters that can be tweaked independently.
Experimentation is paramount. Artists are encouraged to test various combinations of these settings with different brush types and drawing speeds to discover what best suits their individual style and the specific task at hand. Drawing a series of lines, circles, and curves at different speeds while adjusting the stabilizer can quickly reveal how each setting impacts the output.
Advanced Stabilization Techniques and Considerations
While the basic "Stabilizer" setting is the most commonly adjusted, understanding how it interacts with other aspects of your drawing process can lead to even better results.
Brush Type and Stabilization
The type of brush you use in Clip Studio Paint can significantly influence how stabilization is perceived. A "G-pen" or "Dip pen" designed for inking might benefit from a moderate to high stabilization to achieve clean, consistent line weights. Conversely, a "Pencil" or "Charcoal" brush, intended for more textured or sketchy lines, might require less stabilization to retain its natural feel. Some brushes are designed with built-in "roughness" or texture, and overly aggressive stabilization can sometimes smooth out these intended textures, altering the brush's character.
Drawing Speed and Intent
As mentioned, drawing speed is a critical factor. When drawing a quick, gestural line, you might want less stabilization to capture the energy. For a precise, rendered line, more stabilization can be beneficial. Many artists develop a technique of "drawing through" their lines, meaning they don't just make a single stroke but rather draw the line multiple times, with each subsequent stroke refining the previous one. In this scenario, a moderate stabilization can help guide these successive strokes into a cohesive final line.
Hardware and Drivers
While software settings are crucial, the hardware you use and its drivers can also play a role. Ensure your graphics tablet drivers are up-to-date. Sometimes, driver conflicts or outdated software can lead to unexpected input behavior, which might be misinterpreted by the stabilization algorithm. The sensitivity settings of your tablet itself (pressure sensitivity, tilt sensitivity) also interact with how the stylus input is registered, and thus how the stabilizer functions.
The Role of Celsys Support and Community
Clip Studio Paint is developed by Celsys. While direct technical support for specific artistic techniques like stabilization might be limited, Celsys does provide official channels for user assistance. It's important to understand the scope of this support. As stated in the provided information, "Moderators are official CELSYS staff members who are fluent in Japanese as well as various other languages. Moderators are not experts on the software or illustration, so they are not able to directly answer your questions." This means that while they can assist with technical issues or guide you to relevant resources, they are unlikely to offer personalized advice on achieving a specific line quality through stabilization settings.
However, the Clip Studio Paint community is often a rich source of information. Users frequently share tips, custom settings, and workflows. The comment, "This user has contributed greatly to the management of the community, by posting many great responses to the questions asked. These are the next-best contributors to the community after MVPs. Chosen out of all MVP awardees, who are already proof of excellence, this is a testimony of outstanding correspondence in the community," highlights the value of community contributions. Forums, social media groups, and tutorial sites are excellent places to find discussions about stabilization and see how other artists achieve their desired results.
Beyond Basic Stabilization: Achieving Fluidity
Achieving the perfect line in digital art is often a combination of technical settings and artistic practice. While Clip Studio Paint's stabilizer can be a powerful tool, it's not a magic bullet.
Practice and Muscle Memory
The most effective way to achieve smooth, controlled lines is through consistent practice. Developing muscle memory for drawing specific shapes and lines with your tablet and stylus is crucial. The more you draw, the more intuitive your movements become, and the less you will rely on aggressive stabilization to compensate for uncertainty.
How to Start Drawing Digitally | DrawlikeaSir
Layering and Refinement
Don't be afraid to use multiple layers. You can sketch loosely on one layer, then create a new layer on top for cleaner linework. You can also use the stabilizer at a moderate setting for the initial pass, and then use a lower stabilization setting or even a different brush to refine specific parts of the line. Sometimes, "cleaning up" lines by drawing over them multiple times with a very low stabilization setting can yield precise results without the artificiality of high stabilization.
Understanding the "Atrocious" Perception
The perception of CSP's stabilization as "atrocious" by some users might stem from a difference in how its algorithm interprets input compared to other software. While SAI's stabilizer might prioritize a certain type of smoothing, CSP's might be designed for greater responsiveness or to handle different types of input more dynamically. This doesn't necessarily make one "better" than the other, but rather different. The challenge for a new user is to understand and adapt to CSP's specific behavior. Instead of trying to replicate SAI's exact feel, the goal should be to find the settings within CSP that produce the desired outcome for your art.
Exploring Custom Brushes
Clip Studio Paint has a vast library of downloadable brushes, and many artists create their own. Some custom brushes might be designed with specific stabilization profiles in mind, or they might inherently produce smoother lines due to their texture or shape dynamics. Experimenting with different brushes can unlock new possibilities for line quality.
Ultimately, mastering line stability in Clip Studio Paint involves a deep dive into its settings, a willingness to experiment, and a commitment to practice. By understanding the nuances of the stabilizer, exploring its various options, and combining technical adjustments with artistic skill, you can achieve the smooth, controlled, and expressive lines that are essential for bringing your digital artwork to life.
tags: #clip #paint #studio #stabilizer