For many photographers, the true joy lies in capturing moments, the thrill of being out in the world with a camera. While the post-processing of images can be an immensely rewarding creative endeavor, the reality of editing dozens, hundreds, or even thousands of photos can quickly devolve into a tedious and time-consuming ordeal. This is precisely where the power of batch processing in Adobe Lightroom, both CC and Classic, emerges as an indispensable tool, a genuine game-changer for anyone looking to maintain consistency and efficiency in their workflow.

This comprehensive guide will navigate you through the essential techniques for batch editing in Lightroom, exploring the various methods available to achieve consistent and professional results with minimal effort. Whether you're dealing with a collection of images from a social event, a memorable holiday, or a professional photoshoot, mastering these batch editing strategies can transform your workflow, allowing you to dedicate more time to the creative aspects of photography rather than getting bogged down in repetitive tasks.
What is Batch Editing in Lightroom?
At its core, batch editing in Lightroom refers to the ability to apply the same adjustments or a set of pre-defined edits to multiple photographs simultaneously. This feature is particularly invaluable when you aim to achieve a uniform look and feel across an entire collection of images, ensuring a cohesive aesthetic. By leveraging Lightroom's batch editing capabilities, you can significantly streamline your post-processing workflow, moving from a laborious, image-by-image approach to a more efficient, group-based system.
The concept is simple yet profound: instead of manually adjusting the exposure, color balance, sharpness, or other parameters for each individual photo, you can apply these changes to a selection of images in one go. This is especially helpful when you notice common issues across a batch of photos, such as images being slightly underexposed, colors appearing muted, or a general lack of sharpness. Batch editing allows you to address these pervasive issues swiftly and consistently.
A powerful ally in this process is the use of Lightroom presets. Presets are essentially pre-made sets of editing instructions that function much like filters. Applying a preset to multiple photos with a single click can instantaneously impart a specific look or style, further accelerating your editing and reinforcing that desired consistent aesthetic.
Applying Changes During Import: Setting the Stage for Consistency
One of the most time-efficient methods for batch editing is to apply adjustments as you import your photos into Lightroom. This approach ensures that your images enter your library with a uniform baseline, saving you considerable time, especially when dealing with large volumes of photographs.
For Lightroom CC:
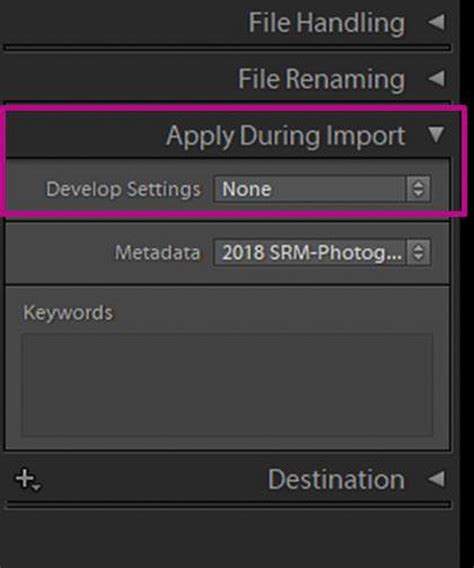
When importing photos into Lightroom CC, the process begins by navigating to the Library module and clicking the "Import" button. This action opens the import dialog box where you can select the desired photos. Before finalizing the import, locate the "Apply During Import" panel on the right-hand side of the window. Within this panel, you'll find a dropdown menu labeled "Develop Settings." From this menu, you can select a pre-existing preset or a custom preset you've created. As soon as you choose a preset, the preview image will update to reflect its application. Once you've selected your desired preset, click "Import" to bring the photos into Lightroom with those initial adjustments already applied.
This method is particularly effective for establishing a consistent starting point for your entire shoot, especially if you have a defined editing style or a project that demands a uniform look from the outset.
For Lightroom Classic:
The process in Lightroom Classic is remarkably similar. After opening Lightroom Classic and navigating to the Library module, click the "Import" button at the bottom left. This opens the import dialog box. On the right side of this dialog, you'll find the "Apply During Import" panel. Here, you can select a preset from the "Develop Settings" dropdown menu. This chosen preset will be automatically applied to all photos as they are imported into your catalog. Clicking "Import" finalizes the process, bringing your images into Lightroom Classic with the selected preset already active.
How to IMPORT PRESETS into Adobe Lightroom Classic
This initial application of adjustments during import is a foundational step in any efficient batch editing workflow, ensuring that all your imported images begin their editing journey with a shared aesthetic foundation.
Copying and Pasting Edits: Precision and Flexibility
When you need to apply specific, refined adjustments to multiple photos, the "Copy and Paste" method offers a straightforward and effective solution in Lightroom. This technique ensures that all selected photos receive the exact same treatment, thereby maintaining a consistent look across your collection.
For Lightroom CC:
To copy edits from one photo to another in Lightroom CC, first navigate to the Develop module. Select the photo that contains the edits you wish to replicate. You can then either copy all edit settings by pressing Command+C (Mac) or Ctrl+C (Windows). Alternatively, if you prefer to select only specific adjustments, use Command+Shift+C (Mac) or Ctrl+Shift+C (Windows) to open the "Copy Settings" dialog box. This dialog allows you to choose which categories of adjustments to copy, such as Basic Tone, Color, Effects, and more. Once you've selected the desired settings and clicked "Copy," return to the Library module. Select the target photos by holding down Command (Mac) or Control (Windows) and clicking on each one, or by using the Shift key to select a range. Finally, press Command+V (Mac) or Ctrl+V (Windows) to paste the copied settings onto all selected images.
For Lightroom Classic:
In Lightroom Classic, you can achieve a similar outcome. After making your desired edits to a single photo in the Develop module, select that photo. Then, hold down Command (Mac) or Control (Windows) and click on the other photos to which you want to apply the same settings. At the bottom right of the Develop module, click the "Sync" button. This action will open the "Synchronize Settings" dialog box. Here, you can meticulously choose which specific settings you want to synchronize across all selected photos, ensuring that only the desired adjustments are applied. Once your selections are made, click "Synchronize" to apply the adjustments.
A more granular approach within Lightroom Classic involves using the "Copy Settings" shortcut (Command+Shift+S on Mac, Ctrl+Shift+S on Windows) after selecting your edited photo and then selecting the target photos. This opens the same "Synchronize Settings" dialog, allowing for precise control over which edits are transferred.
This method is particularly beneficial when you have a series of images captured under similar lighting conditions and want to ensure a uniform appearance, or when you've spent time perfecting the edits on one image and want to replicate that exact look across others.

Batch Editing in the Library Module (Lightroom Classic)
Lightroom Classic offers a highly efficient way to apply presets to multiple photos directly within the Library module's grid view mode. This method is ideal for quickly applying a consistent look to a batch of photos after they've already been imported.
To utilize this feature, switch to the Library module and ensure you are in grid view. Select the photos you wish to edit by holding down Command (Mac) or Control (Windows) and clicking on each individual photo. For a contiguous range of photos, you can click the first photo, hold down Shift, and then click the last photo in the sequence. Once your selection is made, look to the "Quick Develop" panel, typically located on the right-hand side of the screen. Within this panel, you'll find a dropdown menu for "Saved Preset." Simply choose the desired preset from this list, and Lightroom Classic will instantly apply it to all the highlighted photos. The thumbnails in the grid view will update to reflect the applied changes, providing immediate visual feedback.
This technique is perfect for rapid application of a consistent aesthetic, whether it's a stylistic preset or a set of basic adjustments designed to correct common exposure or color casts across a group of images.
Auto Sync: Real-Time Batch Adjustments
Auto Sync is an advanced feature that builds upon the concept of synchronization, allowing for real-time application of edits to multiple selected photos as you make them. This is an incredibly powerful tool for photographers who need to make ongoing adjustments to a group of images simultaneously.
To activate Auto Sync, first select all the photos you wish to apply the same edits to within the Develop module. You'll notice a "Sync" button at the bottom right of the Develop module. To the left of this button, there's a toggle switch. Flip this switch, and the "Sync" button will transform into "Auto Sync."
Once Auto Sync is engaged, any slider adjustments you make to the active photoâsuch as exposure, contrast, highlights, shadows, or color balanceâwill be instantly applied to all other selected photos in real-time. The changes will propagate across all thumbnails in the filmstrip, allowing you to see the cumulative effect of your adjustments on the entire batch.
It's crucial to understand the distinction between Sync and Auto Sync. With Auto Sync enabled, every adjustment you make is immediately applied globally. This means you must be mindful of your edits, as a single slider movement can affect all selected images. However, this immediacy is also its strength, enabling rapid iterative adjustments across a group. For instance, after applying a base preset, you might use Auto Sync to fine-tune the overall exposure or white balance for a set of images taken under slightly different lighting conditions.
This feature is particularly useful for event photography or any situation where you have a series of shots that require very similar, but not necessarily identical, adjustments. It allows for quick, iterative refinements that maintain a consistent look while accommodating minor variations between individual frames.
Batch Editing Metadata
Beyond visual adjustments, batch editing also extends to the metadata associated with your photographs. This includes information such as copyright details, keywords, and other descriptive data that can be crucial for organization and rights management.
For Lightroom CC:
In Lightroom CC, select the images you wish to edit in grid view. Click the "Info" icon, typically found at the bottom right of the interface. With multiple images selected, you can then edit custom fields, and the information you enter will be applied to all selected images.
For Lightroom Classic:
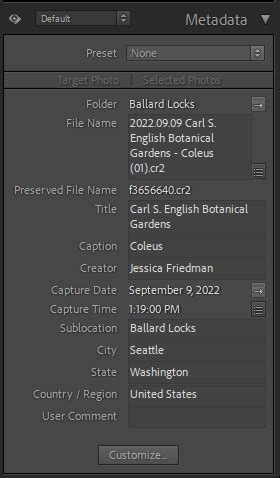
To batch edit metadata in Lightroom Classic, navigate to the Library module. In the right-hand panel, scroll down to find the "Metadata" section. Here, you'll see a "Preset" category with a dropdown menu. Clicking on "Edit Presets" will open a window with a wide range of data entry options, allowing you to create custom metadata presets. You can input information such as copyright holder, contact details, and keywords. After filling in the desired fields, click "Done" and then name your preset. This preset can then be applied to any batch of photographs by selecting the images, going to the Metadata section, and choosing your saved preset from the dropdown menu.
This metadata batch editing is an invaluable tool for ensuring that essential information is consistently embedded within your image files, aiding in organization, searchability, and intellectual property protection.
Batch Cropping
The ability to batch crop photos is another significant time-saver. If you have a series of images that require the same crop, you can apply it efficiently.
To batch crop in Lightroom, first apply your desired crop to a single image in the Develop module. Then, open the "Copy Settings" dialog box by using the shortcut Shift+Cmd+C (Mac) or Shift+Ctrl+C (Windows). In this dialog, ensure that the "Crop" option is checked. Click "Copy." Next, select the other images you wish to crop, and then paste the settings using the shortcut Shift+Cmd+V (Mac) or Shift+Ctrl+V (Windows). This will apply the identical crop to all selected images.
Batch Denoising in Lightroom Classic
When dealing with images shot at higher ISO settings, noise reduction is often a necessary step. Lightroom Classic offers methods for applying denoising to multiple images, but it's important to approach this with care to maintain image quality.
A recommended approach, as demonstrated by photographer Anthony Morganti, involves a multi-step process. First, cull your images to identify those that genuinely require denoising. Then, sort these images by ISO. This step is crucial because not all images will need the same level of noise reduction; images shot at lower ISOs may require minimal or no denoising, while those at higher ISOs will benefit more.
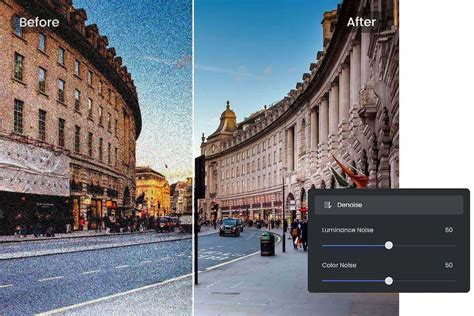
Once you've selected the higher ISO images that need processing, enter the Develop module and turn on "Auto Sync." Before applying the denoising, it's advisable to reset sharpening and noise reduction settings (both luminance and color) to zero across the selected files. Then, initiate the Denoise process. Lightroom will estimate the time required, and each image will be processed independently.
While a common shortcut involves applying denoising to one active image and then synchronizing, Morganti suggests this might not be optimal for varied ISOs, as it could apply the same strength of reduction across files that require different levels, potentially sacrificing fine detail. By processing images with similar ISOs together or individually, you ensure that the noise reduction is tailored to each image's specific needs, preserving detail and texture.
Frequently Asked Questions About Batch Editing in Lightroom
Can I batch edit in Lightroom Mobile?Yes, Lightroom Mobile supports batch editing. Select the photo with the edits you want to copy, tap the three-dot menu, and choose "Copy Settings." Then, go to your photo library, select multiple images, tap the three-dot menu again, and choose "Paste Settings." This applies the copied adjustments to all selected photos.
What happens if I apply a preset during import but want to change it later?Lightroom's editing process is non-destructive, meaning your original image data remains intact. If you apply a preset during import and later decide to change it, you can simply select the photos, choose a new preset, or manually adjust settings in the Develop module. The original data will not be affected.
How do I ensure specific adjustments, like cropping, are not included in my batch edits?When using the "Copy Settings" feature (Command+Shift+C or Ctrl+Shift+C), a dialog box appears where you can specifically select or deselect which adjustments to copy. By deselecting "Crop" or any other unwanted adjustments, you can ensure they are not included in your batch edit.
Can I batch crop in Lightroom?Yes, you can batch crop. Apply your crop to the first image, then use the "Copy Settings" dialog (Shift+Cmd+C or Shift+Ctrl+C) to copy the crop. Select the other images and paste the settings (Shift+Cmd+V or Shift+Ctrl+V).
How do Auto Sync and Sync actually work in Lightroom?With multiple images selected, one image remains active. If Auto Sync is off, adjustments affect only that active frame until you manually sync. When Auto Sync is on, every change you make applies instantly to all selected images. Understanding this difference helps prevent accidental global edits and enables efficient iterative adjustments across a group.
Enhancing Your Workflow with Third-Party Tools
While Lightroom's built-in batch editing features are robust, some photographers explore third-party tools to further streamline their workflow. This can include specialized presets, plugins, or alternative editing software. For instance, ON1 Photo RAW offers advanced editing solutions that can integrate into a Lightroom workflow, providing features like AI-driven enhancements and noise reduction. Additionally, tools like Brilliance AI can assist with batch processing, offering further automation for common editing tasks. For those who prefer hardware-based shortcuts, devices like the TourBox can be programmed to execute multi-step operations, such as batch editing sequences, as macro commands, significantly speeding up repetitive actions by assigning them to physical buttons.
By embracing these batch processing techniques, photographers can reclaim valuable time, ensure consistency across their work, and focus more on the artistic and creative aspects of their craft, rather than getting lost in the minutiae of individual image editing.