The digital darkroom has revolutionized photography, offering powerful tools to refine images and correct imperfections. Among these, the Spot Healing Brush Tool in Adobe Photoshop stands out as an incredibly versatile and user-friendly instrument. Often employed in portrait photography, its primary function is to seamlessly remove blemishes, wrinkles, and other distracting elements, thereby enhancing the natural beauty of a subject or cleaning up an otherwise perfect scene. This tutorial delves into the intricacies of the Spot Healing Brush, exploring its various modes, applications, and best practices to achieve professional-grade results.
Understanding the Spot Healing Brush Tool
At its core, the Spot Healing Brush Tool is designed to intelligently sample pixels from the surrounding area and use them to cover up or "heal" unwanted imperfections. Unlike its predecessor, the traditional Healing Brush Tool, the Spot Healing Brush does not require the user to manually define a source point. Photoshop analyzes the pixels around the area you paint over and automatically selects the best source material to blend in. This makes it an exceptionally efficient tool for quick touch-ups and for those new to retouching.
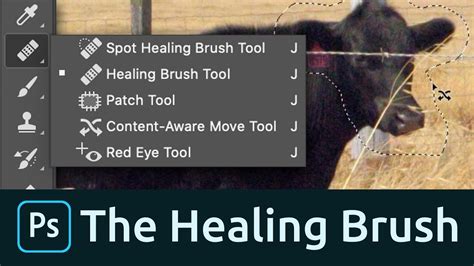
To access this powerful tool, you simply need to select it from the Toolbar. Once the Spot Healing Brush Tool is active, the process is remarkably straightforward: just paint over any distraction you wish to remove. The magic happens as Photoshop's algorithms work in the background, analyzing the texture, lighting, and shading of the surrounding pixels to create a seamless repair.
Navigating the Modes of the Spot Healing Brush
The effectiveness of the Spot Healing Brush can be significantly enhanced by understanding and utilizing its different modes, which are accessible in the Options bar. These modes dictate how Photoshop interprets the surrounding pixels and applies them to the painted area.
Proximity Match
This is the default and often the most intuitive mode. Proximity Match reads the pixel data immediately surrounding the blemish or distraction and matches based on what’s closest. Imagine you’re fixing a pimple on a model’s face. The Spot Healing Brush, in Proximity Match mode, will literally zap the blemish using the skin tone next to the blemish for reference. This mode is generally the easiest to use because it requires no additional user input beyond simply painting over the imperfection. It's a highly effective method for many common retouching tasks.
Create Texture
The Create Texture mode takes a slightly different approach. It analyzes the surrounding pixels and constructs a texture map of the data it finds. This map is then used to approximate the colors needed to repair the spot you are targeting. This mode can be particularly useful when dealing with areas that have a distinct texture, allowing Photoshop to recreate a more nuanced and natural-looking repair. It's an automatic way to fill in a blemish, line, or spot you'd like healed, preserving a sense of the original surface.
Content-Aware Fill
When you're unsure which mode would yield the best results, the Content-Aware Fill option empowers Photoshop to make that decision for you. This intelligent mode analyzes the content of the image around the selected area and attempts to generate a repair that is consistent with the surrounding elements. It's a powerful option for more complex repairs, where a simple blend might not suffice. The Spot Healing Brush, in essence, acts as a blending mode that allows you to take colors from nearby pixels to replace the spot or blemish.
Lighten and Darken Modes
Beyond the primary repair modes, the Spot Healing Brush also offers "Lighten" and "Darken" options, accessible via the "Mode" dropdown in the Options bar. These are particularly useful when dealing with areas that have significant contrast differences.
Consider a wrinkle on a person's face. Wrinkles are often darker than the surrounding skin tone. If the distraction (the wrinkle) is darker than the skin tone, you would select "Lighten" from the Mode in the Options bar. This tells Photoshop to only replace pixels that are darker than the "good" portion of the skin. Notice that as you paint over a wrinkle in Lighten mode, you don’t lose the original highlights and you retain a significant amount of detail, resulting in a much more natural appearance. Conversely, if you were trying to remove a light scar on a darker background, you might use the "Darken" mode to ensure only lighter pixels are replaced.
Comparing results from different brush modes can be illuminating. For instance, in a situation where hair strands are lighter than the skin tone, and blemishes are darker, using the appropriate mode (like Lighten for blemishes) is crucial for a clean outcome.
Practical Applications of the Spot Healing Brush
The Spot Healing Brush Tool's utility extends far beyond simple blemish removal. Its ability to intelligently blend pixels makes it invaluable for a wide range of photographic and graphic design tasks.
Removing Distracting Elements
Whether it's stray hairs, dust spots on a lens, or unwanted objects in the background, the Spot Healing Brush can often make them disappear with a few strokes. If you’re taking images outdoors, you can’t always control the wind or the model’s hair. The spot healing tool makes removing stray hairs incredibly simple. Imperfections in the image like those from candid shots can be fixed too.
Repairing Lines and Textures
Lines, such as telephone wires across a landscape or even subtle lines on a person's face, can be effectively removed. It doesn’t matter what method or mode you choose as much as the way in which you apply the fix. For example, you can remove telephone lines from an image quite easily with the Healing Brush. Lines in a person’s face can be fixed with this healing tool too.
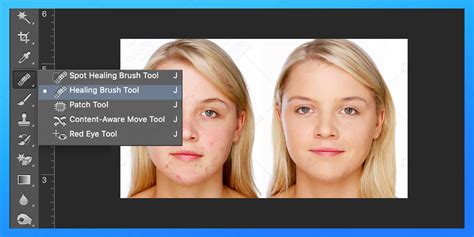
Enhancing Skin in Portraits
In portrait photography, the Spot Healing Brush is a go-to tool for achieving smooth, flawless skin. Baby photographers, for instance, use this tool to get smooth skin on their tiny models. When you’re fixing blemishes and imperfections on a model’s skin, the Spot Healing Brush is one of the easiest to use. It’ll take pixels from the surrounding image and make the fix.
Advanced Skin Retouching Photoshop Tutorial | High-End Dodge & Burn Technique.
Best Practices and Advanced Tips
While the Spot Healing Brush is remarkably intuitive, employing a few best practices can elevate your results from good to exceptional.
Consider the Imperfection First
Before you even pick up the brush, take a moment to consider the blemish, wrinkle, or distraction you are trying to remove. Is it darker than the surrounding area? Is it lighter? Understanding the tonal relationship between the imperfection and its surroundings will guide your choice of mode. As mentioned, if the distraction is lighter, select "Darken" from the Mode. If the distraction is darker, select "Lighten." This forethought can prevent common mistakes and ensure a more natural blend.
Brush Size and Hardness
Adjusting the brush size is crucial. It should be slightly larger than the imperfection you're targeting. A brush that is too small might not cover the entire area, while one that is too large could inadvertently affect surrounding good areas. The hardness of the brush also plays a role. Generally, a softer brush edge (lower hardness) will blend more seamlessly into the surrounding pixels, especially on organic textures like skin.
Strategic Application
The Spot Healing Brush might seem like a "clone" tool, but it has to be applied strategically to get the best result. You are leaving much to Photoshop’s ability to be intelligent and pick the right pixels for healing. This means understanding that there's rarely a "one button" solution. Sometimes, multiple small strokes are more effective than one large drag. For complex imperfections or areas with intricate patterns, you might need to refine the repair with other tools or repeat the Spot Healing Brush process.
When the Spot Healing Brush Struggles
There are instances where the Spot Healing Brush, or any single tool for that matter, might not provide a perfect solution on its own. If you encounter persistent issues, such as when trying to remove dark marks that are deepened by the tool, it might be beneficial to go back to the original image and retry the removal process. You may need to try different methods of removing the dark stars. That will likely be easier than trying to fix an already "botched" copy. It is essential to remember that you are using the correct tools, but you merely need to get more proficient with them. Sometimes, combining the Spot Healing Brush with other tools like the Patch Tool or even the Clone Stamp Tool, used judiciously, can yield superior results.
Jesus Ramirez, a digital graphics expert and educator specializing in Adobe Photoshop, emphasizes that proficiency with these tools is key. He notes that while the Spot Healing Brush is a fantastic tool, it's akin to "Einstein and the Healing Brush Tool had a baby!" - a powerful evolution that simplifies many retouching tasks. This tutorial is part of his Content-Aware series on YouTube, highlighting his expertise as founder of the Photoshop Training Channel, one of the most popular Photoshop YouTube channels globally.
In summary, the Spot Healing Brush Tool is an indispensable asset in any Photoshop user's toolkit. By understanding its various modes, applying it strategically, and knowing when to combine it with other techniques, you can achieve remarkably professional and natural-looking results, breathing new life into your images.