Adobe Photoshop's Free Transform tool is an indispensable and versatile feature that empowers creative professionals and enthusiasts alike to manipulate images, shapes, and paths with remarkable ease and precision. This robust command integrates fundamental transformation functionalities into a single, efficient workflow, offering a comprehensive suite of options for resizing, reshaping, rotating, skewing, distorting, and applying perspective. Understanding and mastering Free Transform can significantly streamline your editing process, allowing for more dynamic and impactful visual compositions.
Accessing the Power of Free Transform
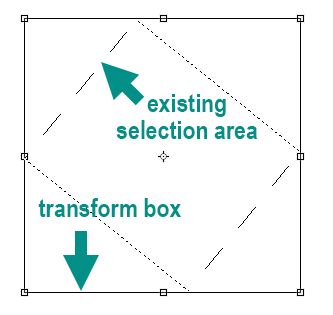
The primary gateway to Free Transform is through a simple keyboard shortcut: Ctrl+T on Windows or Command+T on Mac. This direct access method is significantly faster and more intuitive than navigating through menu options, making it the preferred choice for experienced users. Alternatively, you can access Free Transform by selecting it from the Edit menu in the menu bar at the top of your screen. Regardless of the method chosen, once activated, a bounding box with transformation handles will appear around the selected layer or object. This visual cue indicates that Free Transform is active and ready for manipulation.
For those who prefer a persistent visual aid, enabling Show Transform Controls in the Options bar, when the Move tool is selected, will ensure that the transformation handles are always displayed around selected layers. This setting is sticky, meaning it will remain active until you manually toggle it off, providing continuous visual feedback on transformable elements.
Core Transformation Techniques
The Free Transform tool offers a broad spectrum of manipulation capabilities, each designed for specific visual adjustments.
Scaling and Resizing
Resizing an image or selection is a fundamental aspect of Free Transform. By default, dragging a corner handle now scales the layer proportionally, indicated by the Maintain Aspect Ratio button (Link icon) being in the ON state in the Options bar. This ensures that the image's original proportions are preserved, preventing unwanted distortion. To achieve non-proportional scaling, simply turn OFF the Maintain Aspect Ratio button. The Shift key, when pressed during a drag operation, acts as a toggle for this setting, allowing for quick switching between proportional and non-proportional scaling.
- Direct Scaling: Click and drag any of the corner handles to adjust both width and height simultaneously while maintaining the aspect ratio.
- Non-Proportional Scaling: With the Maintain Aspect Ratio button OFF, dragging corner handles will independently alter width and height.
- Numerical Scaling: For precise control, you can enter specific percentage values for Width and Height in the Options bar.
- Reshaping from Center: Holding down the Alt key (Windows) or Option key (Mac) while dragging a side handle will reshape the area from its center, causing the opposite side to move in the opposite direction, effectively mirroring the transformation.
Rotating
Rotating an object is achieved by positioning your cursor just outside the transformation handles. The cursor will transform into a curved, double-headed arrow. Clicking and dragging in this state will rotate the selected layer. While this method offers visual feedback, for exact rotations, it is often more precise to manually input a desired rotation value in the Options bar.
Skewing and Distorting
Beyond simple scaling and rotation, Free Transform allows for more complex manipulations like skewing and distorting.
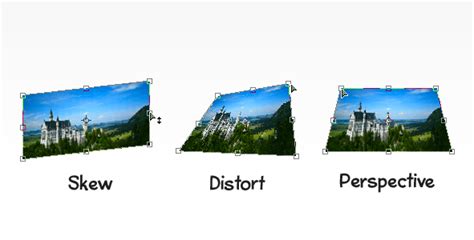
- Skew: To skew an object, press Ctrl+Shift (Windows) or Command+Shift (Mac OS) and drag a side handle. This action tilts the image while keeping parallel sides parallel.
- Distort: For complete freedom of movement, select the Distort mode by right-clicking inside the Free Transform box and choosing 'Distort' from the context menu. Then, click on a corner handle and drag it in any direction. This allows for highly customized shaping.
Applying Perspective
Creating a pseudo-3D effect can be achieved using the Perspective mode. When in this mode, dragging a corner handle either horizontally or vertically causes the opposite corner to move in the opposite direction. This is activated by holding down Shift+Ctrl+Alt (Windows) or Shift+Command+Option (Mac OS) while dragging a corner handle.
Advanced Transformation Modes
Free Transform is not limited to basic manipulations; it offers advanced modes for more intricate adjustments.
Warp Mode
To access the powerful Warp mode, click the Switch Between Free Transform And Warp Modes button (often depicted as a curved grid icon) in the Options bar, or right-click inside the Free Transform box and select 'Warp'. In Warp mode, a grid appears over your image, and by dragging control points or grid lines, you can manipulate the shape of the item with great flexibility. You can also choose from a variety of warp presets in the Warp pop-up menu in the Options bar, such as Cylindrical, which is useful for transforming flat work onto a rounded surface.
Within Warp mode, Bezier control points can now be moved independently. Option-clicking (Mac) or Alt-clicking (Win) on an anchor point toggles between moving control points in unison or independently. Alternatively, right-clicking (or Control-clicking on Mac) on an anchor point and choosing “Convert Warp Anchor Point” from the context-sensitive menu offers similar control. The color and opacity of warp guidelines can be customized by clicking the gear icon in the Options bar, making them easier to discern against your image. Pressing the Delete key when a split line is selected will remove that specific split line.
How Do You WARP Layers in Photoshop?
Transforming Layers with Masks
By default, Photoshop transforms both the layer content and its associated masks together, ensuring that the mask remains correctly aligned with the transformed content.
Non-Destructive Transformations with Smart Objects
To preserve the original quality of your image and allow for multiple transformations without degradation, it is highly recommended to convert your layer(s) into Smart Objects before applying Free Transform. Smart Objects act as a protective container, meaning that any transformations applied are recorded as editable instructions rather than being permanently baked into the pixel data. This enables multiple transformations to be calculated at once. For instance, if you transform a layer smaller and then larger again, a Smart Object retains all of the original information. In contrast, a regular pixel-based layer would discard information when transformed smaller and then attempt to create new, potentially lower-quality, information when transformed larger. This non-destructive workflow is crucial for maintaining image integrity throughout the editing process.
The video "Transforming Video Over Time" demonstrates how to leverage the Timeline in conjunction with Smart Objects to achieve non-destructive transformations over time, a technique particularly valuable for animation and motion graphics.
Understanding the Reference Point
The Reference Point, by default located at the center of the transform box, acts as the anchor around which transformations occur. You can change this point by clicking on the target symbol and dragging it to another location within or outside the bounding box. This allows you to rotate or scale an object around a different axis. The X and Y text boxes in the Options bar also allow you to numerically input values for the new location of the reference point.
Zooming and Visibility During Transformation
When using Free Transform, especially on layers with content extending beyond the canvas, the transformation handles might not be fully visible depending on the zoom level. To manage this, you can use the zoom shortcuts: Command (Mac) / Control (Win) + “+” to zoom in and Command (Mac) / Control (Win) - “-” to zoom out.
Applying Transformations and Exiting Free Transform
Once you have achieved the desired transformations, you need to apply them to commit the changes. This can be done by:
- Tapping the Return (Mac) or Enter (Win) key.
- Clicking in the preview area outside the transformation handles.
- Selecting another tool from the toolbar.
To cancel the entire transformation operation and revert to the state before entering Free Transform, press the Esc key.
Fill With Background Color
An important consideration when transforming content smaller than the document size is how the surrounding areas are handled. If you transform content to be smaller than the document, the areas that become empty will be automatically filled with the current Background Color. This behavior can be useful for creating seamless backgrounds or specific compositional effects.
Displaying Transformation Values
While dragging transformation handles, the precise numerical values for the transformation (such as scale percentage or rotation degrees) can be observed appearing at the top right of your cursor, providing real-time feedback on the magnitude of your adjustments.
Resampling Options
For optimal results when resizing or transforming, Photoshop's Free Transform command can automatically select the best resampling method. In the Options bar, setting Interpolation to Bicubic Automatic allows Photoshop to intelligently choose the most suitable algorithm based on the specific transformation being applied, whether it's enlargement or reduction.
Consistency Across Layer Types
The Free Transform tool is designed to be universally applicable. Regardless of the content of the layer-be it pixels, type, vector shapes, or Smart Objects-the transform behavior remains consistent. This unified approach simplifies the learning curve and enhances efficiency when working with diverse document elements. Free Transform works seamlessly with various layer types, including pixel layers, type layers, shape layers, and even Smart Objects.
Alternatives and Further Exploration
While Photoshop's Free Transform is a leading tool, other image editing software packages offer similar functionalities. Programs like GIMP, Affinity Photo, and Krita provide their own sets of transformation tools that allow users to manipulate images in different ways.
To truly master the Free Transform tool, consistent practice is key. Experimenting with its various handles, modes, and non-destructive workflows will build confidence and unlock new creative possibilities in your Photoshop projects.