Installing new brushes is a fundamental aspect of expanding your creative toolkit within Procreate, the powerful digital art application exclusive to iPads. Whether you're a seasoned digital artist or just beginning your journey, understanding the various methods for importing brushes can significantly enhance your workflow and artistic capabilities. This guide will walk you through the most efficient and accessible ways to import Procreate brushes, catering to different device setups and file types, ensuring you can seamlessly integrate new textures and styles into your digital art.
Understanding Procreate Brush Formats
Before diving into the installation process, it's crucial to understand the different file formats you'll encounter when acquiring Procreate brushes. The primary formats are .brush and .brushset.
The .brush Format
The .brush format is the standard for individual Procreate brushes. When you download brushes in this format, you are typically acquiring a single brush. This format is compatible with all versions of Procreate, including older ones (version 4.0 and earlier). If you are using an older iPad or an earlier version of Procreate, this will be the format you primarily work with. Installing .brush files usually means importing them one by one, though Procreate has streamlined this process.
The .brushset Format
The .brushset format, introduced with Procreate version 4.1, revolutionizes brush installation by allowing you to import entire sets of brushes at once. This is a significant advantage for artists who acquire large collections of brushes, as it drastically reduces the time spent on manual installation. .brushset files are designed to organize brushes into logical categories, making them easily accessible within Procreate's Brush Library. To utilize this format, you will need Procreate version 4.1 or higher installed on your iPad.
Handling Compressed Files (.zip)
Often, downloaded brushes, especially larger sets, will come in a .zip file. Procreate cannot directly import .zip files. Therefore, the first step before installation is to "unzip" or extract the contents of the compressed file. If you are working on a Mac or PC, you can typically double-click the .zip file to extract its contents. If you are working solely on your iPad, you will need a file management app that supports unzipping, such as Winzip or Zip Browser. After unzipping, you will find the .brush or .brushset files ready for import. It's worth noting that if unzipping results in a collection of many small files and folders, it's possible the file was not intended to be unzipped and might be a collection of individual brush elements rather than a complete brush set.
Importing Brushes Directly on Your iPad
For many users, the most straightforward approach is to handle all brush installations directly on their iPad, eliminating the need for a computer. This method has become increasingly efficient with Procreate's integration with the Files app and other cloud storage services.
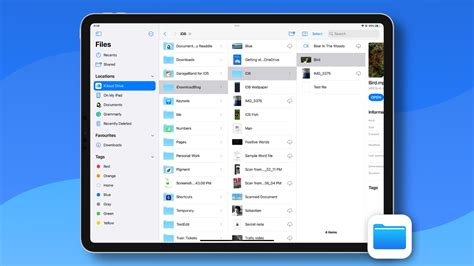
Method 1: Using the Files App
The Files app on your iPad provides a direct pathway for importing brushes. This is often the fastest and most recommended method.
- Download and Unzip: First, download your desired brush files (
.brushor.brushset). If they are in a.zipfile, unzip them using a file management app. The extracted.brushor.brushsetfiles will typically be saved in your iPad's "On My iPad" location within the Files app. - Locate Brush Files: Open the Files app and navigate to the location where you saved your unzipped brush files.
- Direct Import:
- For
.brushsetfiles: Simply tap on the.brushsetfile. Procreate should automatically open and import the entire brush set. The new brushes will appear at the top of your Brush Library. - For
.brushfiles: Tap and hold on the.brushfile. A contextual menu will appear. Select "Share" or "Export," then choose "Copy to Procreate." The individual brush will be imported into a folder named "Imported" at the bottom of your Brush Library.
- For
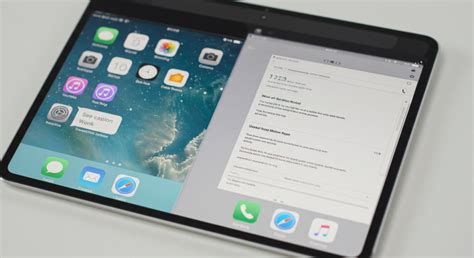
Method 2: Using Split Screen Mode with Cloud Storage (Dropbox, Google Drive, etc.)
Split Screen mode is incredibly useful for multitasking on the iPad, and it's a highly effective way to import brushes from cloud storage services.
- Open Procreate and Cloud App: Open Procreate on one half of your screen. Then, open your preferred cloud storage app (like Dropbox, Google Drive, or iCloud Drive) in Split Screen mode alongside Procreate. You can activate Split Screen by swiping up from the bottom of the screen to open the Dock, then dragging the cloud app icon to the side of the screen.
- Locate Brush Files: Within your cloud storage app, navigate to the folder containing your downloaded and unzipped brush files (
.brushor.brushset). - Drag and Drop: Tap and hold the
.brushor.brushsetfile in your cloud app. Drag it over to the Procreate window. As you drag, a green plus sign will appear, indicating that Procreate is ready to receive the file. Release the file to import it..brushsetfiles will typically import to the top of your Brush Library..brushfiles will usually be placed in the "Imported" folder.
Method 3: Importing via the Files Button within Procreate
Procreate also has a built-in import function that leverages the Files app.
- Open Procreate: Launch the Procreate app.
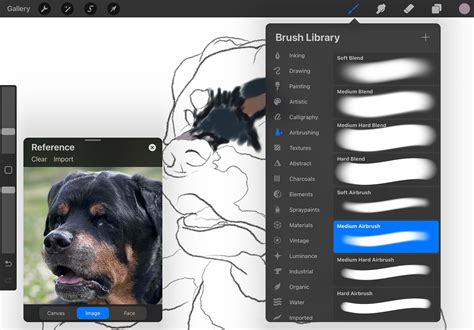
- Access Brush Library: Open your Brush Library by tapping the paintbrush icon.
- Import Button: At the top right of the Brush Library, you'll see a
+button. Tap this button. - Select "Import": A new menu will appear. Tap the "Import" button located at the top right.
- Browse Files: This will open the Files app interface. Navigate to the location of your
.brushor.brushsetfiles. - Select and Import: Tap on the desired brush file. Procreate will then import it. As with other methods,
.brushsetfiles will appear at the top of your Brush Library, and.brushfiles will go into the "Imported" folder.
Importing Brushes Using a Computer (Mac or PC)
If you prefer to manage your downloads on a computer or have purchased brushes that were initially downloaded to your computer, you can transfer them to your iPad.
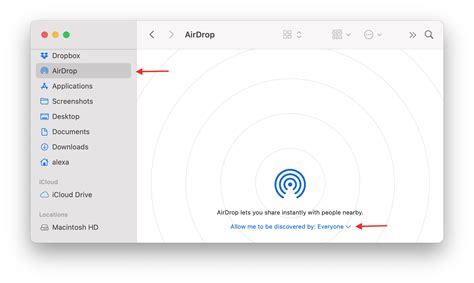
Method 1: Using AirDrop (Mac)
AirDrop is a convenient wireless file-sharing service for Apple devices.
- Download and Unzip: Download your Procreate brushes to your Mac. If they are in a
.zipfile, unzip them. - Locate Brush Files: Find the
.brushor.brushsetfiles in your Mac's Finder. - AirDrop to iPad: Select the brush file(s). Right-click (or Control-click) on the selected files and choose "Share" > "AirDrop." Select your iPad from the list of available devices.
- Accept on iPad: On your iPad, you'll receive an AirDrop notification. Tap "Accept." The file will then prompt you to choose an application to open it with. Select "Procreate."
- Automatic Import: Procreate will open automatically and import the brushes.
.brushsetfiles will appear at the top of your Brush Library, and.brushfiles will be in the "Imported" folder.
Method 2: Using Cloud Storage (Dropbox, Google Drive, iCloud Drive)
This method is versatile and works for both Mac and PC.
- Download and Unzip on Computer: Download your Procreate brushes to your computer. Unzip any
.zipfiles. - Upload to Cloud: Upload the
.brushor.brushsetfiles to your preferred cloud storage service (e.g., Dropbox, Google Drive, iCloud Drive). - Access on iPad: On your iPad, open the corresponding cloud storage app.
- Open in Procreate: Navigate to the brush file within the cloud app. Tap on the file. You should see an option to "Export" or "Open in…" Select this option and choose "Copy to Procreate" or simply "Procreate" if it appears.
- Import: Procreate will launch and import the brush or brush set.
Method 3: Using iTunes File Sharing (Older Method)
While less common now with the prevalence of cloud storage and direct file management, iTunes File Sharing can still be used to transfer files.
- Connect iPad to Computer: Connect your iPad to your Mac or PC using a USB cable.
- Open iTunes/Finder: Open iTunes on your PC or an older macOS version, or use Finder on newer macOS versions.
- Select Your iPad: In iTunes/Finder, select your iPad from the device list.
- Navigate to File Sharing: Find the "File Sharing" section (in iTunes, it's usually under "Summary" or "Apps"; in Finder, it's under "Files").
- Select Procreate: In the list of apps that support file sharing, select "Procreate."
- Add Files: You'll see a Procreate Documents folder. Drag and drop your
.brushor.brushsetfiles into this folder. - Sync: Sync your iPad with your computer.
- Import on iPad: Once synced, open Procreate on your iPad. The brushes will be available in the "Imported" folder or at the top of your Brush Library, depending on the file type.
Managing Your Brushes within Procreate
Once brushes are imported, you can organize them within Procreate's Brush Library.
Creating New Brush Sets
You can create custom folders (called Brush Sets) to group your imported brushes logically.
- Open Brush Library: Tap the paintbrush icon to open the Brush Library.
- Create New Set: At the top of the Brush Library list, drag your finger down from the very top edge of the screen. A blue
+button will appear. Tap this button. - Rename: A new brush set named "Untitled Set" will be created. You can tap on it and select "Rename" to give it a more descriptive name (e.g., "Watercolor Brushes," "Texture Pack").
- Move Brushes: To move an imported brush or brush set into your new custom folder, tap and hold the brush or set you want to move, then drag it into your desired folder.
Deleting and Duplicating Brush Sets
Procreate allows you to manage your custom brush sets efficiently.
- Delete: To delete a custom brush set, swipe left on the brush set name in the Brush Library. A red "Delete" button will appear. Tap it to remove the set. Note: This action is permanent and cannot be undone.
- Duplicate: To duplicate an entire brush set, swipe left on the brush set name and tap "Duplicate." This is useful for creating backups or experimenting with modifications without altering the original set.
Important Considerations and Troubleshooting
- Procreate Version: Ensure your Procreate app is updated to the latest version for the best compatibility, especially when dealing with
.brushsetfiles..brushsetfiles require Procreate version 4.1 or higher. - File Integrity: If you encounter issues, double-check that the downloaded files are not corrupted and that you have successfully unzipped them if they were in a
.ziparchive. - Alternative Methods: If one import method doesn't work, try another. Procreate offers several pathways to ensure you can get your brushes installed.
- Procreate Pocket: Brushes designed for Procreate on the iPad are not guaranteed to work with Procreate Pocket, which is designed for iPhones and has a different brush architecture.
- Other Apps: Procreate brushes are specific to Procreate and do not work in other applications like Adobe Photoshop. However, Procreate can import Photoshop's
.abrbrush files.
PROCREATE BRUSH LIBRARY ORGANIZATION ✨(everything you should know!)
By following these methods, you can confidently import and manage a vast array of brushes in Procreate, unlocking new creative possibilities and streamlining your digital art process. Whether you're working on your iPad, a Mac, or a PC, there's a method tailored to your workflow.