In the realm of visual arts, black and white photography once stood as a distinct discipline, separated from its color counterpart. This separation was not merely an artistic preference but a necessity, stemming from the era before color film was invented. Artists and even everyday photographers had to make a definitive choice between black and white or color before capturing an image. However, the advent of digital technology has revolutionized this process, offering unparalleled flexibility. Today, transforming a full-color image into a striking two-tone composition is remarkably easy, allowing us to capture moments as they happen and refine them later.
There are several compelling reasons to convert a color photograph into black and white. One primary motivation is to salvage an image where the color is either flat, washed out, or overly distracting. Imagine a vibrant family gathering where each member sports a different colored shirt; the multitude of colors might detract from the emotional core of the photograph. In such scenarios, stripping away the color can unify the image and draw attention to the subjects' expressions and interactions.
Beyond rectifying color issues, photographers often choose black and white for stylistic reasons. This medium excels at achieving stark contrasts and rich grayscale tones, imbuing images with a dramatic intensity. The play of light and shadow in landscapes and portraits can become more profound, and silhouettes can gain a powerful, almost sculptural quality. Furthermore, embracing black and white is a conscious nod to the iconic photographs that have shaped our visual history, from Ansel Adams' majestic landscapes to Dorothea Lange's poignant portraits. Wedding photographers, for instance, frequently provide couples with both color and black-and-white versions of their images, offering a diverse aesthetic range. Ultimately, the decision to opt for a grayscale image often boils down to a simple appreciation for its unique visual appeal.
While readily available filters on smartphones or social media apps like Instagram can approximate a black-and-white effect, they often fall short of achieving a truly refined result. Dedicated editing applications, such as Picsart, offer a wealth of tools that allow for greater control and artistic expression. These tools enable users to intensify contrast, selectively apply black-and-white effects to specific areas of an image, and fine-tune the tonalities to achieve a desired look.
Getting Started with Picsart: A Step-by-Step Guide
To begin your journey into black and white editing with Picsart, follow these straightforward steps:
Initiate a New Project: Open the Picsart mobile app and tap the purple plus sign located at the bottom of the screen. This action will open your device's photo library, allowing you to select the image you wish to edit.
Access the Effects Menu: Once your chosen photo is displayed on the editing screen, locate and tap on "FX" from the menu options positioned below the canvas.
Select a Black and White Filter: Within the FX menu, tap on "FX" again to access the filtering screen. Scroll through the available filters, which are generally located towards the end of the list. Picsart offers a variety of black and white filters to suit different moods and aesthetics. For instance:
- B&W Vintage: This filter imparts creamy, soft tones, ideal for a nostalgic feel.
- B&W Cross: This option provides warmer hues, lending a more inviting and classic black and white look.
- B&W HDR: For a more contemporary and dramatic effect, this filter delivers a cooler tone with heightened contrast.
After selecting your preferred filter, confirm your choice by tapping "Apply" in the upper right-hand corner of the screen.
Fine-Tuning the Effect: With the chosen filter applied, it's time to refine the image manually. Inspect the photograph closely for any areas that might benefit from adjustment. For example, if you selected "B&W HDR" and notice that certain shadows, such as those on clothing or foliage, appear too deep and lose detail, or that bright spots on fabric are excessively intense, these are areas that can be addressed.
Adjusting Brightness: Navigate to the "Adjust" tools. Here, you'll find a range of functions to modify various aspects of your image. To address overly dark shadows, select the "Brightness" tool. Shift the slider upwards to gently lighten these areas. When making these initial adjustments, prioritize bringing detail back into the shadows before focusing on the highlights.
Modifying Contrast: Next, move to the "Contrast" tool. By slightly pulling the slider downwards, you can decrease the difference between the darkest shadows and the brightest highlights. This adjustment helps to create a more natural and realistic appearance, especially for images not captured in dramatic lighting conditions like direct spotlights or intense sunsets.
Refining Shadows and Highlights: Further fine-tuning can be achieved using the "Shadows" and "Highlights" tools. The "Shadows" tool allows you to precisely control the intensity of the darkest areas, while the "Highlights" tool adjusts the brightest parts of the image. The objective here is to ensure that the contrasts look natural and mimic the way the human eye perceives light and shadow in real life. These adjustments should typically be subtle.
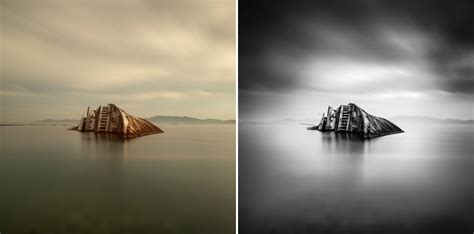
Saving and Sharing: Once you are satisfied with your black-and-white conversion, you can save or share your edited photo. Utilize the export tool, typically marked with a downward-pointing arrow at the top of the screen, to save the image to your phone. Alternatively, you can use the sharing options to post it directly to social media platforms. Take a moment to compare your original color image with the newly created grayscale version to appreciate the transformation and identify what you like best about each.
The Art of Black and White: Beyond Simple Conversion
The decision to convert an image to black and white often transcends a mere technical process; it delves into the realm of artistic expression. Black and white photography has a unique ability to evoke mood, emphasize form, and highlight texture in ways that color sometimes cannot.
Evoking Mood and Emotion
While blue skies are often associated with happiness in color photography, black and white images can convey a broader spectrum of emotions. They are frequently linked with feelings of solitude, contemplation, and pensiveness. The absence of color allows the viewer's imagination to fill in the emotional gaps, creating a more personal and introspective viewing experience. By using your imagination to visualize the mood you want an image to possess, you can guide the viewer's emotional response. Studying the works of masters like Ansel Adams, Edward Weston, and Ernst Haas can provide invaluable insight into how they used grayscale to capture profound emotions and atmospheric qualities.
Emphasizing Shapes, Patterns, and Textures
In the absence of color, shapes and patterns become more pronounced. Lighter tones will stand out boldly when placed against darker backgrounds, effectively drawing the viewer's attention to the subject. This principle can be used to emphasize important elements of a photograph while minimizing distractions. The process of composition in black and white can be thought of as a form of subtraction: identifying and removing elements that are not essential to the narrative of the image. Even a simple shadow on the ground, which might be overlooked in a color photograph, can be rendered as an inky black form in grayscale, adding a dramatic compositional element.
Texture also benefits significantly from the black and white treatment. The subtle details that often go unnoticed in color, such as the wrinkles on a person's hands or the grain of wood, become more evident. This method is particularly effective when using flat or overhead lighting, which can enhance the three-dimensional quality of surfaces. The deeper, more textured appearance of these details can add a profound sense of realism and depth to a portrait or still life.
Mastering Light and Shadow
Black and white photography offers a unique opportunity to work with light and shadow in ways that can be challenging in color. High-contrast lighting, often considered problematic for color photography, can be extremely effective in black and white. The harsh midday sun, for example, can create dramatic shadows and bright highlights that enhance the visual impact of a scene. This shift in perspective requires a different way of thinking about exposure. Instead of avoiding these conditions, photographers can embrace them, using them to create expressive imagery.
The "expose to the right" (ETTR) technique, which aims to maximize the dynamic range of the camera by exposing the sensor as much as possible without clipping highlights, can be particularly beneficial in black and white. This approach ensures that the maximum amount of detail is captured in both the brightest and darkest areas of the image, providing more flexibility during post-processing.
Subjects that linger in darkness can often be more compelling than brightly lit scenes. Black and white photography allows us to show the world in a completely different way, using shadowy areas to our advantage rather than eliminating them. An empty space, or negative space, can also serve as an effective compositional tool, adding a sense of drama and focus to the subject. This artistic approach is often more edgy and evocative than a literal interpretation of a scene. By reviewing your existing photo catalog, you may discover images that would be dramatically enhanced by a conversion to black and white. Experimenting with different post-production filters after conversion can reveal how significantly the mood and impact of a scene can be altered.
How to Create and Photograph One Light DRAMATIC Black and White Silhouettes
Picsart's Advanced Features: Presets and Replays
Picsart goes beyond basic filter application by offering advanced features like photo presets and the Replay function, which empower users to create their own unique editing styles and achieve consistent results.
Understanding Photo Presets
Photo presets are essentially saved combinations of editing settings. Their primary purpose is to save time by allowing you to instantly apply a specific look to an image with a single click or tap. Presets are designed to create a cohesive aesthetic across multiple images, which is particularly valuable for social media profiles, branding, or maintaining a consistent visual style for a series of photographs.
While standard filters offer basic adjustments like color tone and exposure, photo presets allow for more nuanced and comprehensive fine-tuning. Filters are typically embedded tools within apps, whereas presets are entirely customizable editing recipes. This distinction means that presets offer a greater degree of personalization and control over the final image.
Creating and Using Picsart Replays
Picsart's Replay feature is a powerful tool for creating custom mobile presets. It allows you to record your editing process and save it as a "Replay." This Replay can then be applied to any other photo, replicating the exact sequence of edits you performed. This eliminates the need to tediously reapply the same adjustments to multiple images or to purchase presets from others.
To create a Replay:
- Edit Your Photo: Use Picsart's extensive editing tools to achieve your desired look. This can involve applying filters, adjusting brightness, contrast, saturation, and more.
- Save as Replay: When you are ready to save your edited photo, ensure the "Replay" toggle is turned on during the save process. This action captures all your manual edits as a Replay.
- Apply to Other Photos: To use your custom preset on another image, simply tap on "Replay" in the Editor toolbar and select your saved Replay. Tapping on it will apply the entire sequence of edits to your new photo.
This feature is incredibly useful for developing a signature editing style. You can experiment with layering multiple filters, adjusting specific parameters, and combining various effects to create unique looks. The Replay function ensures that you can consistently reproduce these effects with ease.
Picsart also offers a vast library of community-created Replays. By navigating to the "Replay" section, you can explore trending preset filters, access recently used ones, and browse favorites saved to your collections. This provides an endless source of inspiration and allows you to learn from other creators' editing techniques.
Exploring Diverse Preset Styles
Picsart's filter and effect categories, such as FX, Artistic, Magic, and Pop Art, offer a diverse range of options for creating unique presets. Some popular aesthetic trends that can be achieved include:
- Vintage and Retro: Emulating the look of old film, with grain, muted colors, and a touch of nostalgia. Filters like "VHS" and "1992" can contribute to this aesthetic.
- Golden Hour Glow: Recreating the warm, soft light of the golden hour. Combining filters like "SUN3," "BRL2," and "BRNZ4" can achieve this effect.
- Futuristic and Dystopian: Creating edgy, modern looks with neon gradients and a hint of mystery.
- Light and Airy: Producing soft, dreamy images with neutral hues, often achieved through subtle light effects and color toning.
- Bold and Vibrant: Making photos pop with strong colors and high contrast, ideal for branding and business imagery.
- Moody and Mysterious: Utilizing shadows and other lighting effects to add depth and intrigue.
- Classic Black and White: A timeless choice that adds intrigue and focus, with ample room for customization to suit individual aesthetics.
By understanding and utilizing Picsart's comprehensive suite of editing tools, including its extensive filter library and the powerful Replay feature, users can transform their photographs into compelling works of art, whether aiming for a simple black and white conversion or a highly stylized, personalized aesthetic. The platform's vast ecosystem of content, tools, and creator inspiration, backed by over 150 million monthly active creators, solidifies its position as a leading creative platform for users of all levels.