Photoshop and Illustrator, powerful tools in the graphic designer's arsenal, offer extensive capabilities for creating custom textures. While photographic textures have their place, the ability to generate unique wood grain patterns from scratch offers unparalleled creative control and can truly elevate a design. This tutorial will explore various methods for achieving realistic wood textures, ranging from simple filter-based approaches in Photoshop to more intricate vector-based techniques in Illustrator. Whether you're aiming for a rustic, aged look or a clean, modern wood grain, these techniques will empower you to craft convincing and versatile wood textures for any project.
Understanding Wood Characteristics for Realistic Textures
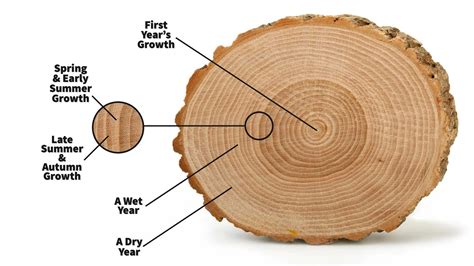
Before diving into the technical aspects, it's crucial to understand the fundamental characteristics of wood that contribute to its visual appeal. Softwood, for instance, is typically lighter and cream-colored, featuring straight fibers and distinct annual rings. In contrast, hardwood is darker, with closely packed fibers and less distinct annual rings. These differences in color, fiber pattern, and ring visibility are key elements to replicate when creating artificial wood textures. Mahogany, a popular hardwood, varies in color from a medium brown to a deep red-brown, depending on its age.
Photoshop: Building Wood Grain with Filters and Adjustments
Photoshop provides a wealth of filters and adjustment layers that can be masterfully combined to simulate wood grain. One common approach involves starting with a base color and then applying filters to create the fibrous texture.
Creating a Base Mahogany Wood Grain
For a realistic mahogany wood grain, we begin by setting up our workspace. An A3 size artboard is a suitable starting point for this Photoshop wood grain tutorial.
Establish the Base Color: Create a new Photoshop document. For mahogany, a base color ranging from a medium brown to a deep red-brown is appropriate. This forms the foundation of our texture.
Apply the Shear Filter for Grain: To impart a wood grain effect, navigate to
Filter > Distort > Shear. This filter allows you to distort the image based on a curve. Clicking on the curve line and dragging it towards the edges to form a flipped 'S' shape will create a wave-like distortion that mimics the natural flow of wood fibers. Experimentation with the Shear curve is key, as the tiny preview box requires careful observation to see the effect.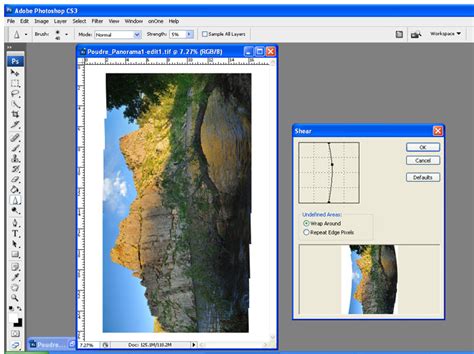
Introduce Knots with the Twirl Tool: Knots are distinctive features of wood. The
Twirl Tool (C)in Photoshop is ideal for creating these. The settings for the Twirl Tool will depend on your image resolution and the desired tightness of the knots. Experiment with the Twirl Rate, potentially reversing its direction to -40, to create more realistic-looking knots. Slightly overlapping knots in opposite directions can further enhance the realism of the wood grain effect.Sharpening and Embossing for Depth: To add definition and a sense of depth, apply the
Sharpenfilter (Filter > Sharpen > Sharpen). Following this, use theEmbossfilter (Filter > Stylize > Emboss). The Emboss dialog box allows you to control the height and amount of the emboss effect, adding a subtle three-dimensional quality to the texture.Levels Adjustment for Color Variation: For finer control over the tonal range and color, utilize the
Levelsadjustment (Image > Adjustments > Levels...). Experiment with the values to achieve the specific look you desire, adjusting the midtones, highlights, and shadows to refine the wood's appearance.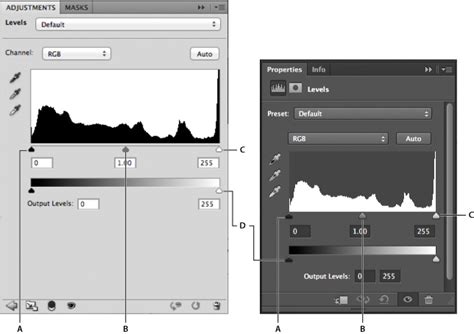
Advanced Photoshop Techniques for Textured Wood
Beyond basic filter applications, more complex layering and adjustment techniques can yield even more convincing results.
Creating Fiber Effects: A new layer can be created and filled with a color. To generate fibers,
Filter > Render > Fiberscan be applied. Adjusting theVarianceandStrengthsettings (e.g., Variance to 20 and Strength to 50) will influence the density and prominence of the fibrous pattern. This layer can then be blended with the base layer using various blending modes likeOverlayorSoft Lightat reduced opacity to integrate the fiber detail.Adding Realistic Detail with Duplication and Masking: Sometimes, the center of a texture might appear less detailed than other areas. This can be rectified by duplicating the layer containing the fiber effect and adding a layer mask. Duplicating this masked layer twice and positioning them strategically in the less detailed areas can effectively enhance local detail. Grouping these layers and setting the group's blending mode to
Overlayat 100% opacity can further unify the effect.Simulating Aged Paint on Wood: To create an aged paint effect on a wood texture, start by filling a background layer with black. Apply the
Cloudsfilter (Filter > Render > Clouds). Immediately after, use theFadefunction to reduce the clouds' opacity to 50% and set the blending mode toSoft Light. This creates a subtle, weathered base. Subsequently,Posterizethe layer to a specific number of levels (e.g., 18 levels) to introduce a more graphic, aged appearance.Amazing things you can do with the Clouds Filter in Photoshop!
Utilizing Channels for Precision Masking: Photoshop's Channels palette can be a powerful tool for creating intricate masks. By duplicating a channel (e.g., the red channel) and applying harsh curves to isolate specific areas, then inverting the channel, you can create precise selections. These selections can then be loaded as masks for adjustment layers, allowing for targeted color or tonal modifications. For instance, a curve adjustment layer applied only to specific parts of the artwork can make it appear as if it's integrated into the wood grain.
Displacement Maps for Surface Realism: To make artwork or text appear as if it's actually on the wood surface, displacement maps are invaluable. This involves creating a new channel from your wood texture that represents the depth or surface irregularities. This channel is then saved as a PSD file. Applying the
Displacefilter (Filter > Distort > Displace) to the artwork layer, using the saved PSD as the displacement map, will warp the artwork to conform to the wood's contours, adding a significant layer of realism.Adding Subtle Noise: A final touch of subtle noise can unify the texture and prevent it from looking too digital. Create a new blank layer at the very top, set its blending mode to
Soft Light, and reduce the opacity to around 20%. Transform this layer to be about 200% of its original size. This adds a fine grain that mimics the subtle imperfections of real-world surfaces.
Illustrator: Vector Wood Grain with Procedural Effects
While Photoshop excels at pixel-based realism, Illustrator offers a different approach for creating vector wood grain patterns, which are infinitely scalable without loss of quality.
Setting Up the Document: Begin with a new Illustrator document. The size can be adjusted based on your needs, but for this tutorial, an 800 x 800 pixel document at 72 dpi is a good starting point.
Creating the Base Color and Fibers: Fill the background layer with a dark brown color. Then, duplicate this layer. On the second layer, set a lighter brown as your foreground color. Apply the
Fibersfilter from theFilter > Rendermenu. Adjust theVarianceandStrengthto achieve a fibrous appearance.Adding Knots with the Bloat and Twirl Tools: To add knots, duplicate the fiber layer. Access the
Bloat Tool(often found nested with the Warp Tool). Double-clicking the icon or pressing Enter will reveal its options. Adjust theTwirl Rateto a negative value (e.g., -40) to create circular distortions that resemble knots. Experiment with overlapping these "knots" in opposite directions to enhance realism.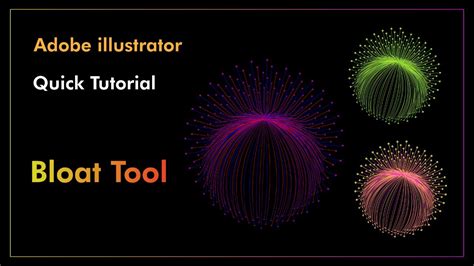
Expanding and Tracing for Vector Output: Once you are satisfied with the procedural wood grain pattern, you'll need to convert it into editable vector paths. Go to the
Objectmenu and selectExpand. This will convert the appearance of the effects into actual vector shapes.Applying Graphic Pen Filter (Optional): For a more hand-drawn aesthetic, you can navigate to
Effect > Sketchand apply aGraphic Penfilter. However, be aware that this filter is bitmap-based.Image Trace for Vector Conversion: Because filters like Graphic Pen are bitmap-based, you'll need to trace the image to convert it back into vectors. Start with the
SilhouettesImage Trace preset and customize the settings as needed. This process converts the pixel data into scalable vector paths.Amazing things you can do with the Clouds Filter in Photoshop!
Adding a Background Rectangle: Draw a new rectangle that fills the entire canvas and place it on a layer below your wood grain effect. This ensures your wood grain texture has a defined background and appears as a complete element.
Saving and Applying Your Textures
Once your wood texture is complete, it's essential to save it in a format suitable for your projects.
Photoshop: For pixel-based textures, saving as a JPEG (
File > Save as) is common for web use. For higher quality or further editing, consider saving as a PSD or TIFF file.Illustrator: Vector textures created in Illustrator are inherently scalable. You can save them as
.aifiles, which can be placed into other Illustrator documents or other Adobe applications. Exporting as SVG can also preserve vector data for web use.
Beyond the Basics: Exploring Wood Types
The techniques described can be adapted to create a variety of wood types.
Softwood: Lighter, cream-colored bases with more pronounced, straighter fibers and distinct annual rings can be achieved by adjusting the base color and the parameters of the
FibersandShearfilters.Hardwood: Darker base colors with closely packed, less distinct fibers can be simulated by using darker brown or reddish-brown hues and potentially reducing the intensity of the fiber generation filters.
General Texture Application: These generated textures can be applied to various design elements, from backgrounds and website elements to 3D models and digital illustrations, adding a tactile and natural feel to your work. The ability to create custom textures ensures that your designs are unique and stand out.
By mastering these Photoshop and Illustrator techniques, you can move beyond generic stock textures and craft truly bespoke wood grain patterns that perfectly complement your creative vision. Experimentation with filter settings, blending modes, and layer adjustments is key to unlocking the full potential of these powerful tools for texture creation.