Postcards, a long-standing and cost-effective method for sending brief messages, continue to hold their ground amidst the proliferation of digital communication. For designers, the challenge lies in transforming this compact medium into an effective tool for conveying information and prompting action. This tutorial delves into the intricacies of setting up and designing postcards using Adobe InDesign, ensuring your creations are not only visually appealing but also compliant with postal service requirements for efficient delivery.
Understanding Postcard Anatomy and Postal Regulations
Before diving into InDesign, it's crucial to grasp the fundamental components and regulations governing postcard design, particularly those mandated by postal services like USPS. Understanding these guidelines ensures your postcards are processed efficiently and at the lowest possible cost.
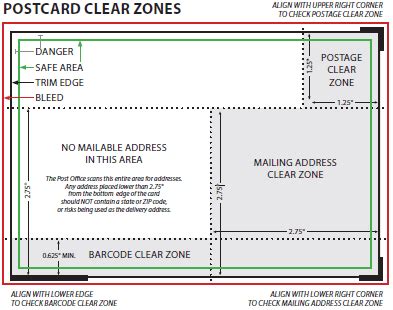
Key Areas of a Postcard
In any print project, there are three primary edges to consider: the trim, the bleed, and the live area.
- Trim Area: This is the final, finished size of your printed postcard after it has been cut.
- Bleed Area: This extends beyond the trim edge. Including elements like images or background colors in the bleed area ensures that they appear to extend right to the cut edge without any white borders after trimming. A common measurement for bleed is 0.125 inches.
- Live Area (or Safe Area): This is the inner margin where all critical content, such as text and important graphics, should be placed. This ensures that these elements are not accidentally trimmed off during the cutting process. A margin of 0.25 inches is often recommended for the live area, encompassing the bottom, left, and right sides of your document.
Postal Service Requirements for Delivery
To ensure your postcards are processed automatically and qualify for lower postal rates, adherence to specific layout rules is paramount.
- Address Placement: The address must be parallel to the longest side of the postcard, meaning it should be readable when the postcard is oriented horizontally.
- "Clear Zones" for Postal Use: Certain areas of the postcard are reserved for postal services, such as space for a barcode or address information. These are often referred to as "clear zones." It is essential not to place text or graphics in these areas, as the Post Office may print a barcode here or apply a label that could obscure your content.
- Indicia and Stamp Areas: The back of the postcard typically includes designated areas for postage (either an indicia printed by the sender or a stamp) and the recipient's address. For automated processing, the indicia text should be in 10 to 12 points, all caps, and a sans-serif typeface.
- Aspect Ratio and Dimensions: To qualify for standard rates, postcards must fall within specific size and proportion criteria. For example, in the US, pieces larger than 4.25″ x 6″ up to 6.125″ x 11.5″ are charged the First-Class rate. The aspect ratio (length divided by height) must fall between 1.0-to-1.3 and 1.0-to-1.25 inclusive; otherwise, it's considered non-standard and incurs higher processing costs. Postcards within the 3.5″ x 5″ to 4.25″ x 6″ range have specific thickness limits, typically between 0.007 inches and 0.016 inches.
- Material and Finish: The stock used for postcards should generally be between 0.007″ and 0.016″ thick for automated processing. Bar-coded pieces that are more than 4-1/4″ high or 6″ long must be at least 0.009″ thick. Avoid patterns, textures, and colors with more than 10% density from white in the address area. Metallic inks should not be used for addresses as they can interfere with scanning. The address color must be darker than the surrounding area, with a color contrast of at least 15%. Flood varnishes or coatings can enhance the look but consider if an uncoated or matte surface is better for readability, especially for appointment or survey cards.
Setting Up Your Postcard Document in InDesign
Adobe InDesign provides a robust environment for creating professional print layouts, including postcards. Following these steps will help you set up your document correctly.
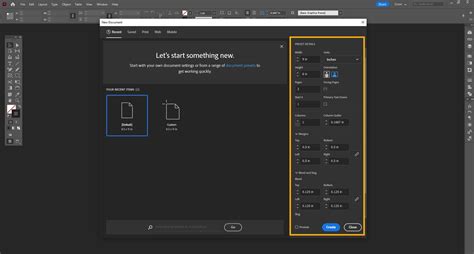
Creating a New Document
- Launch Adobe InDesign.
- Go to File > New > Document.
- In the "New Document" dialog box, you can leave the "Intent" set to "Print."
- Number of Pages: For a standard postcard, you will likely need two pages: one for the front and one for the back. Enter "2" in the "Pages" field.
- Facing Pages: For a postcard, uncheck the "Facing Pages" option as the front and back are typically viewed separately.
- Page Size: You can select a preset page size (e.g., "Postcard") or manually enter the desired Width and Height of your postcard. Ensure these dimensions account for bleed. For instance, if your final postcard size is 4" x 6", you might set your InDesign document to 4.25" x 6.25" to include the bleed.
- Orientation: Choose the appropriate orientation (portrait or landscape) based on your design.
- Margins: Set your margins for the live area. A common setting is 0.25 inches for the top, bottom, left, and right margins.
- Bleed and Slug: Navigate to the "Bleed and Slug" section. Enter the bleed value for all sides. A common bleed is 0.125 inches. The slug area can be used for notes or instructions that you don't want to print.
- Click Create.
Understanding the InDesign Workspace for Postcards
Once your document is created, you'll see two pages, representing the front and back of your postcard.
- Page 1: Typically designated for the front of the postcard, offering creative freedom for your main design elements, imagery, and branding. Remember, however, that the front should not contain anything that could be mistaken for an address or postage indicia.
- Page 2: This page is usually reserved for the back of the postcard, which needs to accommodate the address, stamp area, and any messaging or return information.
InDesign uses guides to help you manage these areas:
- Margin Guides: These are represented by pink lines (by default) and indicate your live area. Keep all essential text and graphics within these guides.
- Bleed Guides: These are red lines (by default) and show the outer edge of the bleed area. Ensure your background elements extend to this line.
Designing the Postcard Front
The front of your postcard is your primary canvas for making a strong visual impression. This is where you can let your creativity shine, incorporating compelling imagery, striking typography, and your brand's visual identity.
Incorporating Visual Elements
- Images and Graphics: Use high-resolution images that are at least 300 PPI (Pixels Per Inch) at their intended print size. When scaling images, remember that scaling them up decreases resolution, while scaling them down increases resolution. Always ensure the resolution remains sufficient after resizing. Images that border the trim edge should extend into the bleed area to avoid any "leaks" of white space on the final printed card.
- Typography: Choose fonts that are legible and align with your brand's message and aesthetic. Consider font pairings for headlines and body text.
- Color Palette: Select colors that are visually appealing and consistent with your brand guidelines. Be mindful of color contrast, especially if any text is placed near the edges or on busy backgrounds.
Designing the Postcard Back
The back of the postcard requires a more structured approach to ensure it meets postal requirements and effectively communicates necessary information.
Setting Up the Back Page Layout
- Add Guides: To delineate the areas for the stamp, address, and message, add custom guides. For instance, a vertical guide at 3.5 inches from the left edge can separate the main messaging area from the address and stamp zone.
- Stamp Area: Reserve a space for the stamp, typically in the top-right corner. A rectangular frame of approximately 1.25" x 1.25" can provide sufficient room, allowing for slight misalignment.
- Address Block: Create a text frame for the recipient's address. This area should be clearly defined and positioned to be easily read by postal scanners. Ensure the address is aligned parallel to the longest edge of the postcard.
- Messaging Area: Designate a space for your message or return address. This can be a text frame or a combination of text and graphics.
Using InDesign Tools for Layout
- Rectangle Frame Tool (F): Use this tool to create frames for images and placeholders.
- Type Tool (T): Create text frames for your address, message, and any other textual content.
- Selection Tool (V): Resize and reposition frames and objects.
- Text Wrap Panel: If you place images within the back design, use the Text Wrap panel to ensure text flows around them gracefully, maintaining readability. Adjust the padding to create adequate space between the text and the image.
Best Practices for Postcard Design and Printing
Beyond the basic setup and design, several best practices can significantly improve the effectiveness and printability of your postcards.
Content and Messaging
- Clear Call to Action: Whether it's visiting a website, making a purchase, or attending an event, ensure your postcard has a clear and concise call to action.
- Conciseness: Postcards are brief. Get straight to the point with your message.
- Dual Purpose Designs: Consider designing postcards that serve multiple functions. An event invitation can also act as an entrance ticket, a sale announcement as a coupon, or a schedule reminder as an appointment card.
File Preparation for Print
- Create Outlines: Before sending your InDesign file to a printer, it's often recommended to convert your text to outlines (Type > Create Outlines). This ensures that the fonts appear correctly even if the printer doesn't have them installed. However, always confirm this with your print provider, as some prefer to receive live text.
- Package Files: When submitting your InDesign layout, it's crucial to package all supporting files, including linked images and fonts, to avoid issues. Go to File > Package. This will gather all necessary assets into a single folder.
- Exporting to PDF: Export your final design as a high-resolution PDF for printing. Choose a preset like "Press Quality" and ensure that "Marks and Bleeds" are correctly set, including "Use Document Bleed Settings."
Working with Printers
- Communicate Clearly: Discuss your design and printing requirements with your chosen printer. They can provide specific templates and guidelines that align with their printing processes.
- "Pleasing Color": Be aware that if you opt for cost-effective batch printing (ganging), you may receive "pleasing color" results rather than exact color matches. Discuss color expectations with your printer.
- Proofing: Always request a digital or physical proof before the full print run to catch any errors or make final adjustments.
Variations in Postcard Design and Mailing
While standard rectangular postcards are common, variations exist that cater to different needs and budgets.
Standard vs. Non-Standard Mail
- Automated Mail: Postcards that meet the dimensional, weight, and thickness requirements can be processed automatically, leading to lower postage costs.
- Non-Standard Mail: Anything outside these specifications may be subject to higher rates or manual processing. This includes unusual shapes, sizes, or thicknesses.
Custom Mail Management (CMM)
For larger or uniquely shaped pieces (up to 12" x 15" x 0.75" and 3.3 ounces), Custom Mail Management (CMM) is an option. These items are handled manually throughout the delivery process.
- Requirements: Minimum dimensions of 3.5" x 5" and 0.007" thick still apply. Uniform thickness is not required, and attachments up to ¼” thick are permitted.
- Considerations: CMM services are more expensive due to manual handling. Since these pieces are not returned to the sender, "Carrier-Leave If No Response" must be included on the piece.
Beyond the Basics: Advanced InDesign Techniques
For those looking to refine their postcard design skills, exploring advanced InDesign features can elevate the final product.
Using Templates Effectively
While templates can be helpful, be cautious. Templates from different sources (printers, software manufacturers) may have varying adherence to postal guidelines or best practices.
- Adobe Templates: InDesign CS3 and CS4 include postcard templates in the "Library > Application Support > Adobe Templates > InDesign" folder. However, these may not always follow the most current postal best practices.
- Printer Templates: Many printers offer their own templates, which are usually tailored to their specific printing and finishing capabilities.
- Custom Templates: Creating your own reusable postcard template in InDesign can save time and ensure consistency across multiple projects.
Adapting Designs for Different Audiences and Purposes
The versatility of postcards means they can be adapted for a wide range of uses:
- Promotional Postcards: Designed to drive sales, announce events, or highlight services.
- Direct Mail Postcards: Often used in marketing campaigns to reach specific demographics.
- Event Invitations: Can serve as tickets or entry passes.
- Appointment Cards: Reminder cards for clients.
- Personal Correspondence: A charming way to send greetings or share news.
By mastering the setup and design principles within Adobe InDesign, and by being mindful of postal regulations, you can create impactful postcards that effectively connect with your audience and achieve your communication goals.