Adobe's recent updates to Lightroom Classic have significantly altered the landscape of image processing, particularly concerning noise reduction. The introduction of an AI-based Denoise feature, now integrated non-destructively into the Detail panel, marks a substantial shift from the previous method of creating duplicate DNG files. This article delves into the nuances of batch processing this powerful tool, offering practical strategies for photographers to maintain an efficient and organized workflow.
The Evolution of Denoising in Lightroom Classic
For a considerable period, applying Lightroom Classic's AI-based Denoise feature to multiple images simultaneously was a cumbersome process. Photographers had to navigate to the grid view, select their desired images, trigger the Enhance dialog, and consequently generate duplicate DNG copies for each processed file. This method was not only awkward and time-consuming but also led to an undesirable clutter of extra files within existing folders.
The latest iteration of Lightroom Classic, particularly with version 14.4, has revolutionized this workflow. The Denoise function now operates non-destructively directly on the original raw files, residing within the Detail panel. This means that instead of generating additional copies, the AI calculations for noise reduction are stored as settings associated with the original raw file. If you decide to turn off the setting, Lightroom retains the AI calculation for a short duration before purging it, prompting a recalculation if you re-enable it. This approach significantly reduces the need for managing extra files, a particular boon for users of Fujifilm cameras who previously relied on Raw Details to improve demosaicing, now without the burden of creating separate DNG files. Furthermore, the ability to adjust Denoise settings at any time without re-creating a DNG file offers unprecedented flexibility.
Understanding the New Non-Destructive Workflow
A critical aspect of the updated noise reduction workflow is its non-destructive nature. Unlike the older version where changes were "baked" into a new file at the pixel level, making them irreversible without deleting the DNG and starting over, the new method stores AI settings. These settings are computed and stored, but they do not create a hidden DNG. This distinction is important for understanding how Lightroom handles these enhancements.
An important interface element to be aware of is the AI settings icon located in the Adjustments panel under the Histogram in the Develop module. This icon, the last one on the right, indicates if AI settings are applied. If it turns yellow, it signifies that the AI settings require updating. This applies to all AI-driven features within Lightroom, including masks and generative erase. Clicking this menu will display what has been applied and alert you to any necessary updates.
Methods for Batch Denoising
With the new non-destructive workflow in place, several straightforward methods exist for batch processing Denoise, Raw Details, and Super Resolution in Lightroom Classic. These methods align more closely with Lightroom's established practices for batch and sync operations.
Method 1: Sync Settings
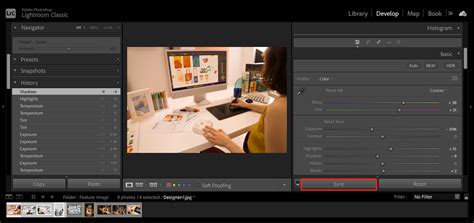
The most straightforward approach to batch processing Denoise, Raw Details, or Super Resolution in Lightroom Classic 14.4 involves setting the desired parameters on a single image and then synchronizing them across the rest. This process is performed within the Develop module.
- Select Images: In the filmstrip at the bottom of the Develop module, select all the images to which you want to apply the settings. You can use the Shift key for selecting a range of images.
- Apply Denoise: Navigate to the Detail panel and adjust the Denoise settings as desired for your master image.
- Sync Edits: With all target images selected, click the "Sync Settings" button. This will prompt a dialog where you can choose to apply specific edits, including noise reduction. While profiles and exposure tweaks are commonly synced, it's generally advisable to avoid syncing crop adjustments, as these are typically best handled on an individual image basis. Lightroom will then apply the selected settings to all chosen images, initiating the AI update process.
Method 2: Utilize Presets
Creating and applying presets offers another efficient way to batch process Denoise settings. This method allows for quick application of specific noise reduction profiles tailored to different shooting conditions or camera types.
- Create a Preset: In the Develop module, adjust the Denoise (or other AI settings in the Detail panel) to your preferred levels on a single image. Then, create a new preset containing these settings.
- Apply the Preset: In the Quick Develop panel, under "Saved Preset," select the preset you just created. This will apply the saved settings to all currently selected images, and the AI settings will begin to update.
An advantage of this method is the ability to create multiple presets for various scenarios. For instance, you could develop ISO-adaptive presets that automatically apply different Denoise settings based on the ISO of the image.
Method 3: Apply on Import
This method is a variation of using presets but is applied during the image import process, offering a proactive approach to noise reduction.
- Create Presets: Ensure you have already created the desired presets for Denoise or other AI enhancements.
- Apply During Import: In the Import dialog box, select the "Apply During Import" option and choose the relevant preset.
It's crucial to note a caveat with this method: while the preset settings will be applied to the interface, the AI calculations may not immediately update. You will likely observe a yellow AI indicator on the affected images in the Develop module, signaling that an update is required.
To batch update these AI settings after import:
- Select Images: Navigate to the Library module and select all the images that require an AI settings update.
- Update AI Settings: From the menu, choose Photo > Develop Settings > Update AI settings. This action will initiate the batch update of the AI calculations for all selected images.
How To Batch Process Denoise in Lightroom Classic 14.4 (And Raw Details & Super resolution)
Auto Sync: A Powerful, Yet Potentially Perilous, Tool
Lightroom Classic's Auto Sync feature, while lesser-used by some, offers a dynamic approach to applying adjustments simultaneously to multiple selected images as you edit a master file. To utilize this for denoising:
- Enable Auto Sync: In the Develop Module, ensure "Auto Sync" is turned on.
- Select Images: Select the group of images you wish to process.
- Apply Denoise: Adjust the Denoise settings on one image. These adjustments will be applied in real-time to all other selected images with Auto Sync enabled.
However, Auto Sync carries a significant risk. If you forget to disable it after use, any subsequent edit made to a single image will be automatically applied to all other selected images. This can lead to unintended consequences, especially if you have multiple images selected in the filmstrip while working on one. Therefore, it is strongly emphasized to turn off Auto Sync immediately after completing your batch adjustments. Another scenario to be mindful of is when all photos in the catalog are inadvertently selected instead of just those in the current folder, leading to widespread unintended edits.
Considerations for System Resources and Edit Order
The AI-based denoising process is computationally intensive. On high-resolution raw files, this task can place a substantial demand on your system's CPU and GPU. The speed of the process is heavily dependent on the power and memory of your graphics card. While the new non-destructive method may offer workflow advantages, it's worth noting that some users have reported longer processing times compared to the older DNG-creation method, with 113 images taking over three hours in one instance, compared to less than an hour previously.
It is also crucial to maintain the correct order of operations when using Denoise in conjunction with other AI tools like Lens Blur or Generative Remove. Denoise modifies every pixel in an image. If other AI tools are applied while Denoise is still running, it could invalidate those pixels. Following Adobe's recommended order of operations is key to avoiding such issues.
Frequently Asked Questions and Workarounds
One common question that arises is whether selective masking of noise reduction is possible with the new AI Denoise feature directly within Lightroom Classic. Currently, Lightroom Classic does not offer direct masking capabilities specifically for its AI-based noise reduction tool. For users requiring this level of control, a workaround involving Photoshop is available: this entails layering the denoised image and manually masking it.
The Benefits of the New Workflow
Despite the initial adjustment period, the new non-destructive Denoise workflow in Lightroom Classic offers significant advantages. The elimination of duplicate DNG files streamlines file management, reduces catalog clutter, and simplifies the editing process. The ability to adjust noise reduction settings at any time without creating new files provides unparalleled flexibility. This updated workflow embodies Adobe's ongoing commitment to enhancing Lightroom Classic with common-sense simplicity, reducing steps, and optimizing the user's editing experience. The consistency brought by this update to how edits are synced across multiple images is a welcome change, reinforcing a more unified approach to batch processing.