Procreate, the acclaimed digital art application for iPad, offers an expansive and powerful brush system that empowers artists to create with unparalleled freedom and precision. At the heart of this system lies the ability to customize, manage, and utilize a vast array of brushes, including those designed to emulate the rich textures and vibrant qualities of acrylic paints. This tutorial delves into the intricacies of Procreate's brush engine, focusing on how to navigate, create, and effectively employ acrylic brush settings to achieve stunning artistic results.
Navigating and Organizing Your Brush Library
Procreate's brush library is your central hub for all things related to digital painting tools. Understanding how to navigate and organize this space is crucial for an efficient workflow.
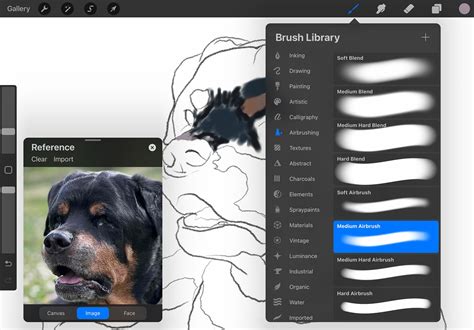
The primary method of browsing available brushes involves scrolling through a comprehensive list of brush sets. Each set is designed to house a collection of brushes with a specific purpose or aesthetic. Tapping on a brush set reveals the individual brushes contained within it on the right-hand side of the screen. This list clearly displays the name of each brush and, importantly, a visual preview of the stroke it produces. This immediate feedback allows artists to quickly assess a brush's potential without needing to select and test it on the canvas.
Procreate offers two primary ways to access your brush libraries, reflecting its integration with the iPad's file management system. Brush libraries can be stored locally within your iPad's storage, specifically in On My iPad → Procreate → Brushes, or they can be synchronized via iCloud Drive under the Procreate Brushes folder. This dual storage option provides flexibility for users who prefer local control or cloud-based accessibility and backup.
The integration with the Files app means that brushes, brush sets, and entire brush libraries are treated as files and folders. This has implications for naming conventions, as certain characters are restricted due to operating system limitations. Furthermore, any changes made to brushes within Procreate are mirrored in the Files app, and vice versa, ensuring a seamless synchronization experience.
Importing and Managing Brush Files
The ability to import external brush files is a cornerstone of Procreate's flexibility. You can import individual .brush files by simply placing them into a designated brush set folder within the Files app. For larger collections, you can import entire brush libraries directly from the Files app.
PROCREATE BRUSH LIBRARY ORGANIZATION ✨(everything you should know!)
Once imported, brush libraries can be renamed directly within Procreate or through the Files app. Similarly, individual brushes and entire brush sets can be renamed. Prior to version 5.4, renaming a brush was done within the Brush Studio's "About this Brush" section. Now, renaming a brush set can be achieved by tapping it twice or by a long press, followed by selecting the "Rename" option. Renaming brushes and sets through the Files app is also a straightforward process, ensuring consistency across your workflow.
To enhance visual identification and organization, brush sets can even incorporate emojis as icons. Procreate automatically utilizes the first emoji found in a brush set's name as its icon, provided no other icon has been explicitly set.
Recent and Pinned Brushes
Procreate streamlines access to frequently used tools through its "Recent" brushes feature. These brushes appear at the top of your brush library sets, accessible by tapping "Paint," "Smudge," or "Erase," and then selecting "Recent." For those brushes you use most often, there's an option to "Pin" them. Swiping left on a brush within the "Recent" set and tapping "Pin" will permanently anchor that brush to the top of your "Recent" list, easily identifiable by a pin symbol.
If you no longer need a pinned brush or wish to remove any brush from your "Recent" list, a simple swipe left and tap of the "Clear" button will accomplish this. To locate the original set a brush in "Recent" belongs to, swipe left on the brush and tap "Find." This feature is invaluable for users who frequently switch between different brush types and want to quickly return to their original organizational structure.
Exploring Procreate's Core Brush Sets
Procreate's default brush library is a treasure trove of meticulously crafted tools, designed to cater to a wide spectrum of artistic needs and styles. The introduction of 18 new handcrafted brush sets in recent updates has further expanded this already impressive collection. These brushes range from the hyper-realistic to the purely fantastical, offering artists a diverse toolkit for any project.
Essential Brush Set Categories and Their Applications
- General Brushes: This set is characterized by its clean and predominantly rounded brushes, making it an excellent starting point for a variety of artistic endeavors.
- Ink Brushes: Tailored for comic and manga creation, this set includes brushes with inks and halftones, perfect for achieving classic line art and shaded effects.
- Technical Brushes: Designed with precision in mind, these brushes are purpose-built for projects requiring a more technical or structured approach, such as architectural drawings or detailed illustrations.
- Sketching Brushes: This set is ideal for practical drawing, planning, quick studies, and capturing initial ideas with a natural, fluid feel.
- Rendering Brushes: Offering a range of effects for artistic drawing, these brushes are adept at creating smooth transitions and detailed finishes.
- Sumi-e Brushes: Perfect for cleaning up artwork and drawing in ink-centric styles, these brushes emulate the distinctive qualities of traditional Japanese ink painting.
- Painting Brushes: These brushes encompass a variety of realistic and digital painting effects, simulating mediums from acrylics and stucco to oils.
- Texture Brushes: With a strong focus on tactile qualities, this set provides brushes that create a range of effects, from watery washes to clumpy impasto.
- Lettering Brushes: Featuring Streamline enabled, these brushes are designed to assist letterers in creating smooth, consistent, and elegant calligraphic forms.
- Textured Brushes: A staple of classic digital art, these brushes efficiently lay down large areas of texture, adding depth and character to artwork.
- Experimental Brushes: This playful set showcases the unique capabilities of Procreate's versatile Brush Studio, including brushes that alter color, generate smoky effects, and produce chaotic shapes.
- Material Brushes: Designed for 3D painting, this category features brushes that simulate various materials, including metallics and roughness.
- Grunge Brushes: These brushes are engineered to add realistic grunge textures, lending a gritty and weathered aesthetic to your art.
- Organic Brushes: Embracing natural elements, this set includes scatter brushes for adding textures like grass, leaves, and bark, as well as brushes that mimic handmade mediums.
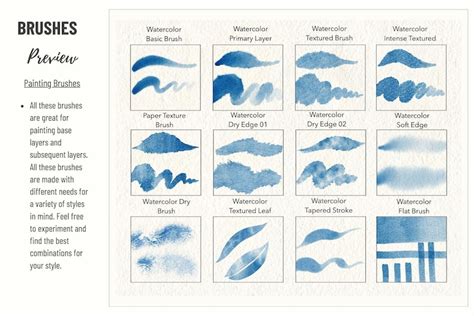
- Watercolor Brushes: This set offers a selection of realistic watercolor brushes, designed to capture the transparency, color buildup, and subtle edge effects of traditional watercolors.
The Power of the Brush Studio: Customizing Your Acrylic Brushes
While Procreate's default brushes are exceptional, the true power of the application lies in its Brush Studio, a comprehensive environment that allows for the creation and meticulous customization of virtually any brush imaginable. When you tap "Create new brush," you are transported to this studio, where you gain total control over every aspect of your digital tool.
The Brush Studio is where you can transform a basic brush into a specialized acrylic brush, perfectly tailored to your artistic vision. Here's a breakdown of the key areas you can manipulate:
Shape and Grain
The Shape settings define the fundamental form of your brush tip. You can import custom shapes or utilize Procreate's built-in options to create anything from a sharp, precise edge to a soft, diffused circle. The Grain settings determine the texture that appears within the brush stroke. By adjusting the grain's behavior, scale, and movement, you can simulate the gritty texture of dried acrylic paint, the smooth flow of wet pigment, or the subtle variations found in natural media.
Behavior and Dynamics
This is where the magic truly happens for emulating traditional media. The Behavior tab allows you to fine-tune how the brush responds to your input.
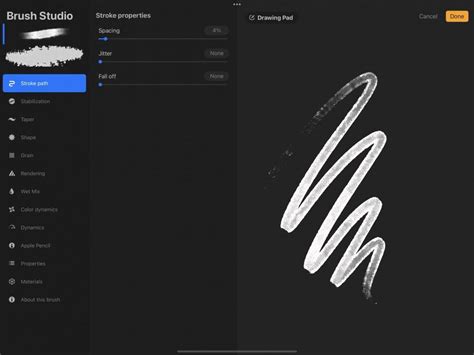
- Stroke Path: This setting influences how the brush tip repeats along a stroke. Adjusting this can create dithering effects, consistent textures, or broken lines.
- Rendering: Here you can choose how the brush's color is applied. Options like "Uniform," "Glaze," and "Wet Mix" allow for different levels of opacity, blending, and pigment accumulation, crucial for mimicking acrylics.
- Color Dynamics: This advanced setting lets you introduce color variation into your brush strokes based on factors like pressure, tilt, or even a color palette. This can simulate the way pigments interact on a palette or blend on the canvas.
Properties and Responsiveness
- Properties: This section allows you to set the maximum and minimum sizes of your brush, its opacity, and how it interacts with the canvas. For acrylics, controlling opacity is key to building up layers and achieving depth.
- Apple Pencil: This is where you define how your Apple Pencil's pressure and tilt affect the brush. For acrylic brushes, you might want pressure to control opacity and size, and tilt to influence the brush's edge or texture.
- Taper: This setting controls how the brush stroke thins or thickens at its beginning and end, allowing for more dynamic and natural-looking strokes.
Advanced Customization for Acrylics
To create a convincing acrylic brush in Procreate, consider these specific adjustments within the Brush Studio:
- Shape: Start with a slightly textured or irregular shape to avoid a perfectly smooth digital look. A shape that mimics a bristle pattern or a slightly worn brush edge can be very effective.
- Grain: Experiment with grainy textures that have a subtle variation. A grain that has a bit of "bite" can simulate the physical texture of dried acrylic paint. Adjust the "Movement" of the grain to add subtle shifts and prevent a repetitive pattern.
- Rendering: Utilize "Glaze" or "Wet Mix" rendering modes to allow for color buildup and subtle blending, characteristic of acrylic painting. Adjust the "Blend Mode" to further control how colors interact.
- Opacity and Flow: Fine-tune the "Opacity" and "Flow" settings to mimic how acrylics can be applied thinly for glazes or thickly for impasto. You might want pressure to control opacity, allowing for subtle layering.
- Texture: Explore the "Texture" settings within the Brush Studio to add a physical feel to your strokes. Adjusting the "Depth" and "Scale" of the texture can create a convincing impasto effect.
- Streamline: While often associated with lettering, Streamline can also be beneficial for acrylic brushes to ensure smooth, controlled strokes, especially when rendering fine details or smooth gradients.
With hundreds of settings available, the possibilities for creating custom brushes are virtually limitless. Procreate diligently remembers all your custom settings, allowing you to build a personalized toolkit that evolves with your artistic journey.
Advanced Brush Management and Workflow Tips
Beyond the core functionalities, Procreate offers advanced features for brush management and workflow optimization, ensuring that your creative process remains fluid and uninterrupted.
Duplicating and Deleting Brushes
To duplicate a brush, simply swipe left on the brush thumbnail in your library and tap "Duplicate." This creates an exact copy, allowing you to experiment with modifications without altering the original. Duplicating a brush set follows a similar pattern: tap the set twice, then select "Duplicate." An identical copy will appear directly below the original.
Deleting a brush is as straightforward: swipe left on the brush and tap "Delete." It's crucial to remember that deleting a brush or a brush set permanently removes it from both Procreate and the Files app. Therefore, it is always advisable to back up any important custom brushes or sets before proceeding with deletion. If you accidentally delete a brush, set, or library, you can often recover it from the "Recently Deleted" folder within your Locations in the Files app.
Moving and Organizing Brushes
Organizing your brush library is essential for maintaining efficiency. To move brushes or brush sets, tap and hold the item you wish to move. After a brief moment, it will "lift up" and appear slightly faded. You can then drag it to its new location.
To move multiple items simultaneously, pick up the first item as described above. Then, with another finger, tap any other items you wish to add to the stack. A green icon will appear on the initial item, and a number will display next to it, indicating how many items are in your selected stack. You can then drag this entire stack to a new brush set or library.
A unique behavior occurs when you hover brushes over the title of a brush set and drop them directly onto the title itself. In this specific instance, the brushes are copied, and these copies are placed within the target set, rather than the original brushes being moved. This is the only scenario where a brush is copied across rather than completely moved.
Moving brushes and sets between different brush libraries is also seamless. Tap and hold the brush or set to pick it up, and then drag it to the desired library. This functionality extends to bulk movements, allowing you to reorganize large collections efficiently. In Procreate version 5.4 and above, moving brushes and brush sets entirely transfers the files to their new positions, ensuring that only one instance exists.
Sharing and Backing Up Brushes
Sharing your custom creations with others or backing up your valuable work is easily facilitated. To share an individual brush, swipe left on its thumbnail and tap "Share." For custom brush sets, tap the set twice and select "Share."
For comprehensive backup solutions, consider saving your brushes and brush sets to an iPad-compatible external hard drive or a dedicated cloud storage service. This ensures that your hard work is protected against data loss.
Resetting Brushes
If you ever need to revert a brush to its default settings, you must enter the Brush Studio. Within the brush library, tap the button to open the context menu, and then select the option to reset the brush. This action can be crucial for troubleshooting or returning to a known state when experimenting with extensive modifications.
Experimenting with Procreate's Acrylic Brushes: A User's Perspective
The recent release of Procreate 5.4 brought with it a significant expansion of the brush library, including several new handcrafted sets that offer exciting possibilities for artists. While personal preferences and art styles vary, exploring these new tools can unlock new creative avenues.
Pencils: Versatility for Sketching and Linework
Pencil brushes are often the workhorses of a digital artist's toolkit, used for everything from initial sketches to final linework. For an ideal pencil brush, a user might look for:
- Easy opacity build-up: The ability to achieve rich lines without excessive pressure or layering.
- Good pressure control: A wide spectrum of line weight and darkness that predictably responds to varying pressure.
- Subtle texture: A feel akin to traditional graphite, not too rough, but not as smooth as an ink pen.
- Versatility: The capacity to shade large areas smoothly while also allowing for precise fine detail.
For these requirements, brushes like "Bruny" and "Waratah" are often cited as strong contenders. "Stringybark," while perhaps less adept at fine detail, offers an interesting "color burn" effect that can be artistically appealing.
Pens: Precision for Linework and Expressive Strokes
Pens are typically reserved for linework, where precision and control are paramount. Ideal pen brushes possess:
- Smooth edges and texture: To ensure intricate linework doesn't appear chaotic or overly heavy.
- Varied width dependent on pressure: A balance between line variation and consistent control.
While specific brushes within the "Pen" category might suit more controlled linework, others from the "Ink" section, such as "Lichen," can also be valuable for expressive or calligraphic purposes.
Markers: Mimicking Traditional Media
The quest for digital markers that closely replicate the feel of traditional alcohol markers is ongoing. Some users have found Procreate's newer marker brushes to be remarkably close to their traditional counterparts, particularly in terms of color layering and texture. Brushes like "Magpie" and "Flynn" are noted for their juicy, vibrant qualities, while others might appear drier.
Pastels and Oils: Exploring New Textures
While traditional pastels and oils can be demanding in terms of setup and equipment, digital versions offer an accessible way to explore their unique textures. Certain brushes within these categories are highlighted for their ability to translate the tactile qualities of these mediums into the digital realm.
Paints: Acrylics, Gouache, and Watercolors
The "Paints" category is broad, encompassing the diverse characteristics of various paint mediums.
- Acrylics: For acrylics, users often seek brushes that can handle texture layering and smudging effectively. Brushes that offer a convincing "painterly" look with visible brushstrokes are highly sought after.
- Gouache: A beloved gouache brush might offer consistent transparent layers with slight texture, or it could be explored for opaque, blocky applications.
- Watercolors: Emulating the transparency, color buildup, and characteristic pigmented edges of watercolors is a challenge. Brushes that achieve accurate color buildup, such as "Penguin," and those with beautiful textures are particularly valuable.
Charcoals and Lettering: Specialized Tools
For those who venture into charcoal textures, brushes like "Florentine" can offer a softer, pencil-like feel. For handwriting, calligraphy, and typography, lettering brushes with consistent texture, good line width control, and low opacity variation are essential for readability and aesthetic appeal.
Current Go-To Brushes
Many artists develop a core set of brushes they rely on daily. These might include:
- Line Brush (from BigPear Liu): Valued for its darker, more pronounced lines, suitable for quick sketches and linework.
- Square Render (Jingsketch): Praised for its versatile texture, ideal for opaque, subtly painterly styles and realism.
- Gouache (original Procreate library): A reliable tool for transparent painting.
- Studio Pen (original Procreate library): A foundational brush for linework, though often used less frequently than other specialized tools.
By understanding the capabilities of Procreate's brush system and engaging in thoughtful experimentation, artists can unlock a world of creative possibilities, transforming their digital canvases with the rich and varied textures of acrylic brushes and beyond.