Procreate offers a robust and versatile toolkit for digital artists, with its extensive library of default brushes forming the foundation of this creative power. Understanding these brushes, from their organization and customization to their intended uses, is crucial for any Procreate user looking to maximize their artistic potential. This guide delves deep into the world of Procreate's default brushes, providing insights for both beginners and seasoned professionals.
Navigating the Brush Library
Accessing your brush libraries in Procreate is straightforward, with two primary methods available. Brushes are now organized within the iPad's Files app, either in "On My iPad → Procreate → Brushes" or "iCloud Drive → Procreate Brushes." This integration means that changes made to brushes within Procreate are reflected in the Files app, and vice versa, creating a seamless workflow.
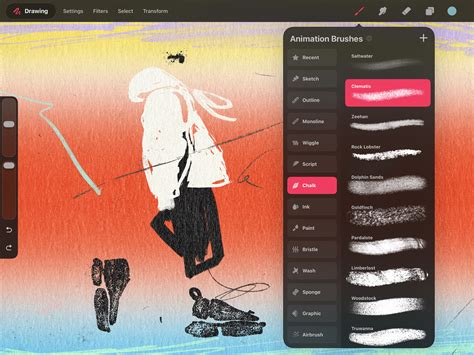
To browse through the available brush sets, simply scroll the list. Tapping on a specific brush set reveals the brushes it contains on the right-hand side. Each brush is presented with its name and a visual preview of the stroke it creates, allowing for quick identification and selection.
Recent and Pinned Brushes
Procreate streamlines access to your frequently used tools through the "Recent" brushes feature. These can be found at the top of the brush library sets, accessible by tapping Paint, Smudge, or Erase, and then selecting "Recent." To locate the original set a brush belongs to, swipe left on the brush in the Recent list and tap "Find."
For brushes you use most often, the "Pin" function is invaluable. Swiping left on a brush in your Recent set and tapping "Pin" will keep it permanently at the top of your Recent list, easily identifiable by a pin symbol in the top right-hand corner. This ensures your essential tools are always at your fingertips. If you no longer need a pinned brush or wish to remove any brush from your Recent list, simply swipe left and tap "Clear."
Exploring Procreate's Core Brush Sets
Procreate's Brush Library is populated with 18 versatile, handcrafted brush sets designed to cover a wide spectrum of artistic needs. These sets offer a blend of realistic and fantastical brushes, providing a comprehensive range of useful tools for diverse creative endeavors.
Technical and Sketching Brushes
For projects requiring a more precise and technical approach, the Technical brush set is purpose-built. These brushes are ideal for practical drawing, planning, sketching, and quick studies. Similarly, the Pencil set, often a favorite for sketching, offers a natural feel and responsive behavior, allowing for nuanced line work and shading.
Ink and Comic Brushes
The Ink brush set is perfect for cleaning up artwork and drawing in ink-centric styles, such as sumi-e. For those venturing into comic and manga creation, the dedicated Comic set provides a range of inks, halftones, and other essential tools to bring your graphic narratives to life.
Painting and Rendering Brushes
The Painting set encompasses a variety of brushes for artistic drawing and rendering, offering different textures and effects. This set includes brushes that mimic traditional mediums like acrylic, stucco, and oil paints, providing realistic digital painting possibilities. The Rendering set, in particular, offers a range of brushes specifically designed for detailed artistic drawing and achieving smooth, polished finishes.
Texture and Special Effect Brushes
Texture plays a significant role in many artistic styles, and Procreate's brushes cater to this with sets like Texture. These brushes offer a diverse range of effects, from watery and fluid strokes to more tactile, clumpy applications.
The Wet Media set, for instance, focuses on simulating the behavior of watercolors, offering realistic and expressive results. This set includes brushes that mimic the flow and blending characteristics of actual watercolors, allowing for luminous washes and delicate details.
For those seeking unique and experimental effects, the Playful set is a treasure trove. This set demonstrates the unique capabilities of Procreate’s versatile Brush Studio, featuring brushes that can change color dynamically, create smoky or ethereal effects, and generate captivatingly chaotic shapes.
Lettering and Calligraphy Brushes
The Lettering set is a staple for digital calligraphers and typographers. Brushes in this set are equipped with Streamline, a feature that smooths out strokes, enabling users to create fluid and consistent calligraphic forms with ease. This is particularly useful for achieving elegant script and decorative lettering.
Grunge and Organic Brushes
For artists looking to add grit and character to their work, the Grunge set is indispensable. These brushes are designed to add realistic grunge textures, lending a worn, distressed, or edgy feel to your art.
The Organic set is dedicated to all things natural. It includes a variety of scatter brushes that can be used to effortlessly add elements like grass, leaves, and bark textures to concept pieces. Furthermore, this set offers brushes that faithfully mimic the organic strokes created by handmade mediums, adding an authentic touch to digital creations.
3D Painting and Advanced Brushes
Procreate also caters to more specialized workflows with its Material brush set, which features brushes with metallics and roughness properties, specifically created for 3D painting.
The Advanced set, described as "mind-blowing," takes full advantage of the power of digital art. These brushes are designed for complex effects and sophisticated applications, pushing the boundaries of what's possible in digital illustration.
Procreate Brush Studio Explained (Finally Understand Every Setting)
Creating and Customizing Brushes: The Brush Studio
The Brush Studio is the heart of Procreate's brush customization, offering unparalleled control over every aspect of a brush's behavior. You can access the Brush Studio by tapping "Create new brush" from the brush library, which will then open the studio to customize your new creation.
Within the Brush Studio, you have the power to alter a multitude of settings, including:
- Shape: Define the fundamental form of your brush tip.
- Grain: Control the texture applied by the brush.
- Behavior: Adjust how the brush responds to pressure, tilt, and speed.
- Color Dynamics: Influence how color is applied, including variance and blending.
- Responsiveness: Fine-tune how the brush reacts to your stylus input.
- Opacity: Set the transparency of the brush strokes.
- Taper: Control the thinning or thickening of strokes based on pressure or other dynamics.
With hundreds of settings available, the possibilities for creating unique brushes are virtually limitless. Procreate intelligently remembers your custom settings, ensuring your personalized tools are always ready for use.
Importing and Managing Brushes
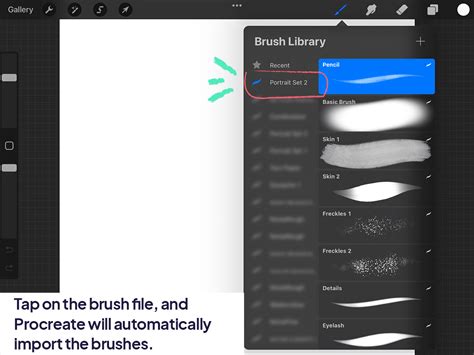
Procreate simplifies the process of expanding your brush collection through the Files app. You can import individual .brush files, .brushset files (which contain multiple brushes), or entire brush libraries by navigating to them within the Files app and selecting them. When you import a single brush, a new set called "Imported" is automatically created to house it.
You can also import entire brush libraries from the Files app. Once brushes or brush sets are within Procreate, you have robust management options:
- Renaming: To rename a brush set, tap it twice (or tap and hold) and select "Rename." Brushes can also be renamed from within the Brush Studio or via the Files app. Note that you cannot rename Procreate's default brush sets.
- Duplicating: To duplicate a brush, swipe left on it and tap "Duplicate." For brush sets, tap twice on any set and then tap "Duplicate." An exact copy will appear below the original, and this copy becomes a custom set that you can then rename, delete, or share.
- Moving: Brushes and brush sets can be moved within the library by tapping and holding them until they lift up, then dragging them to the desired location. To move multiple items, pick up the first item, then tap additional items with another finger to create a stack. Brushes can also be copied to a new set by dragging them over the set's title.
- Sharing: Share individual brushes by swiping left on their thumbnail and tapping "Share." Custom brush sets can be shared by tapping the set twice and selecting "Share." This is crucial for backing up your custom creations or sharing them with other artists.
- Deleting: To delete a brush, swipe left on it and tap "Delete." Deleting a brush or brush set permanently removes it from both Procreate and the Files app. It is always advisable to back up important brushes before deleting them. If you accidentally delete an item, you can often recover it from the "Recently Deleted" folder within the Files app.
Brush Set Icons
You can even personalize your brush sets by using an emoji as an icon. To achieve this, ensure no specific icon is already set for the brush set. Procreate will then automatically use the first emoji found in the brush set's name as its icon.
Advanced Brush Concepts and Tips
Streamline for Smoothness
Many brushes, particularly those designed for lettering and calligraphy, feature the "Streamline" setting. This feature is crucial for smoothing out strokes, ensuring that even with slight hand tremors or inconsistencies, the resulting lines are clean, even, and aesthetically pleasing. This is a cornerstone for achieving professional-looking typography and fluid linework.
Brush Behavior and Responsiveness
The true power of Procreate's brushes lies in their customizability. Understanding how settings like "Jitter," "Flow," and "Wet Mix" affect stroke appearance is key to replicating traditional media or inventing entirely new digital effects. The interplay between pressure, tilt, and speed sensitivity, controllable within the Brush Studio, allows for an incredibly nuanced artistic experience, mimicking the feel of pencils, markers, paintbrushes, and more.
Importing from External Sources
Beyond the default sets, Procreate allows for the import of brushes from external sources. Locating .brush, .brushset, or .brushlibrary files in the Files app and tapping on them will import them directly into Procreate. This opens up a universe of custom brushes created by other artists, community members, or yourself, allowing for endless creative exploration.
Backing Up Your Brushes
Given the integration with the Files app, backing up your brushes and brush sets is essential to prevent data loss. Saving them to an iPad-compatible external hard drive or a dedicated cloud service folder is highly recommended. This ensures that your valuable custom tools are safe, even if device issues arise.
Experimentation is Key
Procreate's default brushes, from the practical to the fantastical, are designed to provide a wide range of useful tools. The best way to truly master them is through experimentation. Spend time exploring the different brush sets, understanding their intended uses, and then dive into the Brush Studio to tweak their settings. Whether you're a beginner just getting comfortable with digital painting using a generic round brush or an advanced artist seeking specific textures, Procreate's brush system offers the flexibility and power to bring any artistic vision to life. By understanding the core functionalities and embracing the customization options, artists can unlock the full potential of Procreate's default brush library.