The journey of video creation culminates in the final export, a critical step that can significantly impact how your work is perceived. A phenomenal edit, meticulously crafted within your non-linear editor, loses its impact if it cannot be shared effectively. Exporting content is often an overlooked element in the video editing process, yet a single misconfigured setting can result in a video that looks drastically different from the polished timeline. Fortunately, for those seeking powerful yet accessible tools, Blackmagic's DaVinci Resolve offers a robust, free solution for exporting all types of content. This guide will delve into the intricacies of exporting your DaVinci Resolve projects, with a particular focus on the ubiquitous MP4 format, ensuring your video content shines as brightly as it does on your editing timeline.
Understanding DaVinci Resolve's Export Options
For users transitioning from software like Adobe Premiere Pro, Final Cut Pro, or Avid, DaVinci Resolve's interface might initially appear different. However, understanding its export functionalities reveals a streamlined and powerful system. DaVinci Resolve offers two primary export pathways: the "File" export and the more comprehensive "Deliver" tab exports.
The "File" Export: For Project Data and Collaborations
Newcomers to DaVinci Resolve might instinctively navigate to "File" and then "Export" in the drop-down menu, expecting to render their timeline. However, in DaVinci Resolve, this pathway is designed for exporting the data within your timeline, not the final video output. This "File" export menu provides four distinct options:
- Bin Export: This is particularly useful for users who leverage "Power Bins." Unlike standard bins, Power Bins are consistent across all projects, making them ideal for managing extensive libraries of stock music, video footage, or graphic elements used repeatedly. Exporting these bins is an efficient way to maintain file organization and project consistency when working across multiple projects.
- Timeline Export: This function is invaluable for collaborative workflows or when using DaVinci Resolve as a specialized tool, such as for color grading, alongside other primary editing software like Adobe Premiere Pro, Final Cut Pro, or Avid. A timeline export allows you to save your timeline data in a format compatible with other editing platforms, facilitating a seamless transfer of your work. It's crucial to verify the preferred file extensions for your chosen editing software before exporting.
- Subtitle Export: For editors who need a standalone file containing only the subtitles, this option is a lifesaver. You can easily export subtitles in various file extensions, such as
.srtor.vtt. For those who find subtitle creation and transcription a daunting task, tools like Simon Says can simplify the process, allowing for easy transcription and captioning directly within DaVinci Resolve. - Fusion Composition Export: This feature is excellent for saving and sharing complex visual effects and motion graphics created within DaVinci Resolve's integrated Fusion page. If multiple editors are collaborating on a project, exporting Fusion compositions ensures that these intricate graphical elements can be seamlessly shared and integrated.
Beyond these specific file exports, DaVinci Resolve also allows you to "Export Project." This option enables you to save your entire DaVinci Resolve project as a .drp file, which is essential for backing up your work or transferring projects between computers and collaborators.
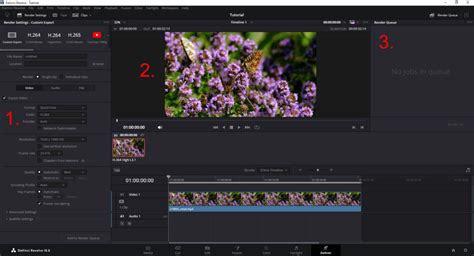
The "Deliver" Tab: Your Gateway to Final Video Exports
The conventional and most comprehensive method for exporting your final video in DaVinci Resolve is through the "Deliver" tab. Visually represented by a rocket ship icon, this tab is located in the bottom-right section of the DaVinci Resolve interface. Here, you gain access to a full spectrum of settings, including codecs, bitrates, and render configurations, allowing for precise control over your final output.
Step-by-Step Guide to Exporting Your DaVinci Resolve Project as MP4
Exporting a video can appear intimidating due to the sheer number of options available. Even minor export mistakes can lead to undesirable results, such as a loss of quality or incorrect aspect ratios. Before diving into the export process, it's a good practice to review your project settings by clicking the gear icon in the bottom-right corner. This ensures that elements like resolution, frame rate, and color space are correctly configured, preventing issues like an improperly colored clip appearing at the end of your exported video.
Step 1: Access the Deliver Tab
Once your project is finalized and you're satisfied with every edit, transition, and color grade, navigate to the "Deliver" tab.
Step 2: Configure Output Settings - Custom Export
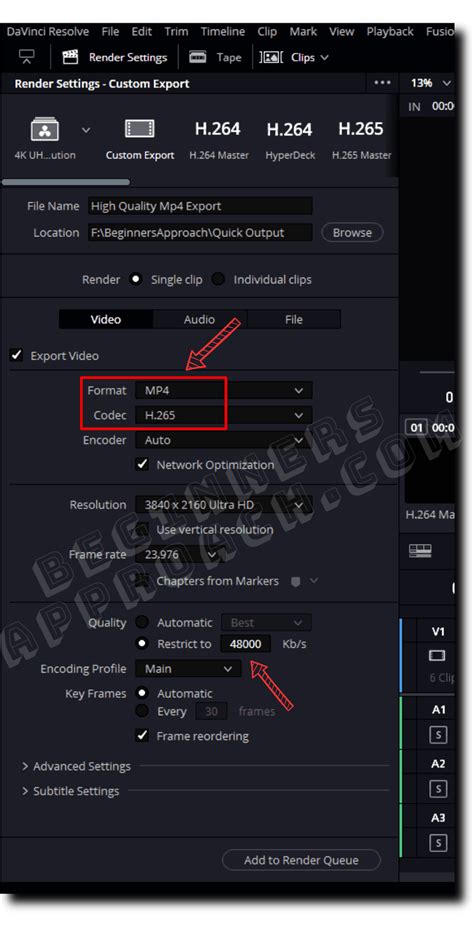
By default, the Deliver tab is set to "Custom Export." While numerous presets are available for quick exports to specific platforms, the custom export option provides the most granular control, ensuring you achieve the exact MP4 output you desire.
- File Name and Location: At the top of the custom export panel, you'll define your video's "File Name" and select the "File Location" on your computer where the exported file will be saved.
- Render Single or Individual Clips: You'll then choose whether to render a "Single Clip" (combining your entire timeline into one video file) or "Individual Clips" (exporting each video element on your timeline as a separate file). The latter is incredibly useful for batch converting footage or exporting proxies.
- Video, Audio, and File Tabs: Below these options are three primary tabs: "Video," "Audio," and "File." Clicking on each reveals settings specific to that element.
- The "File" tab, especially when exporting individual clips, allows you to retain the source name for each exported file, which is beneficial for proxy workflows.
- The "Video" tab is where you'll configure all video-related export settings.
- The "Audio" tab allows for audio-specific configurations.
Focusing on Video Export Settings for MP4:
Under the "Video" tab, several crucial settings determine your MP4 export:
Format: This refers to the container format of your video file. The two most prevalent containers are MPEG-4 (MP4) and QuickTime Movie (MOV). DaVinci Resolve defaults to MP4.
Codec: The codec dictates how the video and audio data within the container are compressed. For MP4 files, the primary codec options are H.264 and H.265 (also known as HEVC). When you export using the MP4 format, your file will receive a
.mp4extension.- MP4 (H.264/H.265): MP4 is highly recommended for streaming and general file transfer due to its generally smaller file sizes compared to QuickTime. H.264 is widely compatible, while H.265 offers better compression efficiency, resulting in smaller files for similar quality, though it requires more processing power.
- QuickTime (MOV): While MP4 is excellent for broad compatibility and file size management, QuickTime offers a wider array of codec options, including professional codecs like Apple ProRes, DNxHD, and DNxHR. These are often preferred for high-end post-production workflows where preserving maximum quality is paramount, though they result in significantly larger file sizes. For web-based content, H.264 and H.265 within an MP4 container are usually sufficient and more practical.
Resolution and Frame Rate: It is vital to ensure these settings match your project's timeline settings. Exporting at a higher resolution than your timeline will result in an error. You can check your timeline settings by going to the "Media" tab, right-clicking on your timeline in the Media Pool, and selecting "Timeline Settings."
Quality/Bitrate: If you select H.264 or H.265 as your codec, you will see a "Quality" setting. By default, this is often set to "Automatic." However, by checking "Restrict to," you can manually set the "Bitrate." The bitrate determines the amount of data used per second of video. A higher bitrate generally means better quality but a larger file size. For web uploads, adhering to platform recommendations (e.g., YouTube's bitrate guidelines) is advisable. For instance, YouTube recommends specific bitrates for different resolutions and frame rates to ensure optimal playback and minimal compression. For 1080p at 30 fps, a bitrate of 8,000 kb/s is suggested, while for 4K at 30 fps, it jumps to 35,000-45,000 kb/s. Experimenting with bitrate settings can help you balance file size and visual fidelity.
- Audio Export: If you only need to export audio, uncheck the "Export Video" box. Then, navigate to the "Audio" tab and select your desired audio codec. Common options include AAC and MP3. Ensure the "Export Audio" checkbox is ticked if you are exporting video with sound. Under "Output Track 1," ensure it is set to "Bus 1 (Stereo)" for standard stereo audio output.
Step 3: Add to Render Queue
Once you are completely satisfied with all your export settings, scroll down to the bottom of the Deliver tab and click "Add to Render Queue." This action places your export job into a queue on the right-hand side of the screen.
Step 4: Render Your Project
With your export job added to the Render Queue, the final step is to initiate the rendering process. Click the "Start Render" button. DaVinci Resolve will then process your timeline and create the final MP4 video file at the destination you specified. The rendering time will vary based on the length of your video, its resolution, the complexity of effects, and your computer's processing power.
The Complete Guide to the DaVinci Resolve Deliver Page
Quick Export: Streamlined MP4 Exports for the Web
For those who need to get videos online quickly, DaVinci Resolve's "Quick Export" feature is a valuable tool. Located to the left of the main "Custom Export" button, Quick Export offers pre-configured settings optimized for various platforms and common formats like H.264, H.265, and even Apple ProRes.
To use Quick Export, simply click the button, select your desired preset (e.g., H.264 for general web use), and then click "Export." You'll be prompted to name your file and choose a save location. This method is ideal for social media creators or vloggers who prioritize speed and ease of use.
Direct YouTube Uploads
DaVinci Resolve further streamlines the process by allowing direct uploads to YouTube via the Quick Export tab. After signing into your YouTube account within DaVinci Resolve's preferences (under Internet Preferences), you can select the YouTube button in the Quick Export tab. This enables you to choose a title, description, visibility settings, and category directly within DaVinci Resolve before rendering and uploading your video.
Troubleshooting Common MP4 Export Issues in DaVinci Resolve
While DaVinci Resolve is a powerful and versatile tool, occasional export issues can arise. Here are some common problems and their solutions when exporting MP4 files:
Audio Issues with MP4 Export
- No Audio:
- Ensure the "Export Audio" checkbox is ticked in the Deliver tab's Audio settings.
- Verify that your audio tracks are enabled in the timeline.
- Check that "Output Track 1" is set to "Bus 1 (Stereo)" or an appropriate audio bus.
- Audio and Video Out of Sync:
- Corrupt Audio Clips: Re-import or convert your audio files to a different format.
- Variable Frame Rate (VFR) Footage: DaVinci Resolve works best with Constant Frame Rate (CFR) footage. If your source footage is VFR (often from screen recordings or mobile devices), convert it to CFR using tools like Shutter Encoder or HandBrake before importing.
- Frame Rate Mismatches: Ensure your project, timeline, and export settings all share the same frame rate.
- Software Updates: Keep DaVinci Resolve updated to the latest version.
Gamma Shift in MP4 Exports
Gamma shift, a noticeable difference in brightness or contrast between your timeline and the exported video, can be frustrating.
- Viewer Preferences: In DaVinci Resolve's preferences, under "Image Scaling," ensure "Use Mac display profile for viewers" (on macOS) is checked. On Windows, similar color management settings within DaVinci Resolve's preferences and system display settings should be reviewed.
- Project Settings: Within Project Settings, navigate to "Color Management." For beginners, keeping these at default is often best.
- Advanced Settings (Deliver Tab): If the issue persists, in the Deliver tab's advanced settings, try setting the "Color Space Tag" to "P3-DCI" and the "Gamma Tag" to "sRGB." This can help ensure a more consistent color output across different viewing environments.
Render Artifacts in Final Video
Glitches, color shifts, or black screens in your final MP4 can stem from several sources:
- Codec or Format: Try exporting with a different codec or container. Some codecs might be more demanding on your system.
- Graphics Card Drivers: Ensure your graphics card drivers are up-to-date.
- Optimized Media: In the Media or Edit tab, right-click on your media files in the Media Pool and select "Generate Optimized Media." This creates lower-resolution proxy files that can sometimes alleviate rendering issues with complex effects.
- System Resources: If your system is struggling, consider reducing the bitrate or resolution, or exporting in sections.
File Size is Larger Than Expected
If your exported MP4 is significantly larger than anticipated:
- Bitrate: The most common cause is an excessively high bitrate. Lower the bitrate in the "Quality" section of the Video tab. A bitrate of 20,000 kb/s is often a good starting point for 1080p content.
Conclusion: Empowering Your Video Exports
DaVinci Resolve, particularly its free version, stands as an exceptional tool for both aspiring and seasoned video professionals. Mastering the export process, especially for a widely compatible format like MP4, is fundamental to sharing your creative vision. By understanding the nuances of the Deliver tab, from selecting the right container and codec to fine-tuning bitrate settings, you can ensure your exported videos meet your quality expectations and are ready for any platform. Whether you're opting for the speed of Quick Export or the precision of Custom Export, DaVinci Resolve provides the flexibility to bring your edited projects to the world, polished and professional.