Adobe InDesign offers a suite of viewing modes designed to cater to every stage of the design process, from initial layout to final output preview. These modes allow designers to control precisely what elements are visible on their screen, ensuring accuracy and efficiency. The primary modes are Normal, Preview, Bleed, and Slug, each serving a distinct purpose. Additionally, Presentation Mode provides a distraction-free environment for showcasing work. Mastering these viewing options is crucial for any InDesign user aiming for professional results.
Normal View: The Designer's Workbench
The Normal view mode is the default and most comprehensive display in InDesign. It presents a complete picture of your document, revealing all elements that contribute to the design and its physical output. This includes not only the content within the page boundaries but also surrounding elements that are essential for layout and production.
Within Normal view, you will see the document pages themselves, clearly delineated. Surrounding these pages is the pasteboard, a crucial area that acts as a holding space for text, images, and other objects that are not currently on the active page but may be needed later or are part of a larger spread. Guides, both ruler guides and margin guides, are also visible, providing non-printing lines to help with precise alignment and organization of design elements. Frame edges, hidden characters, and other non-printing elements that inform the layout are also displayed, offering a complete overview of the underlying structure. This mode is indispensable during the active design and editing phases, allowing for maximum control and visibility of all components.
Preview Mode: A Glimpse of the Final Product
In stark contrast to Normal view, Preview mode offers a clean and uncluttered representation of what will actually be printed or exported. Its primary function is to hide all non-printing elements, providing a clear visualization of the final output. When you activate Preview mode, the document pages are displayed strictly within their boundaries, with the pasteboard, guides, bleed, and slug areas completely hidden.
This mode is invaluable for reviewing your work before it goes to print or is published digitally. It allows you to assess the overall aesthetic, check for any unintended visual elements that might appear in the final output, and ensure that the content within the page margins is precisely as intended. By removing the visual clutter of guides and pasteboard, Preview mode helps designers focus on the essential elements of their design, simulating the final viewing experience for the end-user or client.
Bleed and Slug Modes: Accounting for Production Needs
Beyond the fundamental Normal and Preview modes, InDesign offers specialized views for handling print production requirements: Bleed mode and Slug mode. These modes are specifically designed to visualize areas outside the standard page dimensions that are critical for professional printing.
Bleed Mode: Ensuring Edge-to-Edge Printing
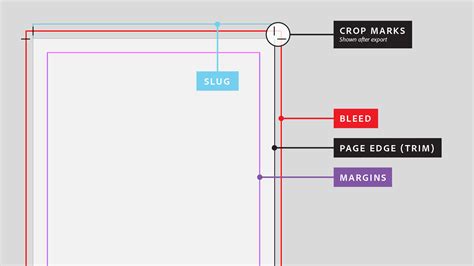
The bleed, by definition, is the area outside the trim of the page where objects still print. This is a crucial concept in professional printing, as it allows for designs that extend to the very edge of the page without any white borders. Printers trim the paper after printing, and the bleed area ensures that any image or color that is meant to go to the edge will do so without any unsightly gaps. Bleed mode displays the bleed area along with the document pages. This allows designers to ensure that their background elements, images, or colors extend sufficiently into the bleed area, preventing any unintended white edges after trimming.
Slug Mode: Incorporating Production Notes
The slug area is a region outside the bleed and trim marks, typically used for notes, instructions, or other production-related information that is not intended to be part of the final printed piece. This might include client comments, printer instructions, or color calibration marks. Slug mode displays the slug area and document pages. This allows designers to include and manage essential production notes directly within their InDesign document, ensuring that all necessary information is present for the printing process without it appearing on the final printed pages.

Presentation Mode: A Distraction-Free Showcase
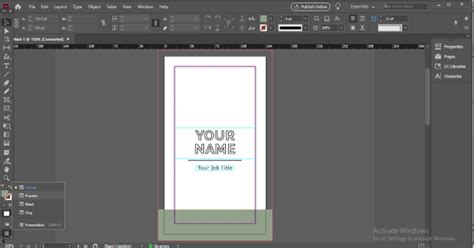
For presenting designs to clients or for a focused review, InDesign's Presentation mode is an exceptionally useful feature. This mode strips away all interface elements of the InDesign application, including the application bar, panels, and tools. What remains is a clean, full-screen view of your document, allowing for an immersive experience that simulates how the final output might be viewed.
This mode is ideal for client presentations, as it removes any technical distractions and allows the viewer to concentrate solely on the design itself. It provides a clear and professional way to showcase artwork, making it easier for clients to provide feedback and make decisions without being overwhelmed by the complexities of the design software. To activate Presentation mode, you can navigate to the View menu and select "Screen Mode," then choose "Presentation," or use the dedicated Screen Mode icon often found in the application bar or Tools panel.
Navigating Your Document: Tools and Techniques
Effective use of InDesign's viewing modes is often enhanced by a solid understanding of its navigation and zoom tools. These tools provide granular control over what you see and how you interact with your document.
The Zoom Tool: Magnifying Your Design
The Zoom tool is a fundamental element for controlling the magnification of your document. It is located in the Tools panel and is represented by a magnifying glass icon. This tool does not alter the document itself or its viewing mode, but rather changes the scale at which you view the content on your screen. You can zoom in to examine intricate details or zoom out to get a broader overview of the layout.
To use the Zoom tool, click on it in the Tools panel. Clicking on an area of your document with the Zoom tool will zoom in, centering the magnification on the point where you clicked. To zoom out, you can hold down the Alt key (or Option key on a Mac) while using the Zoom tool. Furthermore, you can drag a marquee with the Zoom tool to define a specific area you wish to enlarge, with the image magnifying based on the boundaries of your drag. The maximum magnification achievable is 4000%, while the minimum is 5%.
The Zoom Tool Indesign for beginners
Zoom Level and Fit Options
Beyond the Zoom tool, InDesign offers several direct methods for controlling zoom levels and fitting your document to the screen. From the Application bar, you can click the Zoom Level button to directly input a specific percentage or choose from predefined options.
For quickly adjusting the view, InDesign provides helpful shortcuts:
- View > Fit Page in Window: This command scales the entire page to fit within the current window.
- View > Fit Spread in Window: This command displays all facing and adjacent pages of a spread, fitting the entire spread within the window.
- View > Actual Size: This command displays your document at its true, 100% size, reflecting its physical dimensions.
- View > Entire Pasteboard: This command zooms out to show the entire pasteboard area, including all document pages and the surrounding workspace.
Rulers, Guides, and Grids: Precision in Design
Achieving precise layouts in InDesign relies heavily on the use of rulers, guides, and grids. These visual aids are essential for accurate placement, alignment, and measurement of design elements.
Rulers: Measuring and Positioning
Rulers in InDesign are typically located along the top and left sides of the document window. They provide a visual scale for measuring the dimensions of objects and for positioning elements with accuracy. The numbering on the rulers usually starts at the upper left corner of the page. You can use rulers to place guides, which are non-printing lines that help you align objects. Additionally, rulers can create markers that follow your cursor, providing real-time coordinate information.
Measurements on InDesign rulers are often displayed in picas by default, a common unit in graphic design and printing. However, you can easily change this unit of measurement. Navigate to Edit > Preferences > Units & Increments to adjust the unit of measure to inches, millimeters, centimeters, or points. This same preference panel also allows you to change the origin of the rulers, which defines the starting point (0,0) for measurements. You can set the origin to be relative to the page, spread, or spine of a book, facilitating different layout scenarios.
Guides: Aligning and Organizing
Guides are non-printing lines that can be placed horizontally or vertically on your document. They serve as essential tools for aligning text and objects, ensuring consistency across your design. You can show or hide guides, lock them to prevent accidental movement, or use the "Snap to Guides" command to quickly align objects to them.
To create a guide, first ensure that rulers are visible by going to View > Show Rulers. Then, click and drag from either the horizontal or vertical ruler onto the document. The line that appears is your guide. You can create as many guides as needed to structure your layout. Once placed, guides can be moved if they are not locked. To lock guides, navigate to View > Grids & Guides > Lock Guides. To unlock them, simply uncheck this option. To show or hide all guides, use View > Grids & Guides > Show Guides or Hide Guides.
InDesign offers several types of guides:
- Ruler Guides: These are the guides you manually create by dragging from the rulers.
- Margin Guides: These visually represent the margins set for your document.
- Column Guides: These indicate the column structure defined for a page or master page.
- Bleed and Slug Guides: These highlight the bleed and slug areas, respectively.
Each type of guide can be assigned a different color for better visual distinction. You can customize guide colors, display options, and pasteboard settings by going to Edit > Preferences > Guides & Pasteboard. This panel allows you to tailor the appearance of guides to your preferences, making them more recognizable and functional. You can also set a "View Threshold" for ruler guides, determining the minimum zoom percentage at which they will be visible.
Grids: Establishing a Visual Framework
Grids are visual frameworks that help in aligning text and objects on a page, providing a structured approach to layout. InDesign features two primary types of grids: the Document Grid and the Baseline Grid.
- Document Grid: This grid appears as a checkerboard pattern and is primarily used for aligning objects. When enabled, it provides a visual structure for arranging elements with consistent spacing and alignment.
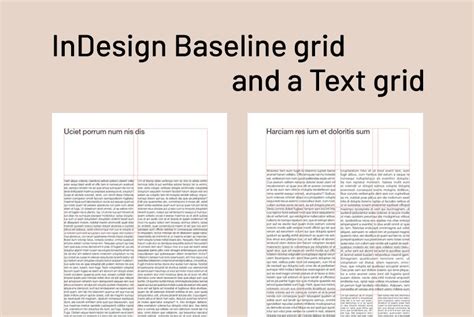
- Baseline Grid: This grid consists of horizontal lines and is particularly useful for aligning text across multiple columns or pages. It ensures that the baselines of text align vertically, creating a harmonious typographic flow.
Both grids appear behind your objects and text, offering a subtle yet effective organizational tool. Similar to guides, objects can be made to "snap" to gridlines. The Snap to Document Grid command, accessible via View > Grids & Guides, causes objects to automatically align to the nearest gridline when they are dragged close to it. This feature greatly enhances efficiency and precision in layout. To display the Document Grid, go to View > Grids & Guides > Show Document Grid. For the Baseline Grid, use View > Grids & Guides > Show Baseline Grid.
Smart Guides and the Hand Tool: Dynamic Assistance
In addition to static grids and guides, InDesign offers dynamic alignment tools and navigation aids.
Smart Guides: Intelligent Alignment
Smart Guides are a powerful feature that appears automatically when you drag or resize objects. These intelligent guides provide real-time visual cues to help you align objects with each other, with margins, or with other key elements on the page. They appear as temporary lines and labels indicating alignment points, centers, and spacing. To turn Smart Guides on or off, navigate to View > Grids & Guides > Smart Guides.
The Hand Tool: Effortless Panning
The Hand tool, found in the Tools panel, is used to move around an active document without using scroll bars. Clicking and dragging with the Hand tool allows you to pan across your document, repositioning the view to access different areas. This is particularly useful when working with large documents or at high zoom levels.
The Info Panel: Real-Time Data
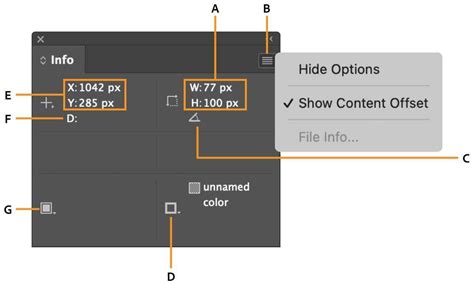
The Info panel provides valuable real-time information about your document and the objects you are working with. Accessible via Window > Info, this panel can display the X and Y coordinates of your mouse cursor, the width and height of selected objects, and even the type of object you are currently interacting with.
The coordinate information is invaluable for precise object placement. As you drag and drop elements, the Info panel can show you their exact position. Similarly, when drawing shapes or resizing objects, the panel displays their dimensions. You can even use the Info panel to create objects of specific sizes. For instance, when drawing a rectangle with the Rectangle tool, you can monitor the Info panel to achieve a precise width and height.
Customizing Your Workspace
InDesign's workspace is the entire area of the application, including the document window and all the panels. Recognizing that designers have unique workflows, InDesign allows for extensive customization of this workspace. You can open, close, resize, and reposition panels to suit your preferences.
To create a custom workspace:
- Open the panels you wish to use and arrange them as desired.
- Go to the Workspace menu on the Application bar and select "New Workspace."
- Enter a name for your new workspace.
- Choose whether to save the panel locations and menu customizations.
- Click "OK" to save your custom workspace.
This allows you to quickly switch between different workspace layouts optimized for various tasks, such as text editing, image manipulation, or print preparation.
Undo and Redo: A Safety Net for Creativity
The Undo and Redo commands are indispensable features that provide a safety net for your creative process. The Undo command, accessible via Edit > Undo, allows you to reverse your last action. If you make a mistake or decide against a change, you can simply undo it. You can chain multiple Undo commands to reverse a series of actions, effectively stepping back through your editing history. The Redo command, found at Edit > Redo, allows you to reapply an action that you have previously undone. These commands are crucial for experimentation and error correction, enabling you to work with confidence.
GPU Performance: Enhancing Display Quality
Modern design workflows, especially those involving high-resolution images and displays, benefit significantly from GPU acceleration. The Graphics Processing Unit (GPU) is a specialized processor designed for rapid image manipulation and display. With the increasing prevalence of HiDPI monitors, which have very high resolutions, the CPU can sometimes be strained during rendering.
InDesign's GPU Performance feature offloads rendering tasks to the GPU, leading to smoother performance, particularly when zooming, scrolling, or panning. For optimal GPU performance, it is recommended to have a minimum of 1024 MB of VRAM (Video Random Access Memory), with 2 GB being ideal. This feature is supported on monitors with a resolution greater than 2K. If your system meets the requirements, GPU Performance will be enabled by default in InDesign's Preferences. You can access and adjust these settings within Preferences > GPU Performance.
Screen Modes: Tailoring Your View
Screen modes are a powerful way to control the visibility of the InDesign interface and focus on specific aspects of your document. As mentioned earlier, there are several screen modes available:
- Normal: Shows all elements, including non-printing items.
- Preview: Hides non-printing elements for a clean view of the final output.
- Bleed: Displays the bleed area and document pages.
- Slug: Displays the slug area and document pages.
- Presentation: Hides the entire InDesign interface for a full-screen, distraction-free view.
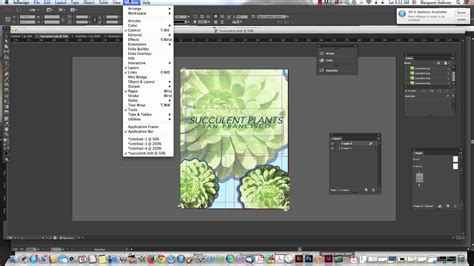
You can switch between these screen modes in several ways:
- Application Bar: Click the Screen Mode icon (often a small square or circle representing the current mode) and select your desired mode from the dropdown menu.
- View Menu: Navigate to View > Screen Mode and choose the desired option.
- Keyboard Shortcut: The 'W' key is a quick toggle between Normal and Preview modes.
These screen modes are essential for understanding how your document will appear in different contexts, from the detailed design phase to the final printed product.