Changing the background color in Photoshop is a fundamental skill that can dramatically alter the mood, focus, and overall impact of an image or design. While it might seem straightforward, especially when dealing with simple, solid backgrounds, the process can become deceptively difficult when intricate details like hair, fur, or complex shadows are involved. Many users encounter frustrating issues such as rough edges, unwanted white halos around subjects, or masks that require painstaking cleanup. However, with the right techniques and an understanding of Photoshop's powerful tools, achieving clean, professional-level results is well within reach. This guide will explore various methods for changing background colors, from the simplest document setup to advanced photo manipulation, ensuring you can tackle any background challenge.
Setting Up Your Canvas: The New Document Background
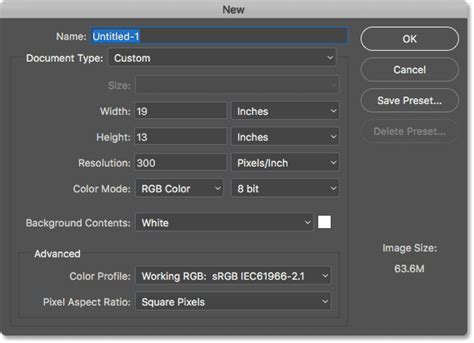
When initiating a new project in Photoshop, the default background is typically white. This is often a starting point for many designs and edits. However, you don't have to live with this white canvas. You can easily change the background color right at the creation stage. In the "New Document" menu, before finalizing your document dimensions and settings, there is an option to select your initial background color. This allows you to begin with a colored background that suits your project's aesthetic, saving you an extra step later on.
Simple Fills: Solid Color Backgrounds for Designs
For design work or when you need a plain, solid color background for a graphic element, Photoshop offers straightforward methods.
Using a Fill Layer for Solid Colors
One of the most flexible ways to apply a solid color background is by using a fill layer. This method is non-destructive, meaning you can easily change the color later without redoing any work.
- Navigate to the Fill Layer Option: Go to
Layer > New Fill Layer > Solid Color. - Choose Your Color: A "Color Fill" dialog box will appear, allowing you to select any color from the spectrum.
- Confirm: Click "OK" to apply the solid color fill layer.
This fill layer will appear in your Layers panel, usually at the bottom. You can double-click the color swatch on the fill layer at any time to revisit the Color Picker and select a new color, offering ultimate control over your background.
Direct Layer Filling
Another quick method for filling a layer with a specific color, especially if you're working with an existing layer or a blank one, involves using keyboard shortcuts.
- For Windows users: Press
Alt + Backspaceto fill the selected layer with your current foreground color. - For Mac users: Press
Option + Deleteto achieve the same result.
This is particularly useful if you've already set your desired color in the foreground color swatch of your toolbar.
Transforming Photos: Changing Backgrounds in Existing Images
Changing the background color of a photograph is where the real challenge often lies, particularly when dealing with subjects that have intricate edges. The goal is to isolate the subject from its original background and then replace or recolor that background without damaging the subject's details.
Method 1: Quick Selection and Masking for Distinct Subjects
This technique is ideal when the subject is clearly defined against its background, making it easier for Photoshop's selection tools to differentiate between the two.
- Open Your Image: Start by opening the photograph you wish to edit in Photoshop.
- Select the Subject: The
Select Subjectbutton, often found in the taskbar at the top of the workspace, is a powerful AI-driven tool that attempts to automatically identify and select the main subject of your image. Alternatively, you can use theQuick Selection Toolfrom the Tools menu. Experiment with different selection tools like theObject Selection Tool,Magic Wand Tool, andLasso ToolsifSelect Subjectdoesn't yield perfect results. - Refine the Selection: Once your subject is highlighted, it's crucial to refine the selection for clean edges. Zoom in (using the
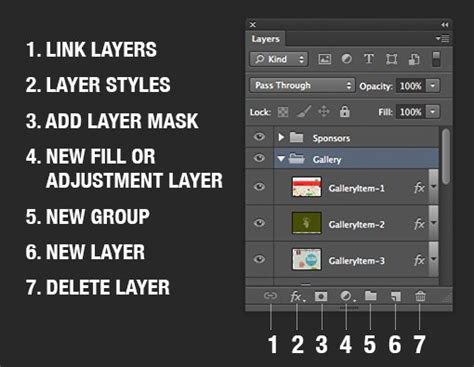
Zkey for the Zoom Tool) and use theBrush Toolwith a soft edge to manually add or subtract areas from the selection, ensuring all parts of your subject are included and no background is accidentally masked in. - Apply a Layer Mask: With your subject accurately selected, create a layer mask. In the Layers panel, click the "Add layer mask" icon (a rectangle with a circle inside). This will create a mask that hides everything except your selected subject.
- Invert the Mask (if necessary): If your initial selection was of the background rather than the subject, you can easily invert the mask. Click on the mask thumbnail in the Layers panel, then go to the Properties panel and click
Invert Mask. This will swap the visibility, revealing the background and hiding the subject. - Add a New Background Layer: Create a new layer below your subject layer. You can do this by selecting your subject layer and then clicking the "Create a new layer" icon while holding
Ctrl(Windows) orCmd(Mac). - Fill the New Layer with Color: Select this new, lower layer. You can then use the
Paint Bucket Toolto fill it with your desired background color, or use theAlt + Backspace/Option + Deleteshortcut if you've set the foreground color.
Method 2: Adjusting Colors on a Neutralized Background
Sometimes, especially with complex backgrounds or when you want to retain subtle lighting effects, a more nuanced approach is needed. This method involves neutralizing the background first, then applying a new color.
- Initial Selection and Masking: Follow steps 1-5 from Method 1 to isolate your subject and create a mask that reveals the background.
- Neutralize the Background: With the background layer selected (or the area around your subject if you've masked it out), you can adjust its colors. A common approach is to use adjustment layers. For instance, you could add a
Hue/Saturationadjustment layer and set it to only affect the background layer. In theHue/Saturationproperties, you might try reducing saturation to zero to create a grayscale background, which then becomes a neutral canvas. - Colorize the Background: Once the background is neutral, you can apply your new color. Again, using a
Hue/Saturationadjustment layer is effective. With the "Colorize" option checked, you can then adjust the Hue, Saturation, and Lightness sliders to achieve your desired background color. This allows for precise control over the new color's tone and intensity. - Fine-Tuning with Specific Area Adjustments: If you find that the new color isn't quite right in certain areas, or if you want to reintroduce some of the original background's character, you can use additional adjustment layers or brushes. For example, if you want to "Bring Back Blue in Specific Areas," you could create a new layer, clip it to the background layer, and use a soft brush with a blue color to paint over those areas, blending it with the existing color.
How to Change the Color of an Object in Photoshop | Adobe Photoshop Tutorial
Addressing Fine Details: Hair and Halos
Fine details like flyaway hair or wispy edges are notorious for causing issues. Dark backgrounds, in particular, can reveal "white halos" around these delicate strands where the original background was masked out.
- Refine Edge/Select and Mask: Photoshop's
Select and Maskworkspace (accessible from the Options bar when a selection tool is active, or by right-clicking a layer mask and choosing "Select and Mask") is indispensable for this. Tools like theRefine Edge Brush Toolwithin this workspace are specifically designed to help you tackle hair and other complex edges. - Color Decontamination: Within
Select and Mask, theDecontaminate Colorsoption can help remove color fringing from the edges of your selection, which is often the cause of halos. - Manual Cleanup: Even with advanced tools, some manual cleanup might be necessary. Using a small, soft-edged brush on your layer mask, with either black or white paint, allows you to meticulously paint away or restore small areas to perfect the edge.
Advanced Techniques and Creative Possibilities
Photoshop's capabilities extend beyond simple color replacement, offering avenues for more creative background transformations.
Gradient Backgrounds and Ombre Effects
Instead of a solid color, you can create dynamic backgrounds using gradients.
- Create a New Layer: Add a new layer below your subject.
- Select the Gradient Tool: Choose the
Gradient Toolfrom the toolbar. - Configure the Gradient: In the Options bar, select the type of gradient you want (linear, radial, etc.) and choose your colors. You can use pre-set gradients or create your own custom ones by clicking on the gradient preview.
- Apply the Gradient: Click and drag on your new layer to apply the gradient.
This is perfect for creating subtle ombre effects or more vibrant, multi-colored backgrounds.
Textured Backgrounds
For a richer look, you can replace the background with a texture.
- Place Your Texture: Open your desired texture image (e.g., paper, fabric, concrete) and place it into your Photoshop document. You can do this by going to
File > Place EmbeddedorFile > Place Linked. - Position and Resize: Position and resize the texture layer so it covers the entire background area.
- Clipping Mask: To ensure the texture only affects the background and not your subject, place the texture layer above your subject layer and create a clipping mask. Right-click the texture layer and select
Create Clipping Mask, or use the shortcutAlt + Ctrl + G(Windows) /Option + Cmd + G(Mac).
Changing Background Color of a Group of Layers
If your project involves multiple layers that form a cohesive element, you might want to change the background color of the entire group.
- Group Your Layers: Select all the layers you want to group and press
Ctrl + G(Windows) orCmd + G(Mac) to group them. - Create a New Layer for Background: Create a new layer below this group.
- Fill with Color: Fill this new layer with your desired background color using the
Paint Bucket Toolor keyboard shortcuts.
Alternatively, you can select the layer group, then go to Layer > New > Group from Layers to create a new group. Then, select this new group and apply a Color Overlay layer style (Layer > Layer Style > Color Overlay). This method allows you to easily change the overlay color at any time.
3D Environments
For those working with 3D elements within Photoshop, changing the background color can also be achieved through environment settings.
- Access Environment Settings: Go to
3D > Scene > Environment. - Choose Color: From the environment map options, you can select a desired color for the scene's ambient lighting and background.
Considerations for PDF Backgrounds
It's worth noting that if you're working with PDF files in Photoshop, changing the background color might only affect how the PDF displays on your screen within Photoshop. The underlying PDF structure might not be altered in a way that changes how it appears in other PDF viewers or is printed, unless you specifically export or save the file in a format that preserves these changes.
Conclusion: Empowering Your Creative Vision
Changing background colors in Photoshop, whether for a simple design document or a complex photographic edit, is a fundamental skill that, once mastered, opens up a world of creative possibilities. The key lies in understanding the different tools available, from the intuitive Select Subject and Quick Selection Tool to the powerful layer masking and adjustment layers. By practicing these techniques, especially those that focus on refining edges and handling fine details, you can transform your images and designs with clean, professional, and impactful background color changes. Remember that nondestructive editing, like using fill layers and layer masks, is your best friend, allowing for flexibility and iteration throughout your creative process.
tags: #replace #background #color #photoshop