Photoshop offers a powerful suite of tools to replicate the vibrant, glowing aesthetic of neon lights. Achieving this eye-catching effect involves a meticulous layering process, combining layer styles, blending modes, and carefully applied gradients. This tutorial will guide you through the steps, from setting up your document to adding the final luminous touches, allowing you to create your own captivating neon designs.
Setting the Stage: Document Setup and Background
The foundation of any compelling Photoshop effect is a well-prepared document. To begin, navigate to File > New to create a new document. The dimensions can be tailored to your specific project needs, but for practice, a standard canvas size will suffice.
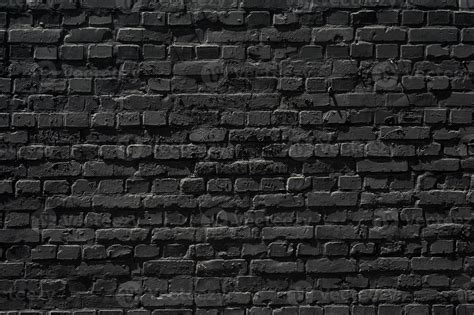
The first crucial step in learning how to make neon text in Photoshop is establishing the background. This sets the mood and provides the contrast necessary for the neon elements to pop. A common and effective approach is to use a textured background that mimics a dark, urban environment, reminiscent of where one might encounter actual neon signs.
To achieve this, go to File > Place Embedded. Locate and open a grunge grey brick wall texture background image. This texture adds depth and realism, preventing the neon from appearing to float in a void. Once the texture is placed, it’s often beneficial to slightly darken it to enhance the luminosity of the subsequent neon layers. This can be accomplished by adding a new fill or adjustment layer. Click the "Create new fill or adjustment layer" icon and choose "Hue/Saturation." Within the Hue/Saturation properties, you can decrease the lightness to achieve a darker, more atmospheric background.
Crafting the Neon Core: Text and Initial Styling
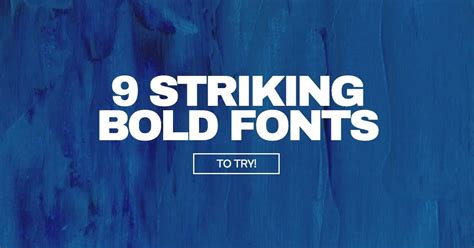
With the background in place, it's time to introduce the core element of your neon design: the text. For a strong neon presence, it's essential to choose bold fonts that will give a strong presence to the neon effect. Open your text tool and type out your desired word or phrase. The font "Meragen" is specifically recommended for its suitability in creating a neon sign effect, and it’s best to use it in All Caps for maximum impact. Set the color to #a33e88 and a substantial Size of 295 pt. This large, bold text will serve as the base for our neon glow.
To build the complex glow of a neon tube, the single text layer needs to be deconstructed and manipulated. Duplicate the text layer. This duplicate will be essential for creating the inner glow and the outer halo. Make the original text layer invisible for now by clicking the eye icon next to it.
What we'll be doing next is separating the vertical and diagonal parts of the neon text letters from the horizontal ones. This separation allows for more nuanced control over the lighting and thickness of different parts of the letterforms, mimicking how neon tubes are bent and joined. Select the visible text layer. You can then use selection tools like the Pen tool or Marquee tools to select specific parts of the letters. For instance, select all the vertical strokes and diagonal elements. Once selected, go to Edit > Cut, and then Edit > Paste Special > Paste in Place. This action will place the selected parts-the vertical and diagonal components-onto a separate, new layer. This layer will be instrumental in building the core neon light effect.
Building the Glow: Inner and Outer Radiance
Now we'll make neon letters in Photoshop, and the next step is to add some neon light in Photoshop. Here, we'll add an Inner Glow to the neon text in Photoshop. This effect is crucial for simulating the light emitted from within the neon tube itself.
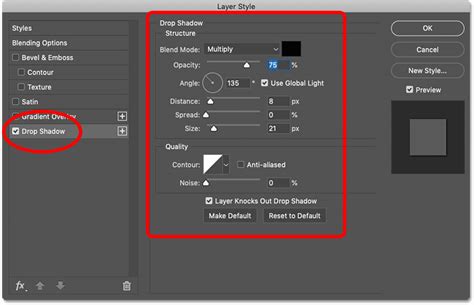
Double-click the original text layer (which should now be the horizontal components) to open the Layer Style dialog box. Navigate to the "Inner Glow" option. Here, you'll experiment with settings to create the initial glow. The color of the Inner Glow should be a vibrant hue that complements the base text color. For example, if your base text is a deep pink, an Inner Glow of a lighter, more intense pink or even a complementary color could be used. The "Blend Mode" for the Inner Glow is typically set to "Screen" or "Linear Dodge (Add)" to simulate light emission. Adjust the "Choke" and "Size" parameters to control the intensity and spread of the inner glow. A higher "Choke" value will make the glow more concentrated near the edges, while a larger "Size" will make it spread further into the text.
Learning how to make a neon sign in Photoshop is a matter of working diligently on all the layers. This iterative process of adding and refining effects is key.
The neon letters in Photoshop are coming together, but they need more depth. Now, let's work on the next layer of our neon sign Photoshop design. Select the layer containing the vertical and diagonal parts of the text that you separated earlier. Double-click this layer to access its Layer Styles.
We will apply a Bevel and Emboss effect to these parts to give them a sense of depth and curvature, mimicking the rounded edges of a neon tube. Adjust the "Angle" and "Altitude" values. For the vertical and diagonal parts, changing the "Angle" to 1 and "Altitude" to 97 can help create a specific lighting direction that enhances the perceived three-dimensionality of these elements. Experiment with the "Style" (e.g., "Inner Bevel") and "Technique" (e.g., "Smooth") to fine-tune the appearance.
Now, we'll move to the next layer of our neon sign Photoshop design. We need to ensure consistency and further enhance the neon look. Copy the layer style from the original horizontal text layer (which already has its Inner Glow applied) and paste it onto the vertical and diagonal layer. This ensures that both parts share the same fundamental glow.
However, to differentiate the lighting and depth of the vertical and diagonal components from the horizontal ones, we'll make further adjustments within the Bevel and Emboss settings of the vertical copy layer. Double-click the vertical copy layer to re-open its Layer Styles. Change the "Bevel and Emboss" effect's "Angle" to 180 and its "Altitude" to 72. This shifts the perceived light source, creating a more dynamic and realistic lighting scenario.
In the "Inner Glow" settings for this vertical copy layer, you might want to further refine the glow. Change "Choke" to 61 and "Size" to 15. These specific values help create a more concentrated and defined inner glow on the vertical and diagonal elements, making them appear brighter and more distinct.
Hang in there-the neon font Photoshop design is coming along nicely! The next step involves applying similar adjustments to another duplicated layer. Copy and paste the layer style from the second copy of the horizontal layer (assuming you made further duplicates for advanced effects) to the second copy of the vertical layer. Then, double-click this "Vertical copy 2" layer to modify its "Bevel and Emboss" effect. Change the "Angle" to 139 and the "Altitude" to 12. These specific adjustments are designed to build up layers of subtle lighting and shadow, contributing to a more complex and believable neon glow.
Adding Realism: Cables and Background Glow
Now, we'll add the finishing touches to the neon sign Photoshop design. To finish the neon lettering, we need to simulate the power source and connections. Set the Foreground color to #98338b, which is a deep, rich magenta. Pick the Brush Tool and choose a very big, soft, round tip. This large, soft brush is ideal for creating ambient glows and subtle lighting effects. Brush around the neon letters with this tool, on a new layer set to a blending mode like "Screen" or "Linear Dodge (Add)," to create a subtle background glow that emanates from the neon itself. This makes the neon appear to illuminate its immediate surroundings.
So far, our creation looks like a neon light font against a textured background. To add the connecting cables that power the neon sign, create another new layer below the "Background Light" layer (or whatever you named your background glow layer) and name it "Cable."
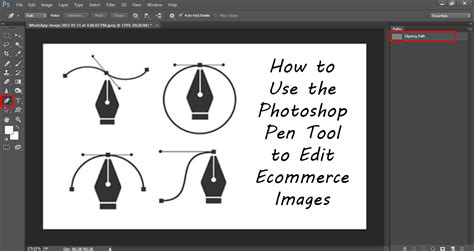
What you'll need to do next is create the paths where you want to add the cable. Using the Pen Tool (P), you can click to add corner anchor points, and click and drag to create smooth curves. This precise control allows you to draw the path of the cable realistically, snaking between the neon elements. Once the path is drawn, right-click on the path and select "Stroke Path." Choose "Brush" from the dropdown menu in the Stroke Path dialog box. Ensure your brush settings (size, hardness, and color) are appropriate for a thin cable-perhaps a dark grey or black with a small, hard brush. This will stroke the path, drawing the cable along the line you've defined.
Now that we've worked on the Photoshop neon effect text, let's focus on the next part. The neon effect Photoshop design is almost complete! To introduce more color variation and enhance the overall vibrancy, we can create a solid color adjustment layer. Click the "Create new fill or adjustment layer" icon again and choose "Solid Color." Use the color #a34799, a vibrant reddish-pink. Place this adjustment layer below the "Cable" layer but above the background texture. Change its "Blend Mode" to "Vivid Light." This blend mode will interact with the layers below, intensifying colors and adding a luminous, almost electric quality to the overall image.
Neon Text Effect in Photoshop - Fast & Easy
Enhancing Realism and Exploring Alternatives
Congratulations! In this neon effect Photoshop tutorial, we have successfully modified a brick texture background and darkened it. Once the main neon light text was created and styled with intricate layer effects, we added some more glow to the background to simulate ambient light, and used the Pen Tool to create the cable's path, adding a crucial element of realism.
The process of creating a convincing neon effect in Photoshop is multifaceted, involving careful layering and the strategic application of various Photoshop features. The core idea is to simulate the inner light source, the glowing tube, and the ambient illumination it casts.
If you want to save time or explore different stylistic avenues, there are numerous resources available. Simply download hundreds of text effects for Photoshop from platforms like Envato Elements. These often include pre-made neon Photoshop text effects and layer styles that can be applied with just a few clicks. This bundle typically has something for every project, offering text effects that look like shiny metal, wood, and a whole lot more, alongside neon options.
If you're looking for a neon Photoshop effect without needing to download a specific font, you might find resources that offer effects compatible with Illustrator as well. These often include ten different effects that work with both shapes and text, providing versatility.
If you don't want to make neon text in Photoshop from scratch, downloading pre-made assets is a wise choice. Many of these allow you to customize the colors of the neon sign, and some even include options to add braces or other elements for more realism, truly mimicking a physical neon sign. This isn't just a neon font in Photoshop-it's often a full typeface or a comprehensive layer style that you can use across a number of projects, and stylishly at that.
For those who appreciate a neon light font that looks modern, exploring options like "Saberz" can be beneficial. This neon sign font often comes with numbers, symbols, and multilingual characters, making it a robust choice for diverse design needs.
As you're probably already aware, Photoshop can do much more than just neon text effects! Its capabilities extend to creating a vast array of visual styles, and mastering techniques like the neon effect can open up a world of creative possibilities for your graphic design projects. Experimentation with different fonts, colors, shapes, and layer effects will allow you to create a wide variety of unique and captivating neon light effects.
For instance, scaling a duplicated layer slightly larger than the original can be used to create a subtle halo or an outer blur effect, further enhancing the glow. Feel free to experiment with different colors and shapes beyond text to create various neon light effects, such as glowing lines, borders, or abstract shapes. Graphic artist Erica Larson, an associate creative director on the Adobe Studio team, often dreams up inspired designs, demonstrating the creative potential within these tools. For practice, you can utilize sample files with Adobe Stock images, which can be purchased for continued use beyond the tutorial.
When working with shapes, the Pen tool is invaluable. As demonstrated by Larson, using the Pen tool, one can click three points to draw a triangle around a hand, for example, to isolate or highlight specific elements within a design, or to create custom neon shapes. To hide parts of your neon shape, you can select the mask (the white icon on the layer) and then set the Brush tool to black and brush over the areas you wish to conceal, effectively creating cutouts or specific placements for your neon elements.
The process of defining patterns can also be integrated. Opening a texture file like "Texture_02" and going to Edit > Define Pattern allows you to use that texture as a repeatable element within your design, perhaps for a background or a subtle overlay.
The journey of mastering Photoshop effects is one of continuous learning and experimentation. By understanding the interplay of layer styles, blending modes, and precise adjustments, you can bring the vibrant energy of neon lights into your digital creations.