Understanding how to resize an image in Photoshop is a fundamental skill for any digital artist, photographer, or graphic designer. Whether you're preparing an image for web display, print, or simply managing file sizes, Photoshop offers a versatile toolkit to achieve precise results without compromising quality. This guide delves into the various methods and considerations for resizing images, from understanding the core concepts of pixels and resolution to utilizing advanced tools and AI-powered features.
The Building Blocks: Pixels, Resolution, and Dimensions
Before diving into the practical steps of resizing, it's crucial to grasp the underlying principles.
What is a Pixel?At its most basic, a pixel is the smallest measurable unit that can be displayed on your computer or mobile screen. Imagine them as tiny colored squares that, when joined together, form the images, shapes, text, and videos you see. Photoshop manipulates these individual pixels by adding, subtracting, or altering their color values to create the desired visual outcome.
What is Image Resolution?Image resolution, often measured in "PPI" (pixels per inch), refers to the density of pixels within a given area of an image. A higher PPI means more pixels are packed into each inch, resulting in greater detail and a sharper appearance. For instance, a 5x5 inch photo displayed at 300 PPI would contain 1500 pixels along each edge (5 inches * 300 pixels/inch = 1500 pixels). If this same photo were displayed at 72 PPI, it would only contain 360 pixels per edge (5 inches * 72 pixels/inch = 360 pixels). This difference is significant, impacting how well an image can be enlarged or printed.
Dimensions: Pixels vs. Physical SizeAn image's dimensions can be described in two main ways: by its pixel count (e.g., 1500x1500 pixels) or by its physical size (e.g., 5x5 inches). A higher number of pixels allows for greater flexibility in changing physical dimensions with less loss of quality. Conversely, an image with fewer pixels will become noticeably degraded, or "pixelated," when enlarged.
Resizing vs. Resampling: A Crucial Distinction
When discussing image manipulation in Photoshop, the terms "resizing" and "resampling" are often used interchangeably, leading to confusion. However, they represent distinct processes:
- Resizing an image, in its purest sense, involves changing the physical dimensions (width and height) without altering the total number of pixels. This can lead to the image being "squashed" or "stretched" if the aspect ratio isn't maintained.
- Resampling an image, on the other hand, involves Photoshop actively adding or subtracting pixels to accommodate changes in dimensions or resolution. When you resample, Photoshop's algorithms interpret the existing pixel data to create new pixels (upscaling) or discard pixels (downscaling), aiming to preserve as much detail and quality as possible.
The "Resample" checkbox in Photoshop's Image Size dialog box is key to this distinction. Keeping it checked allows Photoshop to intelligently alter the pixel data.
Method 1: The Image Size Dialog Box - Your Primary Tool
The "Image Size" dialog box is the cornerstone of image resizing in Photoshop. Accessed via Image > Image Size, it provides a comprehensive suite of controls.
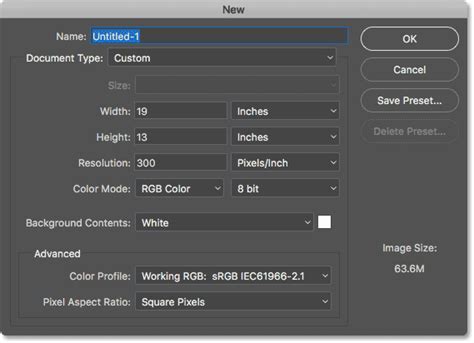
Upon opening the dialog, you'll see two key pieces of information:
- Image Size: This indicates the file size of your image, representing the storage space it occupies. Larger file sizes demand more processing power from your computer. File size is influenced not only by pixel dimensions but also by factors like file type, bit depth, and the number of layers.
- Dimensions: This displays your image's size in pixels. For online projects, working with pixels is standard. For print, you'll typically use inches or millimeters, which are preferred by printers and clients.
Within the Image Size dialog, you'll find several critical settings:
- Fit to: This offers presets for common online and print resolutions, automatically adjusting dimensions and resolution for quick edits.
- Width and Height: Here, you can directly input your desired image dimensions. You can choose your unit of measurement from a drop-down menu, including pixels, inches, points, and percentage.
- Constrain Proportions (Chain Link Icon): This icon, located next to Width and Height, is crucial for maintaining an image's aspect ratio. When activated, changing the width automatically adjusts the height proportionally, preventing distortion.
- Resolution: This setting controls the pixel density (PPI). As discussed, higher PPI is generally better for print and detailed display. For most web uses, 72 PPI is sufficient.
- Resample: This checkbox, when selected, enables Photoshop to add or remove pixels as you change the image dimensions. This is where the intelligent algorithms come into play.
Steps to Resize Using Image Size:
- Preserve Your Original: Before making permanent changes, it's always wise to create a copy of your image. Go to File > Save As and save a new version.
- Access Image Size: Navigate to Image > Image Size.
- Adjust Dimensions: Enter your desired values for Width and Height. Ensure the chain link icon is active to maintain proportions unless you have a specific reason to distort the image.
- Set Resolution: Adjust the Resolution (PPI) according to your intended use.
- Select Resampling Method: If "Resample" is checked, choose an appropriate interpolation method from the drop-down menu.
Understanding Resampling Methods
When resampling is enabled, Photoshop offers various interpolation methods to determine how it creates or discards pixels. Each method has strengths and weaknesses, making it essential to choose wisely based on whether you are enlarging or reducing an image:
- Automatic: Photoshop makes the decision for you. Good for general purposes but can be less predictable for extreme scaling.
- Preserve Details (enlargement): Designed for upscaling, this method aims to maintain detail and offers a "Reduce Noise" option to smooth results.
- Preserve Details 2.0: An enhanced version for enlargement, focusing on retaining the highest level of detail and also offering noise reduction.
- Bicubic Smoother (enlargement): Produces smooth results when enlarging images.
- Bicubic Sharper (reduction): Ideal for sharp and detailed results when reducing image size.
- Bicubic (smooth gradients): A balanced option for sharper images or when Bicubic Sharper is too aggressive.
- Nearest Neighbor (hard edges): Fast but less precise, this method replicates the nearest pixels, preserving hard edges.
- Bilinear: Offers medium-quality results by averaging surrounding pixels to create new ones.
Experimenting with these methods on your specific image is often the best way to determine which yields the optimal outcome.
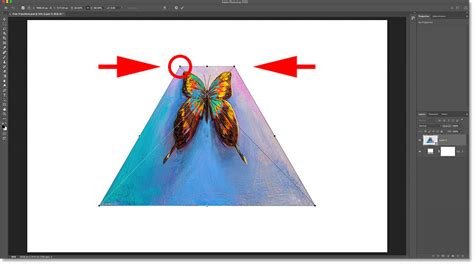
Method 2: Transform Tool for Quick Resizing
For more immediate resizing, especially when working with a specific layer or the entire image, the Transform tool is invaluable.
- Activate Transform: Press Ctrl + T (Windows) or Cmd + T (Mac) to activate the Free Transform tool. A bounding box with handles will appear around your image or selected layer.
- Drag Corners: Click and drag any of the corner handles to resize the image.
- Maintain Proportions: To resize proportionally, hold down the Shift key while dragging a corner.
- Precise Dimensions: Alternatively, you can enter exact dimensions in the Options bar that appears at the top of the screen once the Transform tool is active.
Method 3: Scaling Layer Effects
When an image layer has layer styles applied (like drop shadows or strokes), simply resizing the layer might not scale these effects correctly.
- Select Layer: In the Layers panel, select the layer containing the effects you want to scale.
- Scale Effects: Go to Layer > Layer Style > Scale Effects. You can also right-click the FX icon on the layer and choose "Scale Effects."
- Adjust Percentage: Enter a percentage or drag the slider to scale the applied effects proportionally with the layer content.
For more complex scenarios or to ensure maximum flexibility, converting the layer to a Smart Object before transforming can be highly beneficial. Smart Objects allow for non-destructive transformations, meaning you can resize them multiple times without losing original image data.
Method 4: Batch Resizing with Image Processor
For users who need to resize multiple images simultaneously, Photoshop's "Image Processor" script is a powerful time-saver.
- Access Image Processor: Navigate to File > Scripts > Image Processor.
- Select Images: Choose the images or folder you want to process.
- Set Output Location: Specify where the resized images should be saved.
- Choose Size and Format: You can select desired dimensions, resolution, and file formats (JPEG, PSD, TIFF) for the output images.
- Run Script: Click "Run" to initiate the batch resizing process.
How to Batch Resize Images in Photoshop
Method 5: Adjusting Canvas Size
Sometimes, you don't want to resize the image content itself but rather add or remove space around it. This is where the "Canvas Size" dialog comes in.
- Access Canvas Size: Go to Image > Canvas Size.
- Adjust Dimensions: Enter new values for Width and Height. You can choose units like pixels, inches, or percentages.
- Anchor Point: The "Anchor" box allows you to determine where the new canvas area will be added or removed from. The central dot represents your current image, and the surrounding dots indicate where the canvas will expand.
- Canvas Extensions: You can choose the color for any new canvas areas that are added.
This method is particularly useful for creating space for backgrounds or cropping an image to a specific aspect ratio without altering the existing content's scale.
Method 6: Cropping to Size with the Crop Tool
The Crop Tool (shortcut C) is ideal for reducing an image to a specific size or aspect ratio.
- Select Crop Tool: Choose the Crop Tool from the toolbar.
- Set Aspect Ratio: In the Options bar at the top, you can select a preset aspect ratio (e.g., 16:9) or enter custom dimensions.
- Adjust Crop Box: Drag the handles of the crop box to define the area you want to keep. The tool will automatically maintain the chosen aspect ratio.
- Commit Crop: Press Enter or click the checkmark icon to apply the crop.
Be mindful that some crop presets might also affect the image's PPI, especially if they are designed for specific print sizes.
Method 7: Exporting for Web and Devices
When preparing images for the web or to share, using Photoshop's export functions is essential for optimizing file size without significant quality loss.
- Export As: Navigate to File > Export > Export As. This dialog offers a preview of your image with various file formats (PNG, JPEG, GIF), quality settings, and resizing options. You can adjust dimensions, canvas size, and resampling here before exporting. It also allows you to remove metadata.
- Quick Export: For rapid export in a default format (usually PNG), use File > Export > Quick Export as PNG.
- Save for Web (Legacy): The File > Export > Save for Web (Legacy) option provides a comprehensive interface to preview the impact of different file types and compression settings on image quality and file size. This is invaluable for fine-tuning web images.
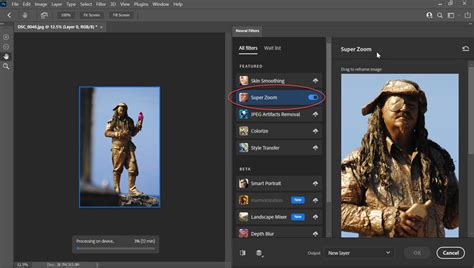
Method 8: Leveraging AI with Neural Filters (Super Zoom)
Photoshop's Neural Filters, powered by Adobe Sensei AI, introduce cutting-edge capabilities, including the "Super Zoom" feature.
- Access Neural Filters: Go to Filter > Neural Filters.
- Install Super Zoom: If not already installed, download the Super Zoom filter by clicking the cloud icon.
- Apply Super Zoom: Select the Super Zoom filter. You can then use zoom controls or manually define an area to enlarge. The AI intelligently reconstructs pixels to enhance detail.
- Refine Options: The filter may offer options like "Remove JPEG Artifacts" and "Enhance Face Details" to further improve the result.
- Output: Choose whether to output the processed image as a New Document or a New Layer.
The Super Zoom feature can produce remarkably crisp results, often outperforming traditional resizing methods, especially when dealing with challenging enlargements.
By mastering these diverse methods within Photoshop, you gain the power to precisely control image dimensions and resolution, ensuring your visuals are perfectly optimized for any application. Whether you're a seasoned professional or a beginner, understanding these techniques will elevate your workflow and the quality of your final output.