Photoshop offers a robust suite of tools for isolating subjects and creating intricate masks, a fundamental skill for any digital artist or photographer. The "Select and Mask" workspace is a powerful environment designed to refine these selections, transforming a rough cutout into a polished, professional result. This guide delves into the various techniques and tools available, from initial subject detection to the final output, ensuring you can tackle even the most challenging selections with confidence.
Initiating the Selection: From Subject to Rough Outline
Before diving into the refined world of "Select and Mask," a foundational selection of the subject is necessary. Photoshop provides several automated and manual methods to achieve this. A highly efficient starting point is the "Select Subject" command, accessible through the "Select" menu or directly from the Options bar when certain selection tools are active. This AI-powered feature, leveraging Adobe Sensei, attempts to intelligently identify and select the primary subject within an image.

For images with clear subjects and contrasting backgrounds, "Select Subject" can often provide a surprisingly good initial selection with a single click. However, it's crucial to understand that this is rarely the final step. Often, "Select Subject" may include unwanted background elements or exclude parts of the subject, particularly in complex areas like hair or fine details.
Once "Select Subject" has been applied, a quick cleanup with manual selection tools can be beneficial. The "Lasso Tool," for instance, allows for freehand drawing of selection outlines. Holding down the "Shift" key while using the Lasso Tool adds to the existing selection, while pressing "Option" (Mac) or "Alt" (PC) subtracts from it. This manual refinement helps to correct any immediate inaccuracies introduced by the automated selection.
Another essential tool for creating a rough selection is the "Quick Selection Tool." Located in the Photoshop toolbar, this intuitive tool works by simply painting over an area you wish to select. As you paint, Photoshop intelligently expands the selection to encompass similarly colored and textured areas. It's incredibly helpful for quickly building up a selection or cleaning up larger areas and gaps within the subject, such as between limbs. Scanning around the image with the "Quick Selection Tool" can reveal areas where it can assist in refining the initial selection.
The Select and Mask Workspace: Precision Refinement
Once a basic selection is established, the "Select and Mask" workspace opens a dedicated environment for detailed refinement. This workspace is a mini-program within Photoshop, offering a tailored set of tools and controls specifically for improving selections and layer masks.
Upon entering "Select and Mask," you'll find a toolbar on the left containing familiar tools like the "Brush Tool," "Hand Tool," and "Zoom Tool," alongside specialized selection tools. Among these, the "Quick Selection Tool" and the "Object Selection Tool" are particularly valuable within this workspace. The "Object Selection Tool," when hovering over an object, will highlight it in pink, indicating it can be selected. If it doesn't automatically detect the object accurately, you can click and drag to draw a rectangle around it.
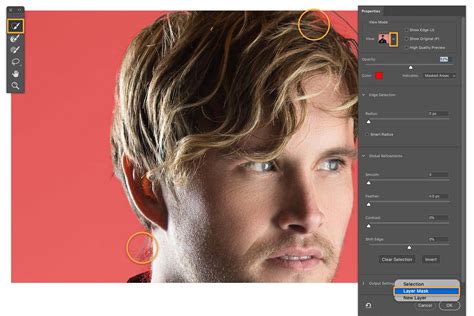
The "Select and Mask" workspace also provides various "View Modes" to help you better perceive the selection's accuracy. These include:
- Overlay: Displays the unselected areas with a transparent color overlay. The default color is red, but this can be changed to any color, which is useful if the default red is present in your subject. Adjusting the opacity of this overlay allows for better visualization of the selection's edges.
- Onion Skin: Shows the selection as a semi-transparent overlay against the background, with adjustable transparency.
- On Black/On White: Places the selection against a solid black or white background, respectively. This is useful for spotting halos or imperfections.
- On Layers: Surrounds the selection with transparency, allowing you to see how it will appear against other layers.
- Black and White: Displays the selection as a black and white mask, mirroring how a layer mask functions. White areas are selected, black areas are masked, and gray areas represent partial transparency. This view is exceptionally helpful for identifying missed spots or areas that are too heavily masked.
The "Properties" panel, located on the right side of the workspace, is where the core refinement tools reside. Here, you can adjust settings that significantly impact the quality of your selection.
Edge Detection and Refinement Tools
Within the "Properties" panel, the "Edge Detection" section offers crucial tools for tackling difficult edges. The "Radius" slider controls the thickness of the area around the selection border where Photoshop will analyze for edge detail. A small radius is suitable for sharp edges, while a larger radius is necessary for soft edges, hair, or fur. "Smart Radius" attempts to dynamically adjust the radius based on the subject's details, which can be beneficial but should be used with careful observation. Ticking "Show Edge" provides a visual representation of the radius's influence.
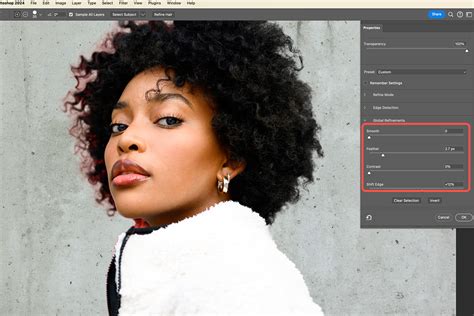
The "Adjust Edge" section offers further control:
- Smooth: Helps to smooth out jagged or irregular selection edges.
- Feather: Softens the transition between the selected and unselected areas. A small amount of feathering can create a more natural look, especially for subjects that don't have sharp, defined edges. However, be aware that excessive feathering can make the selection appear blurry.
- Contrast: Increases the sharpness of the selection edge. This can be useful for solidifying soft edges but should be applied judiciously.
- Shift Edge: This slider allows you to expand or contract the selection boundary. A negative value shifts the edge inwards, which is useful for removing subtle background fringes, while a positive value expands it outwards.
One of the most challenging aspects of selections is often hair and fine details. Photoshop addresses this with specialized tools. The "Refine Edge Brush Tool" (often accessed by painting with the "Brush Tool" in "Select and Mask" or by using the "Refine Edge Brush" option) is invaluable. By painting over areas like hair, Photoshop analyzes the pixels and attempts to intelligently separate the subject from the background.
A particularly powerful, albeit sometimes temperamental, feature is the "Refine Hair" button. Clicking this can automate a significant portion of the hair selection process. It's often worth trying "Refine Hair" and then evaluating the results, potentially undoing and trying alternative approaches if it doesn't yield the desired outcome. When using refinement tools, the "Refine Mode" setting-either "Color Aware" or "Object Aware"-can influence the outcome. "Color Aware" is generally best for simple backgrounds, while "Object Aware" can sometimes provide better results with more complex imagery. Experimenting with both is recommended.
Decontaminating Colors and Output Options
A common issue encountered when cutting out subjects is the presence of color fringes-subtle halos of the background color bleeding into the edges of the subject. The "Decontaminate Colors" option in "Select and Mask" is designed to address this. When enabled, it attempts to replace these color fringes with the color of the fully selected pixels nearby, effectively cleaning up the edges. This option often significantly improves the overall look, but it's important to note that it typically requires outputting to a "New Layer" or "New Document" as it modifies pixel data.
Once you are satisfied with the refinement of your selection, the "Output To" settings determine how Photoshop will apply these changes. The common options include:
- Selection: Outputs a standard Photoshop selection.
- Layer Mask: Applies the selection as a Layer Mask to the current layer. This is a non-destructive method, allowing for future edits.
- New Layer: Creates a new layer containing only the selected subject.
- New Layer with Layer Mask: This is a highly recommended output setting. It creates a new layer with the selected subject and simultaneously applies a Layer Mask based on your refined selection. This preserves the original layer and provides maximum flexibility for further editing.
- New Document: Creates a new Photoshop document containing the selected subject.
- New Document with Layer Mask: Similar to "New Layer with Layer Mask," but outputs to a new document.
For most workflows, outputting to "New Layer with Layer Mask" is the preferred choice due to its non-destructive nature and the immediate application of a mask that can be further adjusted.
Working with Layer Masks Beyond Select and Mask
Layer Masks are fundamental to non-destructive editing in Photoshop, and the "Select and Mask" workspace is often just the beginning of their application. Understanding how to manipulate and refine Layer Masks is crucial for ongoing image editing.
To add a Layer Mask to an existing layer, you can click the "Add Layer Mask" icon at the bottom of the Layers panel. Alternatively, you can create custom keyboard shortcuts for this action via "Edit > Keyboard Shortcuts."

Layer Masks can be edited directly. Painting with black on a mask conceals parts of the layer, while painting with white reveals them. Grays create semi-transparency. You can also convert a Layer Mask into a selection by "Command-clicking" (Mac) or "Control-clicking" (PC) on the Layer Mask thumbnail in the Layers panel. This selection can then be used for further editing or to create other masks.
To delete a Layer Mask, simply drag the mask thumbnail to the Trash icon in the Layers panel. Holding "Option + Shift" (Mac) or "Alt + Shift" (PC) while dragging the Layer Mask thumbnail creates a copy of the mask while simultaneously inverting it, which can be a quick way to flip between showing and hiding different parts of a layer.
Sometimes, after creating a mask, small imperfections or missed areas might remain. A helpful technique to identify these is to temporarily add a layer style, such as a bright red stroke ("Layer > Layer Style > Stroke"), to the layer. This stroke will appear around any small areas that have been accidentally left unselected or are still visible through the mask, making them easy to spot and correct with the Brush Tool.
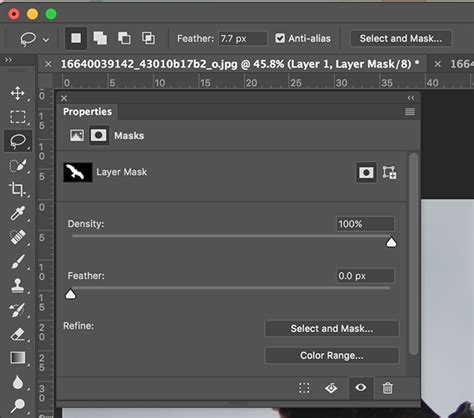
The "Properties" panel offers non-destructive ways to refine masks outside of the "Select and Mask" workspace. The "Feather" slider here allows you to soften the mask's edges without permanently altering the mask itself, and the "Density" slider controls the overall opacity of the mask.
For creating masks based on the transparency of another layer, you can select the layer you want to add the mask to, and then drag another layer to the "Add Mask Icon" at the bottom of the Layers panel. The transparency of the dragged layer will then define the mask.
When working with gradients within a mask, changing the blend mode of the painting tool can be very helpful. If a gradient mask isn't quite right, you can easily paint another gradient to replace it, offering flexibility.
Advanced Selection and Masking Scenarios
While "Select and Mask" is a powerful tool, certain complex scenarios might require different approaches or a combination of techniques. For instance, when dealing with very fine, wispy hair or intricate textures like fur, a multi-step process might yield the best results. This could involve initial automated selections, followed by meticulous refinement using the "Refine Edge Brush Tool" and potentially manual painting on the Layer Mask with soft-edged brushes.
The concept of "outputting" a selection is also worth considering beyond the immediate "Select and Mask" dialog. If you've made a complex selection and want to save only the masked area without the surrounding canvas, you might export specifically the visible content of the layer. However, the most common workflow involves using Layer Masks, which inherently define what is visible and what is not, without altering the original image data. If you've used a rectangular mask to crop an image and want to save only that cropped area, the Layer Mask itself achieves this. When saving for web or exporting, ensure you are saving the layer with its mask applied, or flattening the image if a final, combined output is desired.
The ability to merge bracketed photos together in Adobe Camera Raw (ACR), a feature new in Photoshop CC 2015, demonstrates how selection and masking principles can extend to advanced compositing and HDR workflows.
Ultimately, Photoshop offers a vast array of tools and techniques for making selections and masks. The "Select and Mask" workspace is a central hub for refining these selections, particularly for challenging areas like hair and fur. However, the true mastery comes from understanding how these tools interact and when to employ different methods based on the specific image and desired outcome. Experience gained from working on diverse images and experimenting with various approaches is invaluable for accelerating your learning and achieving professional-level results.
Bob is a lens-based artist who has authored books and articles on photography and presented seminars globally. As a former Panasonic Lumix Ambassador, he stays current with micro four-thirds camera technology and now uses OM System cameras. Coates is a commercial and fine art photographer and photo educator based in Sedona, AZ. He offers workshops on Milky Way and Night Sky Photography in Sedona, a Dark Sky Community.
Radiant Photo offers superior quality finished photos with perfect color rendition, delivered quickly. Mylio Photos provides cloud-free access to your photo library from anywhere.
Consider exploring free Photoshop tutorials online to further hone your skills. For those seeking in-depth learning, free online training sessions featuring technical boot camps and sessions on photography, video, business, and social media are available. By supporting their partners and affiliates, you help keep content on platforms like Photofocus free.