Navigating the complexities of Adobe InDesign, a cornerstone of modern desktop publishing, can be significantly streamlined by understanding and utilizing its extensive array of keyboard shortcuts. While memorizing all 407 shortcuts present in the latest InDesign version might seem an insurmountable task, focusing on the most frequently used ones can dramatically boost efficiency. This article delves into the world of InDesign preview shortcuts, offering insights into their functionality, customization, and the broader advantages of integrating keyboard shortcuts into your design workflow.
Understanding InDesign's Preview Modes
Before exploring the shortcuts, it's crucial to grasp what InDesign's preview modes entail. Preview modes allow designers to visualize how their final output will appear, stripped of non-printing elements like guides, frames, and bleed areas. This is essential for client presentations and for ensuring the design adheres to specifications.
InDesign offers several preview modes accessible through the user interface and the menu bar. The most fundamental is the Normal mode, which displays the standard working environment with all guides and elements visible. This is the default mode.
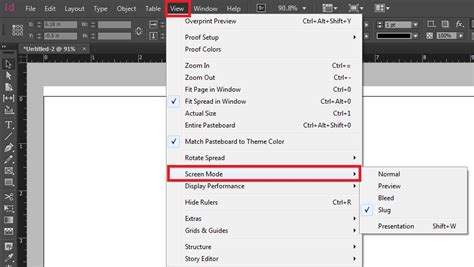
To access different preview options, one can navigate to the View menu in the menu bar and select Screen Mode. Within this submenu, various options dictate how the document is displayed.
The Power of 'W' Key: A Gateway to Preview
Perhaps one of the most frequently cited and useful shortcuts for previewing is the W key. This single keystroke toggles between the Normal mode and a preview mode that hides interface elements, offering a cleaner view of the design. This is invaluable for quick checks of the visual impact of your layout without the clutter of guides and frames.
Beyond the simple toggle, InDesign offers more specialized preview options. For instance, to see how your document will appear with bleed and slug areas considered, you might adjust document setup. The Document Setup dialog box, accessible via the File menu, allows for the precise definition of these areas. Once these are set, switching to a preview mode that incorporates them is essential.
Another important preview mode is the Presentation mode. This mode displays only the document on the screen, removing all InDesign interface elements, creating a full-screen immersive view of your design. This is particularly useful for client presentations where you want to showcase the work without any distractions.
Customizing Your InDesign Shortcut Experience
The sheer volume of available shortcuts necessitates a personalized approach for many users. Adobe InDesign empowers users to create their own shortcuts or modify existing ones to better suit their workflow. This customization is a powerful tool for enhancing productivity, especially for commands used with high frequency.
To embark on this customization journey, follow these steps:
- Close all open documents if any are currently active. This ensures a clean slate for modifying settings.
- Navigate to the Edit menu and select Keyboard Shortcuts…. This action will open a dedicated window panel for managing shortcuts.
Within the Keyboard Shortcuts dialog box, you have several options:
- Select or create a new shortcut set: InDesign offers pre-defined shortcut sets, including "Default" and "QuarkXPress." It's important to note that these default sets cannot be directly edited. Instead, selecting one of them will create a new, editable set based on the chosen default. This preserves the original settings while allowing for your modifications.
- Select the product area: This allows you to browse through different categories of commands within InDesign, such as "File Handling," "Edit," "Type," "Object," and "View." Choosing the correct product area is crucial for locating the specific command you wish to assign or reassign a shortcut to.
- Select the command: Once the product area is selected, you can then pinpoint the exact command for which you want to define or redefine a keyboard shortcut.
- Assign a new shortcut: In the "New Shortcut" box, press the desired key combination. InDesign will register the keys you press.
- Avoid single-key shortcuts: It is strongly advised not to assign single-key shortcuts to menu commands. These can interfere with the normal typing of text, leading to unintended actions.
- Check for conflicts: If the key sequence you've chosen is already in use for another command, InDesign will display the conflicting command under the "Current Shortcut" label. This allows you to decide whether to overwrite the existing shortcut or choose a different key combination.
- Contextual shortcuts: You can specify when a shortcut should function by changing the "Context." This feature is particularly powerful. For example, you can assign
Cmd+Gto group objects when you have multiple objects selected (Object Context), or the sameCmd+Gto merge cells in a table when cells are selected (Table Context). If you select "Default Context," the shortcut will work regardless of the current document state. This ability to assign multiple commands to a single shortcut, differentiated by context, significantly enhances efficiency for complex workflows. - Save your changes: Click "OK" to save your new shortcut and close the dialog box. Alternatively, if you wish to continue adding more shortcuts without closing the dialog, click "Save."
Creating Keyboard Shortcuts in InDesign
Beyond Previews: Essential InDesign Shortcuts for Productivity
While preview shortcuts are critical for visualizing your design, a broader understanding of InDesign's keyboard shortcuts can elevate your overall productivity. Many essential commands have readily available shortcuts that can save considerable time.
Here's a glimpse into some other crucial shortcut categories and examples:
Navigation and Selection
- Switching between Selection Tools:
- Mac:
V(Selection Tool),A(Direct Selection Tool) - Windows:
V(Selection Tool),A(Direct Selection Tool)
- Mac:
- Zooming:
- Mac:
Command + Space + Click(Zoom In),Option + Space + Click(Zoom Out) - Windows:
Ctrl + Space + Click(Zoom In),Alt + Space + Click(Zoom Out)
- Mac:
- Fit Page to Window:
- Mac:
Command + 0 - Windows:
Ctrl + 0
- Mac:
Text and Type Formatting
- Increase/Decrease Font Size:
- Mac:
Command + Shift + >(Increase),Command + Shift + <(Decrease) - Windows:
Ctrl + Shift + >(Increase),Ctrl + Shift + <(Decrease)
- Mac:
- Align Text:
- Mac:
Command + Shift + L(Left),Command + Shift + C(Center),Command + Shift + R(Right) - Windows:
Ctrl + Shift + L(Left),Ctrl + Shift + C(Center),Ctrl + Shift + R(Right)
- Mac:
- Create New Text Frame:
- Mac:
T - Windows:
T
- Mac:
- Toggle Character/Paragraph Formatting:
- Mac:
Command + Option + 7 - Windows:
Ctrl + Alt + 7
- Mac:
Layout and Object Handling
- Duplicate Object:
- Mac:
Option + Drag - Windows:
Alt + Drag
- Mac:
- Group/Ungroup Objects:
- Mac:
Command + G(Group),Command + Shift + G(Ungroup) - Windows:
Ctrl + G(Group),Ctrl + Shift + G(Ungroup)
- Mac:
- Lock/Unlock Objects:
- Mac:
Command + L(Lock),Command + Option + L(Unlock All) - Windows:
Ctrl + L(Lock),Ctrl + Alt + L(Unlock All)
- Mac:
- Bring Forward/Send Backward:
- Mac:
Command + ](Bring Forward),Command + [(Send Backward) - Windows:
Ctrl + ](Bring Forward),Ctrl + [(Send Backward)
- Mac:
- Place Image:
- Mac:
Command + D - Windows:
Ctrl + D
- Mac:
Guides and Grids
- Show/Hide Guides:
- Mac:
Command + ; - Windows:
Ctrl + ;
- Mac:
- Snap to Guides:
- Mac:
Command + Shift + ; - Windows:
Ctrl + Shift + ;
- Mac:
- Create New Guide:
- Mac: Drag from ruler
- Windows: Drag from ruler
Layers and Panels
- Open Layers Panel:
- Mac:
F7 - Windows:
F7
- Mac:
- Duplicate Layer:
- Mac:
Option + Draglayer in panel - Windows:
Alt + Draglayer in panel
- Mac:
File and Editing
- Undo/Redo:
- Mac:
Command + Z/Command + Shift + Z - Windows:
Ctrl + Z/Ctrl + Shift + Z
- Mac:
- Save:
- Mac:
Command + S - Windows:
Ctrl + S
- Mac:
- Export:
- Mac:
Command + E - Windows:
Ctrl + E
- Mac:
Miscellaneous
- Toggle Toolbox Visibility:
- Mac:
Tab - Windows:
Tab
- Mac:
- Select All:
- Mac:
Command + A - Windows:
Ctrl + A
- Mac:
- Toggle Full-Screen Mode:
- Mac:
Shift + W - Windows:
Shift + W
- Mac:
- Spell Check:
- Mac:
Command + I - Windows:
Ctrl + I
- Mac:
- Find and Replace:
- Mac:
Command + F - Windows:
Ctrl + F
- Mac:
- Activate Eyedropper Tool:
- Mac:
I - Windows:
I
- Mac:
- Align Objects to Page/Margins:
- Mac:
Shift + F7 - Windows:
Shift + F7
- Mac:
- Preview Document Without Distractions:
- Mac: `Command + Shift + ``
- Windows: `Ctrl + Shift + ``

Further Productivity Enhancements
Beyond keyboard shortcuts, InDesign offers other avenues for boosting productivity:
- Automation with Scripts and GREP: InDesign scripts and GREP (General Expression for Regular Expressions) expressions can automate repetitive tasks, saving significant time on complex projects.
- Multilingual Projects: For those working on multilingual materials, understanding InDesign's features for handling different languages can streamline the process.
- Avoiding Common Mistakes: Familiarizing yourself with common InDesign pitfalls can prevent time-consuming errors and rework.
- Learning Resources: Continuous learning through InDesign tutorials and courses can unlock new efficiencies and advanced techniques.
- Table of Contents (TOC): Effectively using the TOC feature can automate the creation and updating of document indexes.
- Importing Word Files: Efficiently importing Word files into InDesign can save considerable time on content integration.
By embracing keyboard shortcuts, especially for preview functions, and exploring these additional productivity tools, InDesign users can transform their workflow, dedicating more time to creative endeavors and less to navigating the software's interface. The ability to create custom shortcuts ensures that the most frequently used commands are always at your fingertips, making your design process smoother and more efficient.