Adobe Lightroom Classic stands as a powerful cornerstone in the digital photography workflow, offering a robust suite of tools for organizing, processing, and exporting images. While its extensive capabilities can initially seem daunting, understanding its core functions is key to unlocking its full potential. This guide is designed to demystify Lightroom Classic, providing a clear, step-by-step walkthrough for beginners, and offering valuable insights for those looking to refine their skills. We will delve into the essential processes, from initial import to final export, addressing common points of confusion along the way.
It is important to note that this tutorial focuses specifically on Lightroom Classic, distinct from the newer, cloud-centric "Lightroom / Lightroom CC" software. For a detailed comparison, exploring the differences between these two versions can be highly beneficial. Should you need to locate a specific term within this extensive guide, the "Control + F" (or "Command + F" on Mac) shortcut is an invaluable tool for quick searches.
Introducing Lightroom Classic: More Than Just an Editor
At its heart, Lightroom Classic is a sophisticated software solution designed to streamline the entire photographic process. Its primary strengths lie in three fundamental areas: photo organization, post-processing, and image export. Each of these functions plays a critical role in how photographers manage and present their work.
Organizing Your Photos: The Foundation of a Digital Workflow
One of Lightroom Classic's most prominent roles is its ability to help photographers sort and organize their image libraries. When you import photos into Lightroom, the software displays their location on your computer, mirroring your existing file structure. This visual representation, typically shown on the left-hand side of the screen, provides an immediate overview of where your images are stored.

It's crucial to understand that photos residing on your computer do not automatically appear within Lightroom. To integrate them into your workflow, a deliberate import process is necessary. While the intricacies of the Import Dialogue will be covered later, the fundamental concept is that you must actively bring your photos into Lightroom's management system.
Beyond simply acknowledging the location of your files, Lightroom offers a rich array of tools for categorization and retrieval. Imagine capturing a photograph that you deem exceptional. How can you ensure it's easily discoverable amidst thousands of other images? Lightroom provides multiple solutions: you can assign a five-star rating, apply flags, or add the image to a dedicated "Best Photos" collection, among many other options. These organizational features are explored in greater detail as we progress, empowering you to tailor your sorting methods to your specific needs.
Lightroom Classic has cemented its position as a leading application, widely adopted by photographers worldwide for its unparalleled organizational capabilities.
Editing Your Photos: Refining Your Vision
While organization is a significant aspect of Lightroom Classic, its prowess in photo editing is arguably its most celebrated feature. Lightroom provides a comprehensive set of post-processing tools that, while not as infinitely granular as those found in software like Photoshop, are more than sufficient for the vast majority of photographic editing needs. Many professional photographers find that Lightroom's built-in capabilities are all they require for their daily editing tasks. Personally, even with access to Photoshop, its use is primarily reserved for graphic design rather than photo manipulation.
The editing tools within Lightroom cover all essential adjustments: controlling brightness, contrast, color balance, sharpening, and a multitude of other parameters. A particularly powerful feature is the ability to apply local adjustments, allowing for selective modifications to specific areas of an image without affecting the rest. This level of control is instrumental in achieving precise and nuanced results.
Exporting Your Photos: Sharing Your Masterpieces
The third fundamental function of Lightroom Classic, and one that is often underestimated, is its export capability. When preparing images for online sharing, printing, or submission, managing file size and quality is paramount. Instead of sending large, uncompressed files, Lightroom allows you to create optimized versions. For instance, a 4000-pixel image with zero compression could be transformed into a 1000-pixel version with 20% compression, significantly reducing its file size while maintaining acceptable quality for its intended use.
The Best Instagram Export Settings for Adobe Lightroom 2026
The export process is straightforward: typically, you right-click on a selected photo, navigate to "Export," and then define all the desired settings for your final image. This includes specifying the file type, pixel dimensions, compression level, and file naming conventions. Mastering export settings is a crucial skill that ensures your images are delivered in the optimal format for their destination.
What Makes Lightroom Different from Other Software? The Power of Non-Destructive Editing
A common point of inquiry regarding Lightroom Classic revolves around its unique operational paradigm, which distinguishes it significantly from other editing software, including Photoshop. The core difference lies in how Lightroom handles image modifications.
When you make an adjustment in Lightroom, such as increasing the brightness of a photo, this change is not applied directly to the original file. Instead, the alteration is recorded within the Lightroom catalog. Consequently, if you were to open that same photo in a different application, it would appear unchanged.
This behavior is a fundamental aspect of Lightroom's design and cannot be overridden. This leads many to question the utility of a program that seemingly doesn't "edit" the photos themselves. However, this very system offers profound advantages.
The Non-Destructive Workflow: Preserving Your Originals
The primary concern about edits being confined to Lightroom is easily addressed: your Lightroom adjustments become visible in the final output when you export the image. As previously mentioned, exporting is one of Lightroom's core functions. By exporting a photo, you generate a new file that incorporates all the edits you've made within Lightroom.

This process is inherently non-destructive. You are never altering the original image file on your computer. The only Lightroom actions that directly impact the original file are renaming it, moving it to a different folder, or deleting it from your disk. This safeguards your original images from accidental corruption or irreparable modification.
In stark contrast, software like Photoshop often employs a destructive editing process. If you crop an image in Photoshop, save it, and exit, that crop is permanent. While there are workarounds, such as disabling the "delete cropped pixels" option and saving as a PSD file, these are not intuitive for beginners and increase the risk of unintended permanent changes.
Lightroom's strength lies in its commitment to preserving your original files. This non-destructive editing approach is a critical feature that provides peace of mind and flexibility for virtually every photographer.
Demystifying the Lightroom Catalog: The Brain of Your Workflow
The term "catalog" is frequently encountered when discussing Lightroom Classic, and for good reason. Lightroom is, at its core, a cataloging software. This concept directly relates to the non-destructive editing principle.
What is a Lightroom Catalog?
Every edit you make, every star rating you assign, every photo you add to a collection â all these actions are recorded not within the image file itself, but within the Lightroom catalog file. This single file acts as a central repository for all the information pertaining to your photo library and the adjustments made to each image.

The size of the catalog file is remarkably efficient. Even with thousands of photos and numerous edits, a catalog typically occupies a modest amount of disk space. For example, a catalog containing edits for thousands of photos might only be a few hundred megabytes in size.
As you delve deeper into Lightroom's capabilities, the complexity of catalog management can increase. Scenarios involving multiple catalogs, sharing catalogs with others, or using a single catalog across multiple computers can introduce intricate challenges. For advanced catalog management, consulting dedicated resources is recommended.
However, for users focused on importing photos into a single, primary Lightroom catalog, the foundational understanding provided here is sufficient to begin. By default, photos on your computer or memory card are not automatically part of your Lightroom catalog; they must be explicitly imported. This process is initiated through the Import Dialogue.
Importing Photos into Lightroom Classic
The Import Dialogue is the gateway through which your photos enter Lightroom's organized ecosystem. It's a critical step in establishing your workflow. When you launch Lightroom, it typically prompts you to create or select a catalog. This catalog will serve as the central database for your images.
The Import Dialogue window presents several key options. You'll need to specify the source of your photos â whether they are on your computer's hard drive, a memory card, or another storage device. Equally important is selecting the destination folder where Lightroom will manage these files.
The Best Instagram Export Settings for Adobe Lightroom 2026
Within the Import Dialogue, you have choices regarding how Lightroom handles the files. You can choose to "Copy" the photos to a new location managed by Lightroom, "Move" them from their original location, or "Add" them, which essentially creates catalog entries for files already in their desired final location. For beginners, "Copy" is often the safest option, ensuring your original files remain untouched in their original location while creating manageable copies within Lightroom's structure.
Furthermore, the Import Dialogue allows you to apply metadata, develop presets, and rename files during the import process. This upfront organization saves considerable time later. For instance, you can embed copyright information or keywords as you import, ensuring your images are properly identified from the outset.
Understanding the Layout: Library and Develop Modules
Lightroom Classic's interface is divided into several modules, each dedicated to a specific stage of the photographic workflow. The two most fundamental modules for beginners are the Library module and the Develop module.
The Library Module: Navigation and Organization Hub
The Library module is your central hub for managing your photo collection. Here, you can browse images, organize them into folders and collections, add keywords, assign ratings and flags, and view metadata.
The left-hand panel of the Library module typically displays your folder structure, allowing you to navigate through the directories on your computer where your photos are stored. Below this, you'll find the Collections panel, where you can create virtual groupings of photos, irrespective of their physical location on your hard drive. Collections are powerful for creating themed albums or selecting your best work without duplicating files.
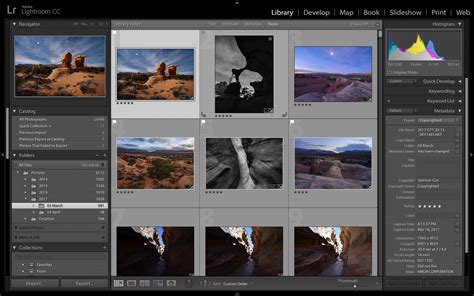
The center area of the Library module is the content browser, displaying thumbnails of the photos within the selected folder or collection. You can adjust the size of these thumbnails for easier viewing. At the bottom of the content browser, you'll find the filmstrip, which shows a row of thumbnails for quick navigation between images.
The right-hand panel in the Library module provides access to metadata, keywords, and other information about the selected photo. This is where you'll spend a significant amount of time organizing and cataloging your images.
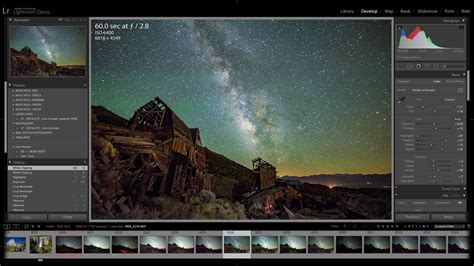
The Develop Module: Unleashing Your Creative Potential
The Develop module is where the magic of post-processing happens. This is where you'll make all your creative adjustments to enhance your photographs.
The left-hand panel in the Develop module displays your import history and snapshots, allowing you to revert to previous states of your edits. The center area shows a large preview of the image you are currently working on.

The right-hand panel is the heart of the Develop module, containing a series of panels with sliders and controls for various adjustments. These include:
- Basic Panel: This is your starting point, offering fundamental controls for exposure, contrast, highlights, shadows, whites, blacks, clarity, vibrance, and saturation.
- Tone Curve: For more advanced control over tonal range.
- HSL/Color: To precisely adjust hues, saturation, and luminance of individual colors.
- Detail: For sharpening and noise reduction.
- Lens Corrections: To automatically correct distortions, chromatic aberration, and vignetting introduced by your camera lens.
- Transform: To straighten horizons and correct perspective.
- Effects: For adding vignettes and grain.
- Calibration: For advanced color channel adjustments.
Beyond these global adjustments, Lightroom Classic offers powerful local adjustment tools, accessible via icons at the top of the right-hand panel:
- Adjustment Brush: Allows you to paint specific adjustments onto areas of your image.
- Radial Filter: Creates an elliptical area where you can apply adjustments.
- Graduated Filter: Applies a gradual transition of adjustments across a selected area, useful for skies or landscapes.
- Spot Removal Tool: For cloning or healing imperfections.
- Red Eye Correction: To remove red-eye from portraits.
Understanding the interplay between the Library and Develop modules is fundamental to mastering Lightroom Classic. The Library module is for organization and selection, while the Develop module is for creative refinement.
Advanced Organization Techniques in Lightroom Classic
Once you've grasped the basics of importing and navigating Lightroom, you can explore more sophisticated methods for organizing your photo library, ensuring that you can always find the images you need.
Collections: Virtual Groupings of Your Photos
Collections are one of Lightroom's most powerful organizational tools. Unlike folders, which are tied to the physical location of files on your hard drive, collections are virtual groupings. This means a single photo can be included in multiple collections without being duplicated.
To create a collection, navigate to the Collections panel in the Library module and click the "+" icon, then select "Create Collection." You can name your collection, choose whether to include all photos from a specific folder, or build it manually by dragging and dropping images into it.
The Best Instagram Export Settings for Adobe Lightroom 2026
Smart Collections offer an even more automated approach. When you create a Smart Collection, you define criteria (e.g., all photos rated 5 stars, all photos taken in a specific month, all JPEGs with a certain keyword). Lightroom then automatically populates the Smart Collection with images that meet these criteria, updating in real-time as you add new photos or modify existing ones. This is incredibly efficient for maintaining dynamic sets of images, such as your "best work of the year" or "client projects."
Keywords: Tagging Your Images for Searchability
Keywords are essential for making your photos searchable. Think of them as descriptive tags that you assign to your images. The more descriptive and accurate your keywords, the easier it will be to find specific photos later.
In the Library module, select a photo or a group of photos, and then use the Keyword panel in the right-hand section. You can type in keywords manually, or use pre-defined keyword lists. It's good practice to develop a consistent keyword strategy. Consider keywords for:
- Subject Matter: "dog," "landscape," "portrait," "architecture"
- Location: "Paris," "Eiffel Tower," "Grand Canyon"
- Event: "wedding," "birthday party," "concert"
- People: Names of individuals
- Technical Details: "long exposure," "macro," "black and white"
You can also create keyword hierarchies, allowing for more structured tagging. For example, "Animals" could be a parent keyword with "dogs" and "cats" as child keywords.
Ratings, Flags, and Color Labels: Visual Cues for Workflow
Lightroom provides visual cues to help you quickly sort and filter your images:
- Flags: You can flag photos as "Picked," "Rejected," or "Unflagged." This is useful for a quick pass through your images, marking what you want to keep and what you want to discard.
- Star Ratings: Assign one to five stars to photos. This is a common method for indicating quality or preference. A 1-star rating might mean "okay," while a 5-star rating signifies a "keeper."
- Color Labels: Assign one of five customizable colors to photos. These can be used for various purposes, such as marking photos for specific clients, identifying images that need further editing, or categorizing by project.
These tools work in conjunction with each other and can be used to filter your view in the Library module. For instance, you can choose to display only 5-star rated photos or only flagged "Picked" images.
Post-Processing Your Photos in Lightroom Classic: A Deeper Dive
The Develop module is where your creative vision truly comes to life. While the Basic panel offers fundamental controls, mastering more advanced features allows for greater precision and artistic expression.
Mastering the Tone Curve
The Tone Curve provides finer control over the tonal range of an image than the Basic panel's sliders. It allows you to adjust specific tonal areas (shadows, midtones, highlights) independently.
- Parametric Curve: This is the default setting and offers a smoother adjustment.
- Point Curve: This allows you to create custom points on the curve, offering the most precise control. Adding points to the curve allows you to manipulate specific tonal ranges. For example, slightly lifting the bottom of the curve can brighten shadows, while slightly lowering the top can deepen highlights.
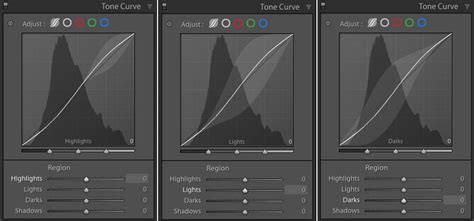
Understanding how to use the Tone Curve effectively can dramatically improve the contrast and mood of your images.
HSL/Color Adjustments: Precision Color Control
The HSL (Hue, Saturation, Luminance) panel provides granular control over individual colors within your image.
- Hue: Adjusts the actual color. For example, you could shift a green in a landscape towards yellow or blue.
- Saturation: Controls the intensity of a color. Increasing saturation makes colors more vivid, while decreasing it makes them more muted.
- Luminance: Adjusts the brightness of a color. Increasing luminance makes a color brighter, while decreasing it makes it darker.
This panel is invaluable for correcting color casts, enhancing specific colors (like making a blue sky more vibrant), or creating specific color effects.
Detail Panel: Sharpening and Noise Reduction
The Detail panel is crucial for refining the sharpness of your image and managing digital noise.
- Sharpening: This slider enhances edge detail. However, over-sharpening can lead to artifacts and an unnatural look. It's often best to apply sharpening judiciously and then use the "Masking" slider (hold Alt/Option while dragging the Sharpening slider) to control where sharpening is applied, protecting smooth areas.
- Noise Reduction: Digital cameras, especially in low light, can produce noise (graininess). The Luminance slider reduces brightness noise, while the Color slider reduces color noise. Again, excessive noise reduction can lead to a loss of detail, so it's a balancing act.
Local Adjustments: Targeted Enhancements
As mentioned earlier, the Adjustment Brush, Radial Filter, and Graduated Filter are essential for making selective edits.
- Adjustment Brush: Ideal for targeted adjustments like brightening eyes, darkening a sky, or adding contrast to a specific object.
- Radial Filter: Useful for creating a vignette effect or drawing attention to a subject by applying adjustments to an elliptical area.
- Graduated Filter: Perfect for landscape photography, allowing you to darken a bright sky or brighten a foreground smoothly.
These tools allow you to refine specific parts of your image without affecting the overall edit, providing a level of control that is indispensable for professional results.
The Best Instagram Export Settings for Adobe Lightroom 2026
Exporting Your Photos from Lightroom Classic: The Final Step
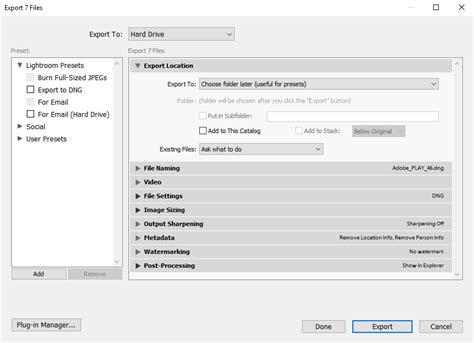
The export process in Lightroom Classic is where your edited images are rendered into shareable files. This is a critical stage, as the settings you choose will determine the final appearance and usability of your photos.
When you select "Export" from the File menu or by right-clicking on an image, the Export Dialogue box appears. This window offers a comprehensive set of options:
- Export Location: You specify where the exported files will be saved. You can choose a specific folder, or use options like "Same as Original" or "Specific Folder."
- File Naming: You can choose to rename files during export, using sequential numbers, dates, or custom text. This is highly recommended for maintaining an organized archive.
- File Settings: This is where you select the File Type (JPEG, TIFF, DNG, etc.), Image Quality (for JPEGs), and Color Space (sRGB is standard for web, Adobe RGB or ProPhoto RGB for print or further editing).
- Image Sizing: You can resize your images to specific pixel dimensions or by resolution (e.g., 300 pixels per inch for printing). This is crucial for optimizing file sizes for different platforms.
- Output Sharpening: You can apply sharpening specifically for the intended output medium (e.g., "Screen" or "Matte Paper").
- Metadata: You can choose to include or exclude metadata, such as copyright information, camera settings, and keywords.
- Watermarking: You can apply a text or graphic watermark to protect your images.
Lightroom also allows you to save your export settings as a preset. This is incredibly useful if you frequently export photos for specific purposes (e.g., "Web JPEG - 1000px," "Print TIFF - 300dpi"). By creating and utilizing presets, you can ensure consistency and speed up your export workflow significantly.
Backing Up Your Lightroom Catalog: Protecting Your Work
Given that the Lightroom catalog contains all your edits, metadata, and organizational information, it is paramount to back it up regularly. Losing your catalog would mean losing all the work you've done within Lightroom.
Lightroom Classic offers an automated backup feature. When you close Lightroom, it may prompt you to back up your catalog. It's advisable to enable this feature and to choose a backup destination that is separate from your main hard drive, such as an external drive or cloud storage.
The backup process typically creates a copy of your catalog file with a timestamp, allowing you to revert to previous versions if necessary. Regularly checking your backup integrity and ensuring that backups are being created successfully is a critical habit for any Lightroom user.
The Best Instagram Export Settings for Adobe Lightroom 2026
By diligently backing up your catalog, you ensure the safety and longevity of your photographic work and the organizational structure you've painstakingly built within Lightroom Classic.