DaVinci Resolve, a powerhouse in post-production, offers a comprehensive suite of tools for video editing, color correction, visual effects, and audio post-production. Developed by Blackmagic Design, it caters to a wide spectrum of users, from individual content creators to professional filmmakers and advertisers, providing Hollywood-grade capabilities within an accessible, all-in-one application. This tutorial delves into a specific, yet crucial, aspect of video production: integrating AI-generated voiceovers seamlessly into your DaVinci Resolve workflow. While traditional voiceover recording can be time-consuming and costly, especially when employing professional voice actors, advancements in AI technology offer an efficient and increasingly sophisticated alternative.
The Power of AI Voice Generation for Voiceovers
The landscape of content creation is rapidly evolving, and the demand for high-quality audio, particularly voiceovers, continues to grow. Traditionally, securing a compelling voiceover involved either hiring a voice actor, which can be a significant expense, or dedicating considerable time to self-recording. However, the emergence of advanced text-to-speech (TTS) technology, powered by Artificial Intelligence, has revolutionized this process.
AI voice generators, such as LOVO's Genny, offer a powerful solution for creating lifelike voiceovers from simple text scripts in mere seconds. This technology leverages sophisticated algorithms to synthesize human-sounding speech, complete with varied intonations, emotions, and accents. The key to a successful AI-generated voiceover lies not only in the quality of the AI but also in the script itself. Recognizing this, tools like LOVO AI's Genny Write script writer are integrated to assist users in crafting compelling narratives. These scriptwriting assistants provide templates and guidance, ensuring that the generated voiceover is tailored to the specific needs and tone of the project, overcoming potential writer's block and offering creative inspiration.
The breadth of available AI voices is another significant advantage. Genny, for instance, boasts a vast collection of over 500 AI voices, each offering distinct accents and linguistic nuances. This extensive library allows creators to find the perfect vocal match for their project, whether it requires a specific regional accent, a particular gender, or a unique vocal character. The ability to generate voiceovers for an entire script with a single command, such as selecting all and initiating the generation process, streamlines the workflow considerably.

Integrating AI Voiceovers into DaVinci Resolve: A Step-by-Step Guide
Bringing AI-generated voiceovers into your DaVinci Resolve project is a straightforward process, designed to be intuitive even for those new to the software. The integration primarily involves generating your audio externally and then importing it into your DaVinci Resolve timeline.
Generating Your AI Voiceover
Before you can import an AI voiceover into DaVinci Resolve, you need to generate it using a specialized AI tool. As previously mentioned, LOVO's Genny is a prime example of such a platform.
- Write Your Script: Craft your script carefully, paying attention to pacing, tone, and clarity. If you need assistance, utilize AI scriptwriting tools.
- Select Your AI Voice: Browse the extensive library of AI voices provided by your chosen TTS generator. Consider the accent, gender, age, and emotional tone that best suits your project.
- Generate the Audio: Input your script into the AI voice generator and select your desired voice. Initiate the generation process. For longer scripts, you can typically select all text and generate the entire voiceover at once.
- Download the Audio File: Once the AI has synthesized the voiceover, download the resulting audio file. Common audio formats like MP3 or WAV are usually supported.
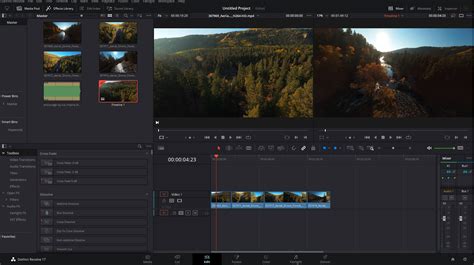
Importing and Editing in DaVinci Resolve
Once you have your AI voiceover audio file, you can bring it into DaVinci Resolve and synchronize it with your video.
- Navigate to the Media Page: Open your DaVinci Resolve project and go to the "Media" page. This is where you will import all your project assets.
- Import Your Audio File: Locate your downloaded AI voiceover audio file on your computer and drag it into the media pool within DaVinci Resolve. Alternatively, you can use the "File > Import > Media" option.
- Move to the Edit Page: After importing, switch to the "Edit" page, which is your primary workspace for arranging and editing clips.
- Add Audio to the Timeline: Find your imported audio file in the media pool. Drag this audio file from the media pool directly onto your timeline, positioning it where you want it to play in relation to your video clips.
- Synchronization and Refinement: Play back your timeline to ensure the voiceover is perfectly synchronized with your video. You can adjust the timing by moving the audio clip on the timeline.
Advanced Voiceover Recording and Editing within DaVinci Resolve
While importing pre-generated AI voiceovers is a common and efficient method, DaVinci Resolve also offers robust tools for direct audio recording and intricate editing, allowing for greater control and customization. This is particularly useful if you are recording your own voice or working with a voice actor directly.
Direct Voiceover Recording
DaVinci Resolve's Fairlight page is a dedicated audio workstation that provides a professional environment for all your audio post-production needs, including direct voiceover recording.
- Access the Fairlight Page: At the bottom of the DaVinci Resolve interface, you will find several tabs. Click on the "Fairlight" tab to enter the audio editing workstation.
- Create an Audio Track: In the track header area (typically on the left side of the Fairlight page), right-click in an empty space. From the context menu, select "Add Track > Mono." A mono track is generally suitable for single-channel voice recordings.
- Connect Your Microphone: Ensure your microphone is properly connected to your computer and recognized by your operating system.
- Configure Audio Mixer and Patching: Locate the "Audio Mixer" panel, usually found on the right side of the Fairlight interface. This panel allows you to manage input and output routing. Open the "Patch input/output" window. Here, you will need to route your microphone's input to the newly created audio track.
- Arm the Track for Recording: On the header of the audio track you just created, you will see several buttons. Click the 'R' button to arm the track for recording. This indicates that the track is ready to capture audio.
- Set Recording Start Point: Move the red playhead on the timeline to the exact point where you wish your voiceover recording to begin.
- Initiate Recording: Click the main "Record" button (often depicted as a red circle) in the transport controls. DaVinci Resolve will begin recording audio from your armed track at the playhead's position.
DaVinci Resolve - Record a Voiceover in Fairlight
Managing Multiple Audio Takes and Layers
Mistakes are a natural part of the recording process. DaVinci Resolve offers a sophisticated way to handle re-recordings without overwriting previous takes, ensuring you can select the best performance.
- Avoiding Overwrites: If you make an error during a recording and need to re-record a section, you don't have to stop and delete. Instead, you can simply continue recording, and DaVinci Resolve will automatically create a new audio file for the subsequent take.
- Viewing Audio Track Layers: To visualize these multiple takes, navigate to the menu bar and select "View > Show Audio Track Layers." This option will display each recorded take as a distinct layer stacked vertically on the same audio track.
- Playback and Selection: When you play back the timeline, DaVinci Resolve will automatically play the topmost audio layer. This allows you to easily listen to each take and determine which one you prefer. You can then disable or delete the unwanted layers, leaving only your best performance. This layering system is invaluable for fine-tuning dialogue and ensuring the highest quality audio.
Leveraging MotionVFX Tools for Enhanced Voiceovers and Visuals
While DaVinci Resolve provides a robust foundation for editing and audio, the integration of specialized plugins and elements can elevate your projects to a professional, cinematic level. MotionVFX offers a comprehensive ecosystem designed to streamline creative workflows and eliminate technical limitations.
The mExtension: Your Gateway to MotionVFX Assets
MotionVFX provides a unified platform for accessing their entire library of effects, transitions, typography, and more. The mExtension is a crucial software tool that enables users to browse, download, and apply these assets directly within their editing software, including DaVinci Resolve (though the provided text primarily highlights Final Cut Pro integration, the concept of centralized asset management is applicable).
- Installation Process: To begin utilizing MotionVFX plugins and elements, you first need to download and install the mExtension application. During the installation, you will be prompted to select the specific software plugins you wish to install and to activate the device you are currently working on. This ensures that the tools are correctly configured for your system.
- Browsing and Applying Assets: Once installed, the mExtension acts as your central hub. You can browse the extensive collection of MotionVFX assets, preview them, and then apply them directly to your timeline without ever leaving your primary editing application. This eliminates the tedious process of downloading individual files and manually importing them, saving significant time and effort.
- "Free Elements" Collection: Even before committing to a subscription or trial, MotionVFX offers a "Free Elements" collection. This versatile set of overlays, effects, transitions, typography, and add-ons is available to all users who download and install the mExtension. These free assets range from subtle, minimal designs to bold, pop culture-inspired graphics, providing a great opportunity to experiment with the platform's capabilities.
Seamless Workflow and Creative Freedom
The core philosophy behind MotionVFX is to empower creators by removing technical hurdles. The statement, "Edit without limits. with a complete toolkit designed to bring your ideas to the screen without friction," encapsulates this mission. By providing a seamless integration of high-quality effects and intuitive tools, MotionVFX aims to allow creativity to flow naturally, rather than being bogged down by "tedious technicalities of building everything from scratch across different tools."
The result is the ability to achieve "Cinematic, million-dollar-looking effects within minutes." This is particularly beneficial for small animation teams or individual creators who may not have the resources to build complex visual effects from the ground up. The tools are designed to be user-friendly, ensuring that even less experienced users can achieve professional-grade results.
Understanding MotionVFX Subscriptions and Trials
MotionVFX offers a subscription-based model to access its full suite of tools and assets. To ensure users can make an informed decision, they provide a generous trial period and flexible subscription management options.
The 14-Day Free Trial
MotionVFX understands that users need to experience the tools firsthand to determine if they fit their workflow. Therefore, they offer a 14-day free trial for each plan. This trial period is comprehensive:
- No Watermarks: Videos rendered during the trial period will not have any watermarks.
- No Render Limits: You are free to render as many projects as you need without limitations.
- All Plugins Included: Every plugin available within the MotionVFX universe is accessible during the free trial.
This "play around with the tools" approach allows creators to thoroughly test the functionality and assess how the MotionVFX ecosystem can enhance their video production process before committing financially.
Subscription Management and Billing
Once the free trial period concludes, or if you decide to subscribe, MotionVFX offers flexible options for managing your subscription:
- Payment Method: You will be asked to provide your payment method before launching the free trial. This is a standard procedure to facilitate a smooth transition to a paid subscription if you choose to continue.
- Stopping Subscription: You have the flexibility to stop your subscription at any time. If you do so, payment will not be processed for the next billing period. Importantly, you will retain access to all subscription products until the end of your current billing cycle, and no further payments will be collected.
- Renewing Subscription: If you change your mind or wish to reactivate your subscription, you can easily do so. The payment will be collected according to the usual schedule if the subscription has not yet expired, or immediately if it has expired.
- Upgrading or Changing Plans: MotionVFX allows you to upgrade your subscription, for instance, to the "Ultimate" tier, or to change your billing period. You can switch to an annual plan for potential cost savings or opt for a flexible monthly plan.
Download Limits and Accessing Information
To manage the extensive library of assets, MotionVFX implements a daily download limit across all plans:
- Daily Download Limit: The daily limit on downloads is set at 500 elements. This limit is generous and designed to accommodate most active users.
- Cross-Device Transfer: Importantly, transferring downloaded elements between your devices does not count towards this daily download limit, offering further flexibility.
All subscription information, including download history, billing details, and account management, can be accessed and modified through your MotionVFX account or directly within the mExtension application. This centralized access ensures that users have complete control and transparency over their subscription and asset usage.
The continuous development of MotionVFX tools signifies their commitment to improvement: "Weâre constantly working on making our tools better." This dedication ensures that users always have access to cutting-edge features and a constantly evolving toolkit, making MotionVFX a valuable long-term partner for video creators.