Capturing the magic of falling snow in photographs can transform an ordinary winter scene into a breathtaking wonderland. However, achieving a truly stunning snowfall image often presents photographic challenges. Fortunately, Photoshop offers powerful tools to recreate realistic falling snow effects during post-production, whether you're applying a pre-made snow overlay or generating the effect organically. This tutorial delves into both approaches, providing a detailed roadmap to enhance your winter imagery.
Understanding Snow Overlays in Photoshop
Snow overlays are pre-designed elements that can be easily integrated into your existing photographs to add a layer of snow. These packs often feature a variety of snow intensities, ranging from gentle flurries to intense snowstorms. The beauty of using overlays lies in their flexibility; their intensity can be adjusted using opacity settings, or their effect can be amplified by layering multiple overlays on the same image.
To apply a snow overlay, the process begins by saving the overlay file to your computer. Once downloaded, double-clicking the file will typically unzip it. Subsequently, you can drag and drop the unzipped overlay directly onto your image in Photoshop. This action will automatically introduce the overlay as a new layer within your Layers palette, ready for further adjustments.
Generating Falling Snow Organically in Photoshop
For those who prefer a more hands-on approach or wish to avoid external assets, Photoshop allows for the creation of realistic falling snow effects from scratch. This method involves a series of steps that manipulate noise, blur, and blending modes to simulate the appearance and movement of snowflakes.
Step 1: Preparing Your Canvas
Begin the editing process by adding a new blank layer to your document. This can be achieved through the menu by navigating to Layer > New > Layer, or by using the keyboard shortcut SHIFT + CTRL + N. Alternatively, you can click on the "New Layer" icon, typically found at the bottom of the Layers palette, near the trash bin icon.
Step 2: Establishing the Base Layer
Once the new layer is created, it’s time to fill it with black. Select this newly added layer, often named "Layer 1," and proceed to the menu bar. Click on Edit and then select Fill. In the dialog box that appears, under the "Contents" section, choose "Black" from the "Use" drop-down menu and confirm by pressing OK. This black canvas will serve as the foundation for our snow.
Step 3: Introducing Noise for Snowflakes
The next crucial step is to add noise to this black layer. This noise will eventually transform into our falling snow. Go to the menu bar, click on Filter, then select Noise and choose Add Noise. In the "Add Noise" dialog box, adjust the "Amount" slider towards the right. A value between 145% and 155% is a good starting point, though you can alter this as needed. Ensure that the "Gaussian" and "Monochromatic" boxes are selected. This process converts the uniform RGB dots into distinct black and white specks, resembling early-stage snow.
Step 4: Softening the Noise with Blur
To make the noise appear more like individual snowflakes, some blur is necessary. Navigate to the menu bar, click on Filter, select Blur, and then choose Gaussian Blur. The "Gaussian Blur" dialog box will open, allowing you to adjust the "Radius" slider to achieve a desired level of softness. Press OK when satisfied. As an alternative, you can utilize the "Blur" or "Blur More" options found under the Filter > Blur menu, though Gaussian Blur offers more control.
Step 5: Refining Noise with Levels
The "Levels" command is instrumental in refining the noise, making it more closely resemble realistic snow. Go to Image > Adjustments > Levels. The "Levels" dialog box displays a histogram representing the tonal range of your layer. Click and drag the white slider towards the left until it reaches the beginning of the slope on the right side of the histogram. This action will brighten the noise. Subsequently, to define the snowflakes and reduce excess noise, click and drag the black slider towards the right until you achieve the desired snowflake appearance. Press OK to apply the changes.
Step 6: Blending for Visibility
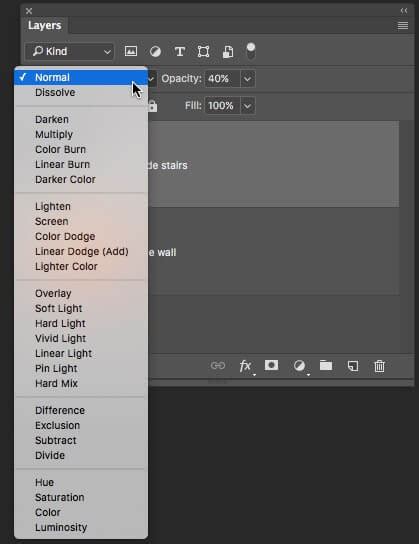
To see the effect you've created on your background image, you need to blend the snow layer with the background. Select the snow layer (Layer 1) and locate the blend mode dropdown menu at the top of the Layers palette, which is typically set to "Normal." Change this to "Screen." This blend mode effectively hides the black areas of your layer, allowing the white specks (your nascent snowflakes) to become visible against your background image.
Step 7: Adding Motion with Motion Blur
While white specks are now visible, they lack the dynamic appearance of falling snow. To introduce motion, apply the Motion Blur filter. Go to Filter > Blur > Motion Blur. In the dialog box, set the "Angle" to a value between -60° and -70°. This angle determines the direction of the snowfall. Next, adjust the "Distance" slider. This parameter controls the length of the trail for each speck, directly influencing the perceived speed and realism of the snowfall. Experiment with this setting to achieve the most convincing effect.
Step 8: Enhancing Snowfall with Layer Duplication
To create a more complex and realistic snowfall, duplicating the current snow layer is a common and effective technique. Select your snow layer and go to Layer > New > Layer via Copy. The keyboard shortcut for this action is CTRL + J (or Command + J on Mac). This creates an identical copy of your snow layer directly above the original.
Step 9: Adjusting the Duplicated Layer
With the duplicated layer (now referred to as Layer 2) selected, navigate to Edit > Transform and choose Rotate 180°. This flips the duplicated snow layer upside down, which, when combined with the original layer, can contribute to a more varied distribution of falling snow.
Step 10: Altering Snowflake Size with Crystallize
To introduce variation in snowflake size, particularly for the duplicated layer, the "Crystallize" filter can be employed. Access this filter by going to Filter > Pixelate > Crystallize. In the "Crystallize" dialog box, you will find the "Cell Size" option, which is set to 10 by default. Adjust this value to best suit your desired snowflake appearance. The preview box will show you the real-time effect. After setting the "Cell Size," press OK.
Step 11: Reapplying Motion Blur for Depth
To further enhance the realism, apply Motion Blur to the larger snowflakes in Layer 2. Go to Filter > Blur > Motion Blur. Ensure the "Angle" is set to the same value as used in Layer 1 to maintain a consistent falling direction. However, for this duplicated and potentially larger snowflake layer, increase the "Distance" value to create a more pronounced trail, suggesting closer or larger flakes. Press OK to exit the dialog.
How to make ANIMATED SNOW in PHOTOSHOP overlay for photos or video
Creating a Bokeh Effect for Close-Up Snowflakes
To simulate snowflakes that appear exceptionally close to the camera lens, a "Bokeh" effect can be introduced. Create a new layer and fill it with solid black. On this layer, you will generate blurry, out-of-focus circular shapes.
To achieve this, you'll need a simple scatter brush. Set your foreground color to white. Using the brush tool, fill the "Bokeh" layer with random dots. The technique involves clicking once with the brush, slightly moving the cursor, and clicking again. This scattered pattern, when blurred and blended appropriately, mimics the soft, out-of-focus lights often seen in photography.
Advanced Techniques and Considerations
- Layering and Opacity: The power of Photoshop's layers allows for extensive customization. By adding more snow layers and adjusting their opacity, you can fine-tune the density and intensity of the snowfall. Experimenting with different blend modes for these additional layers can also yield unique results.
- Smart Objects: For non-destructive editing, converting your snow layers to Smart Objects before applying filters is highly recommended. This allows you to revisit and re-edit filter settings at any time without degrading the image quality. To do this, right-click on the layer in the Layers panel and select "Convert to Smart Object."
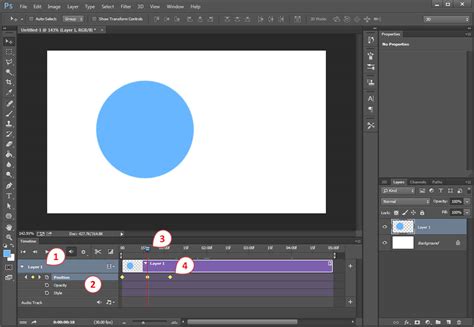
- Animation: For truly dynamic snowfall, Photoshop's Timeline panel is indispensable. By manipulating the "Position" property of your snow layers over time, you can create animated falling snow. This involves setting keyframes at the beginning and end of your animation to define the movement path. You can then duplicate and adjust these animated layers to create a multi-layered, realistic effect with varying speeds and sizes of snowflakes. Rendering this animation as a transparent video overlay (e.g., .mov file) allows it to be used in video editing software like Premiere Pro or Final Cut Pro.
- Custom Brush Creation: Beyond the standard brushes, you can create custom brushes that more closely resemble specific snowflake patterns. This involves painting a single snowflake shape on a new document, saving it as a brush preset, and then applying it with scattering and jitter settings for varied results.
Troubleshooting Common Issues
- Snow Looks Like Rain: If your snow appears too streaky or resembles rain, the "Distance" value in the Motion Blur filter is likely set too high. Reduce this value to create shorter, more delicate trails.
- Performance Issues: Working with numerous layers and complex filters can impact performance, especially with larger images. Converting layers to Smart Objects can sometimes help manage resources. If you encounter significant slowdowns, consider optimizing your image resolution or working on a more powerful machine.
- Unnatural Repetition: To avoid a repetitive look, especially with animated snow, ensure you have multiple layers with different movement characteristics. Varying the speed, size, and density of snowflakes across layers will significantly enhance realism.
By mastering these techniques, you can effectively create compelling and realistic falling snow effects in Photoshop, elevating your winter photographs and digital creations to a professional standard. The ability to generate snow from scratch offers unparalleled creative freedom, allowing you to craft unique winter scenes tailored precisely to your vision.