Adobe Photoshop CC stands as a cornerstone for image editing, offering a creative and enjoyable pathway to process a wide array of imagery, including the intricate details of astrophotography. Among its many powerful features, the Select and Mask tool emerges as a particularly potent instrument for achieving precise edits on selective areas within your images. This advanced selection tool, coupled with its sophisticated mask refinement options, allows for an unprecedented level of control over every adjustment made.
The Power of Selective Editing in Astrophotography
When delving into the processing of a deep-sky astrophotography image, isolating and refining specific elements is often crucial for bringing out the best in the data. Whether it's enhancing the subtle nebulosity, sharpening faint stars, or adjusting the color balance of a particular galaxy, the ability to work on these aspects independently from one another can significantly elevate the final result. The challenge, however, lies in creating these selective areas without introducing harsh, unnatural edges that detract from the overall image. This is precisely where the Select and Mask tool shines, offering a sophisticated solution to define and refine these critical boundaries.
The Select and Mask tool empowers users to get incredibly specific with each edit, ensuring that adjustments are applied only where intended. For astrophotography, this means defining the colors and structures found within your deep-sky target with precision, granting you complete control over parameters like saturation, sharpness, and noise reduction. This granular control prevents enhancements in one area from negatively impacting another, a common pitfall in complex image processing.
Navigating the Select and Mask Workspace
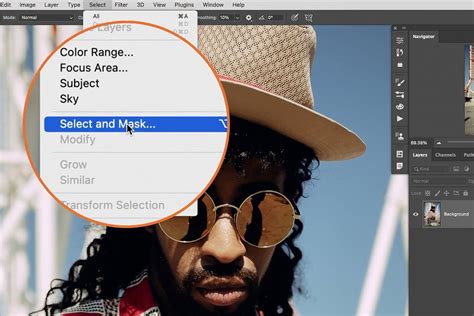
For those utilizing the latest versions of Adobe Photoshop CC, accessing the Select and Mask tool is straightforward. It can be found within the Main Menu Bar, typically under the "Select" menu. While this path is common for general photography purposes, understanding its nuances is key for specialized applications like astrophotography.
Initial Selection Methods
Before diving into the refinement options, a foundational selection needs to be made. There are several traditional methods to achieve this:
- Quick Selection Tool: This tool allows for a relatively rapid selection by painting over areas of your image. Photoshop's AI, known as Adobe Sensei, assists in identifying edges and creating a selection.
- Select Subject: This powerful, often one-click option leverages AI to automatically detect and select the main subject of your image. It's particularly effective for images with clear subjects and distinct backgrounds.
- Object Selection Tool: Similar to Select Subject, this tool allows you to draw a rectangle or lasso around an object, and Photoshop will attempt to select it.
- Magic Wand Tool: This tool selects similarly colored contiguous pixels. Adjusting the "Tolerance" setting controls how similar the colors need to be.
- Color Range: This option, found under the "Select" drop-down menu, allows you to select areas based on specific colors. The "Sampled Colors" option within this is particularly useful for astrophotography, enabling you to define selections based on the unique hues present in your deep-sky targets.
- Highlights Selection Mode: Within the Select and Mask tool itself, you can choose "Highlights" as a starting point. By adjusting the "Fuzziness" slider, you can control how much of the lighter areas, or "signal," is included in your selection. It's important to note that this method might also include stars in your selection, which is often desirable when working with astrophotography data.
Regardless of the initial method chosen, the goal is to establish a starting point for refinement. For astrophotography, it's common for initial selections to include stars along with the primary deep-sky object.

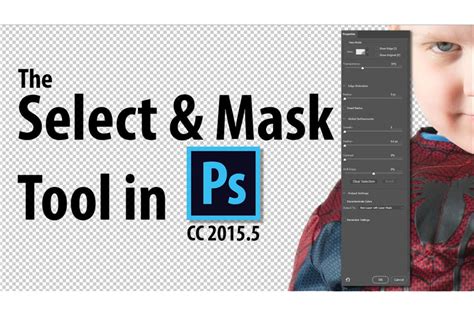
Refining Your Selection: The Select and Mask Workspace in Detail
Once an initial selection is made, entering the "Select and Mask" workspace unlocks a suite of powerful tools for refining its edges. This is where the true magic happens, allowing for natural-looking transitions and precise control.
View Modes for Clarity
Within the Select and Mask workspace, you'll find various "View Modes" to help you visualize your selection and its edges. The Black and White view mode is highly recommended for astrophotography and general masking purposes. It presents your selection as a black and white mask, where white represents the selected area and black represents the unselected area. This stark contrast makes it easy to identify areas that need refinement. Other useful view modes include:
- Overlay: Shows unselected areas with a transparent color overlay.
- On Black/On White: Places your selection against a solid black or white background for clarity.
- Onion Skin: Displays the selection as a semi-transparent overlay.
Key Refinement Tools and Sliders
The Select and Mask workspace offers a comprehensive set of tools and sliders to sculpt your selection:
Global Refinements: These sliders affect the entire selection and are your primary tools for achieving smooth, natural edges.
- Feather: This is arguably the most powerful refinement tool. Adjusting the Feather slider softens the edges of your selection, creating a gradual blend between the selected area and the surrounding pixels. In astrophotography, a subtle feather can make a significant difference in making nebulosity or galaxies appear naturally integrated into the background.
- Shift Edge: This slider expands or contracts your selection. A positive value expands the selection outwards, including more of the original image, while a negative value contracts it inwards, excluding more of the original image. This is useful for fine-tuning the inclusion or exclusion of specific elements near the edge of your selection.
- Smooth: Reduces any choppiness or jaggedness in the selection border.
- Contrast: Sharpens the selection border. Use with caution, as too much contrast can reintroduce hard edges.
Edge Detection:
- Radius: This slider helps Photoshop detect finer details along the edge of your selection. The "Smart Radius" option is often beneficial, allowing Photoshop to dynamically adjust the radius based on the edge complexity. For astrophotography, especially with fine details like star wisps or faint gas structures, a small radius can help capture these nuances. However, it's often best to leave this slider at a low value or experiment carefully.
- Refine Edge Brush Tool: This is a specialized brush that, when painted over areas like hair or fur (or in astrophotography, fine star fields or wispy nebulosity), intelligently analyzes the foreground and background colors to create a more accurate selection. It's particularly effective for complex edges.
- Refine Hair Button: This is a dedicated tool that attempts to automatically refine selections around hair, which can be notoriously difficult. While primarily designed for portraits, its underlying algorithms can sometimes be useful for complex, wispy structures in astrophotography.
Real-Time Previews and Iterative Adjustments
A significant advantage of the Select and Mask feature is the ability to preview changes in real-time. As you adjust sliders or use refinement tools, you can see the immediate impact on your selection. This allows for an iterative approach, making small adjustments and observing their effects until you achieve the desired result.
The process often involves starting with the Global Refinements, particularly Feather and Shift Edges, to establish a good general blend. Then, you might employ the Refine Edge Brush Tool or other specialized tools for particularly tricky areas. The goal is to find a "middle ground" where the selection is accurate without appearing artificial.
Outputting Your Selection
Once you are satisfied with your refined selection, you need to decide how to output it. The most common and recommended outputs are:
- Layer Mask: This is the most flexible option. It creates a mask on your current layer, allowing you to non-destructively hide or reveal parts of that layer. Any adjustments made to this layer will then be confined to the masked area.
- New Layer with Layer Mask: This creates a new layer containing only the selected pixels, with a layer mask applied. This is useful for isolating a subject entirely.
- New Layer: Creates a new layer with only the selected pixels. This is a destructive method as it doesn't include a mask for further editing.
- Duplicate Layer: Duplicates the selected area onto a new layer.
For astrophotography, outputting to a Layer Mask is almost always the preferred method, as it allows for maximum flexibility in subsequent editing.
The Fundamental Role of Layer Masks
While the Select and Mask tool is excellent for creating initial selections, understanding Layer Masks is fundamental to non-destructive and advanced image editing in Photoshop. Introduced in Photoshop Version 3, layers revolutionized image editing by allowing multiple image elements to be stacked and manipulated independently. Layer Masks took this further, providing a way to selectively hide or reveal parts of a layer without permanently deleting pixels.
Photoshop Layer Masks Explained in 7 Minutes!
Understanding Layer Masks
A Layer Mask is essentially a grayscale image attached to a layer. White areas on the mask reveal the corresponding pixels on the layer, black areas conceal them, and shades of gray create semi-transparent effects.
- Creating a Layer Mask:
- Make a selection using any of Photoshop's selection tools.
- With the selection active, click the "Add layer mask" icon at the bottom of the Layers panel.
- Alternatively, go to
Layer > Layer Mask > Reveal All(to show the entire layer) orHide All(to hide the entire layer). You can then paint on the mask to reveal or hide parts of the layer.
Working with Layer Masks
- Painting on the Mask: Select the Brush tool (
B) and ensure the layer mask thumbnail is active in the Layers panel (it will have a white border around it). Painting with white will reveal the layer, and painting with black will hide it. You can toggle between black and white foreground colors by pressingX. - Editing Masks: All normal brush controls, such as opacity, flow, and brush type, can be used when painting on a layer mask.
- Non-Destructive Editing: The power of layer masks lies in their non-destructive nature. If you make a mistake or change your mind, you can simply paint over the mask with the opposite color to undo your changes. This is a significant advantage over using the Eraser tool, which permanently removes pixels.
Practical Applications of Layer Masks
- Replacing Backgrounds: As illustrated with the truck and sunset example, layer masks are ideal for isolating subjects and placing them on new backgrounds.
- Combining Images: Layer masks are essential for seamlessly blending multiple images or elements together.
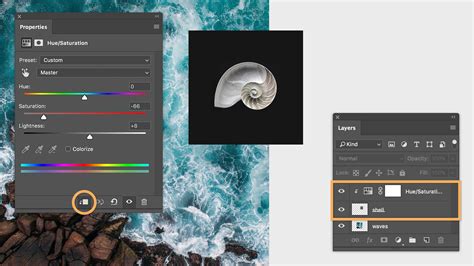
- Targeted Adjustments: By applying an adjustment layer (e.g., Curves, Hue/Saturation) and then creating a layer mask, you can restrict the adjustment to specific areas of your image. This is incredibly powerful for astrophotography, where you might want to boost the saturation of a nebula without affecting the surrounding sky.
- Creative Effects: Layer masks can be used for a wide range of creative effects, from subtle vignettes to complex composite images. For instance, adding a "17" to a graduation photo involved creating a selection for the arms, adding a layer mask, and then carefully brushing to integrate the number seamlessly.
Advanced Techniques and Considerations
Combining Selections and Masks
While the Select and Mask tool is a powerful standalone feature, it's often used in conjunction with other Photoshop tools and techniques.
- Saving Selections: If you create a particularly accurate selection, you can save it under
Select > Save Selection. This selection can then be loaded later to create a mask or for other purposes. - Creating Masks from Selections: As mentioned, you can create a layer mask directly from an active selection. This is a convenient shortcut.
- Masking Difficult Edges: For complex edges like hair or fine nebulae, the Refine Edge Brush Tool within Select and Mask is invaluable. Painting around these areas with this tool helps Photoshop differentiate between foreground and background.
- Using Adjustment Layers with Masks: This is a cornerstone of professional image editing. Create an adjustment layer, and then apply a layer mask to it. Paint on the mask to control where the adjustment affects the image. For example, you could add a Hue/Saturation adjustment layer, mask it to only affect a specific galaxy, and then increase its saturation.
Moving Selections and Masks Between Documents
Transferring selections and masks between documents requires understanding how Photoshop handles these elements.
- Copying and Pasting Layers with Masks: The most straightforward way to move a masked layer is to drag it from the Layers panel of one document to the Layers panel or document window of another. The layer and its associated mask will be copied.
- Copying Paths: For moving selections, copying "paths" can be a robust method. Paths are vector-based and can be saved and loaded.
- Understanding Selection vs. Mask: It's crucial to differentiate between a "selection" (marching ants) and a "layer mask." A selection is a temporary area of focus, while a mask is a persistent element that hides or reveals parts of a layer. Selections are often used to create masks, but they are not the same thing.
Common Pitfalls and Best Practices
- Over-reliance on Shortcuts: While shortcuts can speed up workflow, understanding the underlying principles of mask creation and manipulation is vital. Avoid creating masks while a selection is active until you are comfortable with the process; create the mask first, then work with selections.
- Activating the Correct Thumbnail: When working with layer masks, ensure you have clicked on the mask thumbnail in the Layers panel before painting. Painting on the layer thumbnail affects the image pixels directly, while painting on the mask thumbnail affects the mask.
- Flattening PSD Files: Never flatten a .PSD file unless absolutely necessary for a specific output. Flattening merges all layers into a single background layer, losing all the flexibility and editability of individual layers and masks.
- Edge Halos and Artifacts: Selections often suffer from edge problems like halos, jaggies, and blockies. The Select and Mask tool, particularly its refinement options, is designed to combat these issues. If artifacts persist, manual touch-ups with the Brush tool on the layer mask are often required.
Conclusion
The Select and Mask tool in Adobe Photoshop CC is an indispensable asset for any user seeking precise control over image editing. Whether you're a photographer looking to isolate subjects, an astrophotographer aiming to refine celestial details, or a digital artist creating complex composites, mastering this tool and its synergy with layer masks will unlock new levels of creative potential. By understanding the principles of selection, refinement, and non-destructive masking, you can elevate your images from ordinary to extraordinary, achieving results that are both technically sound and artistically compelling. The journey into mastering these tools may seem daunting at first, but by following a step-by-step approach and practicing consistently, you'll find that achieving sophisticated edits becomes increasingly intuitive and rewarding.
The photograph of the Lagoon Nebula featured earlier was captured using amateur, affordable astrophotography gear back in 2013, demonstrating that advanced techniques can be applied even with accessible equipment. For those interested in delving deeper into astrophotography image processing, comprehensive guides and tutorials are available to explore every technique used in software like DeepSkyStacker and Photoshop.