This tutorial delves into the powerful motion tracking and blurring capabilities within DaVinci Resolve, a professional video editing and color grading software. We will explore how to effectively blur specific elements within a video, such as faces or license plates, as they move across the frame, while leaving the rest of the footage untouched. For those new to Resolve, the concept of applying dynamic effects that follow moving objects can initially seem complex, but with a structured approach and understanding of Resolve's tools, it becomes an intuitive process.
Understanding the Core Challenge: Dynamic Object Blurring
A common scenario in video post-production involves needing to obscure sensitive information or enhance viewer focus by blurring a particular object that moves. This is particularly relevant for privacy concerns, such as blurring faces or license plates, or for creative reasons, like isolating a subject. The fundamental challenge lies in ensuring that the blur effect adheres precisely to the object it's intended to conceal or highlight, even as the object changes position, orientation, or scale within the frame.
When you first attempt to apply a blur effect in DaVinci Resolve, you might place keyframes at the beginning and end of your desired blur duration. However, you may observe that the blur remains static, occupying the same area of the screen throughout the entire clip, rather than following the moving object. This indicates a misunderstanding of how to link the blur dynamically to the tracked motion. The solution involves leveraging Resolve's sophisticated tracking features to analyze the movement of an object and then applying the blur effect in conjunction with this tracked data.
The Power of Power Windows and Keyframing
One highly effective method for isolating a blur to a specific area is by utilizing DaVinci Resolve's "Power Windows." These are tools that allow you to create custom shapes (like circles, rectangles, or even freeform shapes) that can be used to isolate an effect to a particular part of the image.
Here's how this approach works:
Track the Object: The first crucial step is to track the object you want to blur. DaVinci Resolve's Tracker tool is essential here. You'll need to select the object, define a tracking area around it, and then initiate the tracking process. Resolve will then analyze the footage frame by frame to determine the object's movement.
Apply the Blur: Once your object is tracked, you'll typically add a blur effect to your node. This could be a Gaussian Blur, a directional blur, or another blur type depending on your desired aesthetic.
Create and Track a Power Window: Within the node containing the blur effect, you can create a Power Window. This window should be sized and positioned to initially encompass the object you wish to blur. Crucially, you then need to "track" this Power Window. Resolve's tracker will follow the outline of your Power Window, ensuring it maintains its position relative to the moving object.
Constrain the Blur: The Power Window acts as a mask, meaning the blur effect will only be applied inside the boundaries of that window. This is how you ensure the blur doesn't affect the entire frame.
Control Blur Presence with Opacity (Keyframing): This is where the "blur on, blur off" functionality comes into play. While you might not immediately see an "Opacity" control for the blur effect itself, you can achieve dynamic opacity control by keyframing the strength of the blur or, more precisely, by controlling the output gain of the key signal driving the blur.
- Keyframing Blur Value: A straightforward approach is to directly keyframe the intensity of the blur effect. You would set the blur to a high value when you want the object blurred and to zero (or a very low value) when you want it unblurred. This requires setting multiple keyframes along the timeline to precisely control when the blur appears and disappears.
- Using Key Output Gain: A more refined method, as suggested, involves using the "Key Output Gain" control. This control, found within the keyer settings of your node, essentially dictates the overall strength of the effect driven by that node. By keyframing the Key Output Gain to 0, you effectively "turn off" the blur. When you then increase the Key Output Gain (e.g., to 1 or higher, depending on the blur settings), the blur becomes active. This method is advantageous because it allows you to easily adjust the relative amount of blur later on by simply changing the gain value, rather than having to re-keyframe the specific blur intensity.
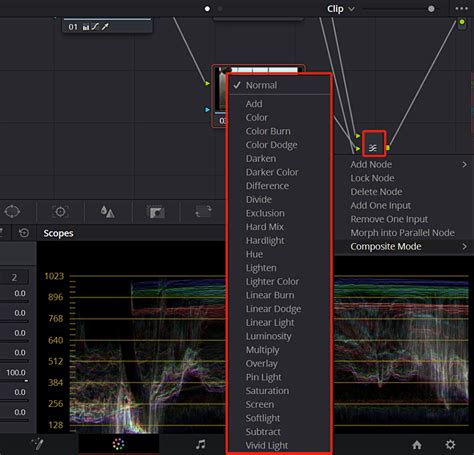
Addressing Node Piping and Layering Issues
A common point of confusion for new users, especially when dealing with multiple effects and nodes, is the order of operations within the node graph. If you find that your blur is layered over text when it shouldn't be, or the entire image is blurred instead of just the tracked object, it's almost certainly an issue with your node piping.
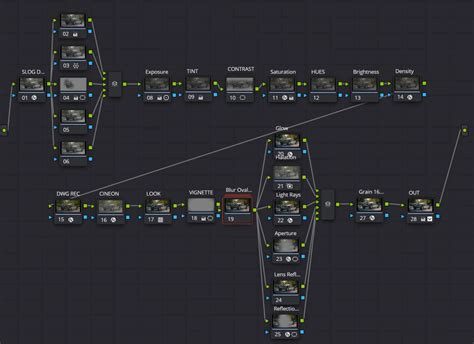
Let's consider the scenario described: "My node pipe is ‘media in - Tracker - blur - media out’, I also have a text node merged with the tracker and blur."
The problem here is that the blur is applied after the tracker, and it's affecting the entire image that passes through the blur node. The text node is then merged, but if the blur has already affected the whole image, the text will appear on top of a blurred background.
To blur only the tracked object, you need to isolate the blur effect to that specific area using a mask (like a Power Window) or by keying a specific part of the image.
Corrected Node Piping Strategy:
Media In: Your starting point.
Tracker Node: Apply your tracker to identify and follow the object.
Blur Node: Add your desired blur effect.
Power Window / Masking: Within the Blur node, create a Power Window that precisely outlines your tracked object. Track this Power Window to follow the object. This ensures the blur is only applied within this window.
Alpha Output from Blur Node: Crucially, the Power Window creates an alpha channel (transparency) for the blur effect. You will typically use the "Outside" mode of the Power Window to apply the blur outside the masked area, or the "Inside" mode to apply it inside. For blurring a face, you'd usually want to apply the blur inside the window.
Merge Node: Now, you need to composite your original footage with the blurred version of the tracked object. This is where a Merge node comes in.
Option A (Simpler, often sufficient): If your blur node is correctly masked to only affect the object, you might not need a complex merge. The blur node itself, when used with a Power Window, will generate an alpha channel. You can then connect this directly to your Media Out, and the rest of the image will remain untouched. If you're adding text, you'd typically add a separate node after the blur node for the text, and then merge that with your original background.
Option B (More Control): A more robust approach for complex layering:
- Node 1: Media In.
- Node 2: Tracker.
- Node 3: Blur. Apply your Power Window and track it to the object. This node should output the blurred object and transparency where the blur is applied.
- Node 4: This node would be your "background" - essentially the original footage coming from Media In, but without the blur applied.
- Merge Node: Connect the output of Node 3 (blurred object) to the foreground input of the Merge node. Connect the output of Node 4 (original footage) to the background input of the Merge node. The Merge node's output will be your composited image.
- Text Node: Add your text node and merge it either with the output of the Merge node, or with the background element before merging the blurred object. The exact placement depends on whether you want the text behind or in front of the blurred object.
Keyframe the Blur Value: A Direct Approach
For simpler scenarios, like "blur on blur off" for a face that's briefly visible, directly keyframing the blur value itself can be the most efficient method.
- Track the Object: As always, start by tracking the object you want to blur.
- Apply Blur: Add a blur effect to your node.
- Add Power Window: Create a Power Window that isolates the object. Track the Power Window.
- Keyframe Blur Intensity:
- Go to the frame where you want the blur to begin.
- In the Inspector for your blur effect, find the "Blur" or "Intensity" parameter.
- Click the diamond icon next to the parameter to set a keyframe. Set the blur value to your desired level (e.g., 20-30 for a noticeable blur).
- Go to the frame where you want the blur to end.
- Set another keyframe, this time setting the blur value to 0 (or a very low value, effectively turning the blur off).
- Resolve will automatically interpolate the blur intensity between these two keyframes, creating a smooth transition.
This direct keyframing method is excellent when the timing of the blur is straightforward and doesn't require complex adjustments to the blur's strength over time.
How to Blur Out a Face with Movement Tracking | DaVinci Resolve 16
Alternative: Key Output Gain for Flexible Control
The suggestion to use the "Key Output Gain" offers a more flexible workflow, especially if you anticipate needing to adjust the blur's intensity later.
- Set up Tracking and Blur with Power Window: Follow the steps above to track your object and apply a blur effect with a Power Window.
- Access Key Controls: In the node where you've applied the blur and Power Window, look for the "Key" tab or section in the Inspector.
- Keyframe Key Output Gain:
- When you want the blur to be off, set the "Key Output Gain" to 0. Click the diamond icon to set a keyframe.
- When you want the blur to be on, increase the "Key Output Gain." A value of 1 is often the default for a full effect. Set another keyframe at this point.
- The advantage here is that the actual blur intensity is still controlled by the main blur parameter. By keyframing the Key Output Gain, you're essentially controlling the opacity or visibility of the blur effect. If you later decide you want the blur to be less intense when it's "on," you can simply adjust the main blur parameter (e.g., from 30 down to 15) for all the frames where the gain is set to 1, and the relative effect will be reduced. This is much easier than re-keyframing the blur value itself.
This technique is particularly useful for maintaining consistency across multiple blurs where you might later want to fine-tune the overall subtlety of the effect.
Handling Objects Moving In and Out of Shot
The tracking and keyframing techniques discussed are also invaluable when objects enter or leave the frame.
- Entering Shot: As the object comes into view, you'll start your blur keyframes (either blur intensity or key output gain) to be "on."
- Exiting Shot: As the object moves out of frame, you'll keyframe the blur to be "off" just before it disappears completely.
- Objects Moving In Front: A common challenge is when another object temporarily obscures the object you're trying to blur. DaVinci Resolve's tracker is generally robust, but for very complex occlusions, you might need to:
- Manually Adjust Tracker: Pause tracking and manually reposition the tracker points or the Power Window.
- Break Up Tracking: In extreme cases, you might need to split the clip into sections where the object is fully visible and where it's occluded, applying different tracking or blur settings to each section.
- Use Multiple Trackers: For very complex scenarios, you might even use multiple trackers to better define the object's boundaries.
Tips for Efficient Tracking and Blurring
- Start with a Clear Subject: The tracker works best when the object you're tracking has distinct features that are visible throughout the shot. Avoid tracking areas with very little detail or areas that change dramatically in appearance.
- Analyze Tracking Data: After running the tracker, review the results. If the tracker has drifted, you'll need to go back and adjust the tracking settings, the size of the search area, or even manually keyframe the object's position for problematic frames.
- Feathering the Power Window: For a softer edge to your blur effect, use the "Softness" parameter on your Power Window. This will create a gradual transition between the blurred and unblurred areas, making the effect look more natural.
- Node Structure Matters: Always ask yourself if your node structure is logical. If you're trying to apply an effect to a specific part of the image, that effect should generally be applied before any operations that affect the entire frame, or it should be isolated using masks.
- Practice and Experiment: The best way to master these techniques is through practice. Experiment with different blur types, Power Window shapes, and keyframing strategies to understand how they interact.
By understanding the interplay between tracking, Power Windows, and keyframing, you can achieve precise and dynamic blurring effects in DaVinci Resolve, ensuring your footage meets professional standards for privacy and creative intent.