The 3D viewport in Blender is your primary window into the digital world you are creating. While often taken for granted, the way your scene is displayed within this viewport - its shading and visual presentation - can significantly impact your workflow, artistic decisions, and the overall quality of your final artwork. Understanding and effectively utilizing the available viewport shading modes is akin to putting on the right "goggles" for the task at hand, allowing you to see your work with the clarity and detail it deserves. This article delves into the intricacies of Blender's viewport shading, with a particular focus on the Solid mode, exploring its settings, applications, and how it complements other modes for a more efficient and visually informative creation process.
Understanding Viewport Shading in Blender
Viewport shading refers to the overall visual appearance of the 3D viewport. Since the introduction of Blender version 2.80 and the Eevee render engine, users have access to a far richer array of options for customizing this visual feedback compared to previous versions. These settings are conveniently located in the top-right corner of the 3D viewport, offering a range of modes from Wireframe to Rendered.
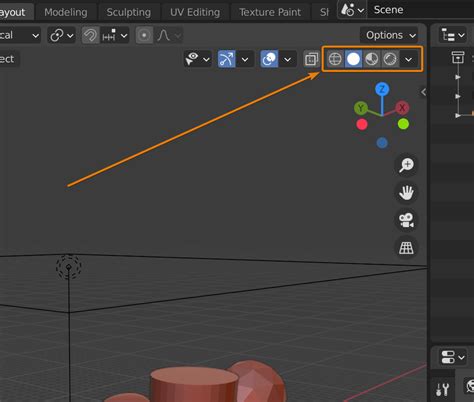
The available shading modes, typically displayed from left to right, include:
- Wireframe: Displays your scene as a network of edges and vertices, offering a skeletal view.
- Solid: Presents your scene with solid surfaces, allowing for basic shape and form visualization without the complexity of real-time rendering.
- Material Preview: Also known as "LookDev" mode, this mode utilizes Eevee to provide a realistic preview of your materials under a default lighting setup.
- Rendered: Displays a real-time preview of your scene as it would appear with the selected render engine (Eevee or Cycles), including lighting, shadows, and textures.
Beyond these primary modes, a dropdown menu adjacent to them offers many mode-dependent options. While many of these settings are down to personal preference, understanding the information each mode can convey is crucial for maximizing your efficiency. This article will primarily focus on the Solid shading mode and its associated settings, but it's important to note that shading often works in tandem with overlays, which control elements like grid lines, statistics, and selection highlighting.
The Solid Viewport Shading Mode: A Foundation for Modeling
When embarking on a new project in Blender, modeling is often the first and most intensive phase. For this foundational work, the Solid viewport shading mode is the most commonly used. It provides a clear, uncluttered view of your geometry, allowing you to focus on manipulating vertices, edges, and faces without the visual noise of complex material properties or lighting setups.
The Solid mode is based on Blender's Workbench render engine. While it's worth noting that most capabilities accessible through the Workbench engine can also be achieved within Eevee or Cycles, the Workbench engine's separation for Solid mode offers a clean and organized approach to viewport visualization. This distinction is helpful for understanding how different viewport modes relate to Blender's underlying render engines. For instance, Material Preview mode is not merely "based on" Eevee; it is Eevee operating in a real-time preview capacity.
The fundamental difference between the viewport display and a final render (produced by pressing F12) lies in their output. A final render is a static image file saved to disk, while the viewport display is a real-time or near real-time representation drawn directly from your system's RAM.
Solid Mode Settings: Lighting, Color, Background, and Options
When Solid viewport shading is enabled, expanding the viewport shading menu reveals four distinct sections: Lighting, Color, Background, and Options. Each of these sections offers controls to customize how your geometry is presented.
Lighting in Solid Mode
The lighting in Solid mode is dynamic and always follows your viewing angle. This means that if you've set up a light to appear from the left, it will continue to illuminate your object from the left regardless of how you rotate your camera. This behavior is distinct from actual scene lighting, which remains static relative to the world.
Within the Lighting section, you have three primary options:
Studio: This option provides a basic, pre-configured lighting setup for the viewport. By clicking on the current sphere icon, you can access a selection of presets. For each preset, you can adjust the rotation of the entire lighting setup. This system can be further customized by pressing the gear icon, which opens a more detailed light setup. Here, you can access and modify up to four distinct lights. The "Edit Studio Light" option allows you to configure the viewport lighting for Solid mode from this detailed menu, overriding the presets.
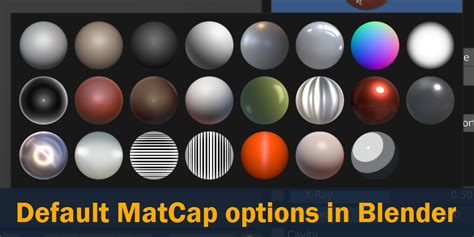
Matcap: Matcap stands for "Material Capture." While it might appear similar to Studio lighting at first glance, Matcaps are fundamentally different as they are generated from images. Matcaps are more dependent on the object's surface and can be used to highlight specific features or to better perceive the form of your model. They are frequently employed during sculpting to emphasize surface details and contours. A common Matcap for this purpose is the "diffuse dull red." You can also create custom Matcaps, though the process is less straightforward than simply selecting a preset. However, you can import and use Matcaps created in other Blender files. An interesting application of Matcaps is their use with normal maps. By rendering your model with a specific Matcap, you can effectively generate a visual representation that can be used to bake normal maps, capturing geometric details as surface information.
Flat: This option essentially disables all lighting calculations. Instead, it relies solely on the color information of your objects. This reduces the perceived form of your scene to flat shapes and outlines, emphasizing pure color and silhouette. While it appears basic by default, you can significantly alter its appearance by adjusting the object colors in the subsequent section.
Color in Solid Mode
The Color section determines the source of the colors displayed for your objects in the Solid viewport. These colors are then blended with the chosen lighting setup to create the final viewport appearance.
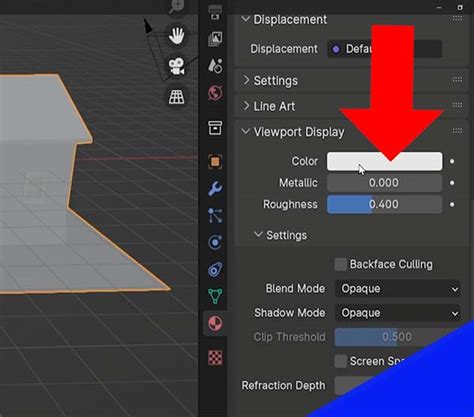
Material: This is the default setting. It utilizes the color defined in the "Viewport Display" section of the Material Properties tab. By default, this color is white for all newly created materials. You can assign a specific custom color to each material within your blend file.
Object: When this option is selected, the color is drawn from the "Viewport Display" section within the Object Properties tab. This allows you to set a single color for the entire object, overriding any material-specific viewport colors.
World: This setting uses the color defined in the "Viewport Display" section of the World Material tab. This is particularly relevant if you are using a world background color or gradient.
Vertex Paint: This mode allows for a more granular approach to coloring by enabling vertex painting. In this mode, you can assign individual colors to each vertex of your mesh. The level of detail and control you have over the painting process is directly related to the mesh density of your object.
Single: This option allows you to set a single, custom color for all objects displayed in the viewport directly from the menu.
Random: As the name suggests, this setting assigns a random color to each individual object in your scene, providing a visually distinct appearance for every element.
Texture: This option displays the color information derived from any textures applied to your objects. This is particularly useful when you want to see how your texture maps will appear without committing to a full material preview.
Background in Solid Mode
The Background section controls the color or gradient displayed behind your 3D scene in the viewport.
Theme: This is the default setting, which uses the background color or gradient configured within your Blender theme preferences. You can access and modify these settings by navigating to Edit > Preferences > Interface > Theme > 3D Viewport, and then expanding the "Gradient Colors" section.
World: This option uses the background color defined in the "Viewport Display" section of the World Material tab. This aligns with the color settings for your scene's world environment.
Viewport: This setting provides an immediate color selector directly within the menu, allowing you to pick a custom background color for the viewport without needing to navigate through preferences. While it might seem redundant with the "World" option, it offers a quick and direct way to change the viewport's background color on the fly.
Options in Solid Mode
The Options section for Solid view offers a range of settings that enhance visibility and help identify potential issues during modeling.
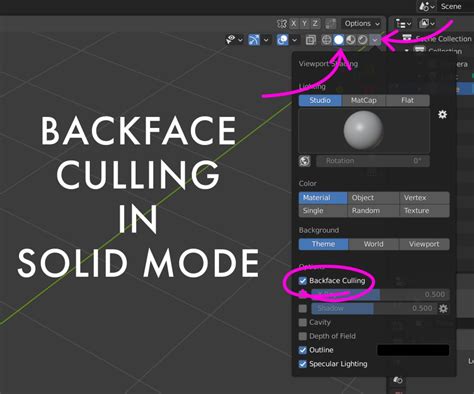
Backface Culling: Enabling this option hides any face that is viewed from its backside. Every face in 3D geometry has a front and a back. Backface culling makes the back faces invisible, which can be incredibly helpful for seeing through objects or identifying normal direction errors. Inconsistent normals are a common source of shading artifacts, and backface culling can quickly highlight these issues.
X-Ray: The X-ray toggle is also prominently displayed just to the left of the viewport shading modes. This essential feature allows you to see and select geometry that is hidden behind other objects. This is invaluable during modeling when you need to select vertices, edges, or faces that are occluded by foreground geometry. The slider next to the X-ray toggle controls the transparency of the objects, allowing you to adjust how much you can see through them. X-ray is available in both Solid and Wireframe modes. When you switch to Wireframe mode, X-ray is automatically enabled. You can toggle between Wireframe and any previously selected view mode by pressing
Shift + Z.Shadow: This setting enables real-time shadows within the Solid viewport. This is incredibly useful for understanding how light interacts with your object's form and can significantly aid in visualizing the three-dimensional shape. The strength of the shadow can be controlled by a slider, with higher values resulting in darker shadows. By pressing the gear icon, you can access additional shadow settings, including control over the light's direction and the properties of the "terminator" - the edge between light and shadow.
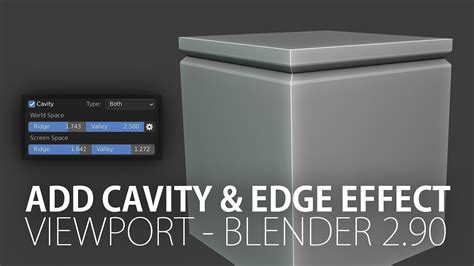
Cavity: The Cavity setting enhances the visibility of surface details by simulating ambient occlusion. It exaggerates the appearance of crevices and raised areas. The most useful controls here are "Ridges" and "Valleys," which allow you to fine-tune the contrast and spread of the cavity effect on your mesh. Pressing the gear icon reveals further settings, such as "Samples" and "Distance." While these offer granular control, for most users, the default settings are sufficient. Be cautious with the "Samples" setting, as excessively high values can negatively impact viewport performance.
Depth of Field: This option allows you to preview the effect of depth of field within the viewport. However, its functionality is limited and requires you to be looking through a camera that has depth of field enabled in its settings.
Outline: This setting provides the option to add a colored outline around your objects. While it can be useful for certain stylized presentations, it's a feature many users, including the author, have not found a significant need for in their typical workflows.
Specular Light: Enabled by default, this setting adds subtle highlights to soft-shaded edges and ridges. This can help to define the smoothness of surfaces. Like the outline setting, it's a subtle effect that many users may not actively adjust.
Beyond Solid: Material Preview and Rendered Modes
While Solid mode is excellent for the initial stages of modeling, other viewport shading modes become indispensable as you progress.
Material Preview Mode
As mentioned earlier, Material Preview mode is directly powered by Eevee. Its primary purpose is to offer a quick and accurate preview of your materials as you work on them in the Shader Node Editor.
Starting Blender? Advice from a Pro
In Material Preview mode, the settings are streamlined, focusing on two main sections: Lighting and Render Pass. This mode is primarily designed for texturing and shading, where your efforts are concentrated on shader node setups and UV mapping.
Lighting: You can choose to enable or disable "World Light" (which refers to the world background material) and "Scene Lights" (which includes all light objects, light probes, and emission materials). Enabling both effectively turns Material Preview into a dedicated Eevee viewport render. This is incredibly useful for quickly matching scene setups between Eevee and Cycles. If your lighting is not yet established, Material Preview mode offers built-in HDRI lighting capabilities. You can select from various built-in HDRI maps to illuminate your scene, allowing you to see how your model or material appears under different lighting conditions. Options for these HDRI maps include rotating them, changing their strength, adjusting their opacity, and blurring them.
Render Pass: This section allows you to single out and view individual Eevee-based render passes separately. A render pass isolates a specific element of the final render, such as the world background, shadows, or a mist pass, or components of the lighting like diffuse or specular color. By viewing these individual passes, you can gain valuable insights into how different channels contribute to the final look of your scene. This is exceptionally helpful for diagnosing rendering issues, understanding shading artifacts, or fine-tuning specific visual elements. For instance, viewing the normal pass can help identify flipped normals, while the mist pass allows you to preview mist effects.
Rendered Mode
Rendered mode provides the most accurate real-time preview of your scene as it will appear in a final render. It utilizes either Eevee or Cycles, depending on your project's render engine selection. This mode is essential for setting up lighting, understanding the impact of your camera, and finalizing the overall look and feel of your scene before committing to a lengthy render. It displays everything: materials, textures, lighting, shadows, and post-processing effects.
Common Misconceptions and Best Practices
A common misconception among beginners is that Wireframe mode is the sole solution for selecting geometry behind other objects. While Wireframe mode does inherently allow you to see through your mesh, the independent X-ray toggle, available in both Solid and Wireframe modes, is a more versatile and precise tool for this purpose. You can enable X-ray in Solid mode and still select occluded geometry without the visual complexity of the Wireframe display.
The Power of Viewport Shading for Workflow
The ability to quickly switch between these shading modes is a cornerstone of efficient 3D production.
- Modeling: Solid mode, with X-ray enabled and potentially cavity shading, is ideal for manipulating geometry.
- Texturing & Shading: Material Preview mode is your go-to for seeing how your materials and textures will look under good lighting.
- Lighting & Rendering: Rendered mode is crucial for evaluating the final output, including complex lighting scenarios and camera effects.
By understanding and leveraging the distinct capabilities of each viewport shading mode, you gain a powerful toolkit for visualizing and refining your 3D creations. The seemingly simple act of changing how your viewport looks can profoundly impact your workflow, leading to more informed artistic decisions and ultimately, better art. The granular control offered within Solid mode, particularly through its Lighting, Color, Background, and Options settings, empowers you to tailor the viewport's appearance to your specific needs at any given stage of your project.