Photoshop's Vanishing Point filter is a powerful tool that allows users to create and edit images with accurate perspective. This feature is particularly useful for architectural photography, interior design, and any scenario where maintaining realistic perspective is crucial. While Photoshop's legacy 3D features have been removed as of July 2024, the Vanishing Point filter remains a vital component for working with perspective in your images. For earlier versions of Photoshop (prior to CC), some of the functionality discussed might have been exclusive to Photoshop Extended, but this is no longer the case as Photoshop does not have a separate Extended offering.
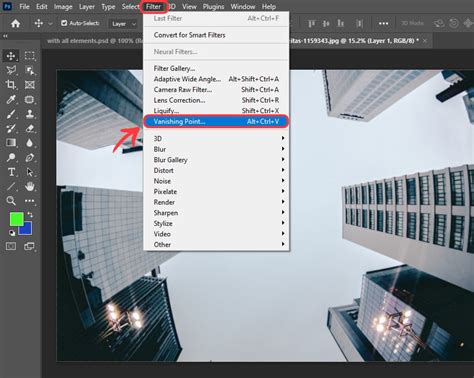
The Vanishing Point dialog box, accessible via Filter > Vanishing Point, is the central hub for all perspective-related operations. It is equipped with a suite of tools designed for defining perspective planes, editing images within those planes, measuring distances, and previewing your work. The tools within the Vanishing Point dialog box, such as the Marquee, Stamp, and Brush tools, function in a manner analogous to their counterparts found in the main Photoshop toolbox. You can also leverage the same keyboard shortcuts for setting tool options, ensuring a familiar workflow.
Navigating the Vanishing Point Interface
The Vanishing Point dialog box is organized into several key areas:
- A. Vanishing Point Menu: This menu provides access to various commands and settings related to the Vanishing Point session.
- B. Options Bar: This area displays and allows for the modification of tool-specific options.
- C. Toolbox: This contains the primary tools for creating and manipulating perspective planes, as well as for image editing within the filter.
- D. Preview Window: This is where you interact with your image, defining planes, making selections, and performing edits.
- E. Main Photoshop Toolbox: While not directly part of the Vanishing Point dialog, your main Photoshop toolbox remains accessible and its tools can often be used in conjunction with Vanishing Point.
- Tool Options for Setting Tool Options: This area, often integrated with the Options Bar, allows you to fine-tune the behavior of the selected tool.
Within the Vanishing Point dialog box, you'll encounter several specialized tools:
- Create Plane Tool: This is the default tool and is used for defining the perspective planes by clicking to set corner nodes. You can edit, move, and resize these planes.
- Marquee Tool: Used for making selections within a perspective plane. These selections can then be moved, scaled, filled, or transformed, all while adhering to the plane's perspective.
- Stamp Tool: Allows you to paint with a sample of the image, effectively cloning pixels from one area to another while respecting the perspective.
- Brush Tool: Used for painting with a selected color or sampled pixels within a plane.
- Transform Tool: Enables scaling, rotating, flipping, flopping, or moving a floating selection.
- Measure Tool: This tool is invaluable for measuring distances and angles of items within a plane. These measurements can even be rendered directly into your Photoshop document.
- Zoom Tool: Magnifies or reduces the view of the image in the preview window. Holding down the "X" key temporarily activates zoom.
- Hand Tool: Moves the image within the preview window.
Defining and Manipulating Perspective Planes
The core of the Vanishing Point filter lies in the creation and manipulation of perspective planes. These planes represent the surfaces in your image that adhere to a specific perspective.
Creating Planes
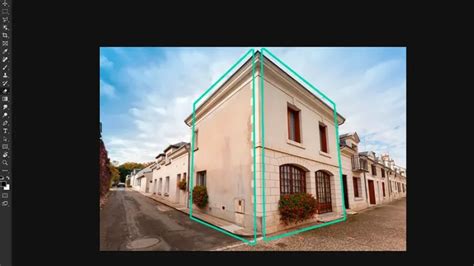
By default, the Create Plane tool is selected. To define a perspective plane, you simply click in the preview image to set its corner nodes. It's often best to use a rectangular object or a distinct plane area in your image as a guide when initially creating a plane.
- Tearing Off Additional Planes: To extend a perspective plane or create new ones that are connected, you can use the Create Plane tool and Ctrl-drag (Windows) or Command-drag (Mac OS) an edge node. This allows you to define complex geometries, such as the sides of a building, walls, or floors, as part of a continuous surface. You can tear off as many planes as you need to accurately capture the geometry of a complex scene.
Plane Validity and Visual Cues
As you create planes, Vanishing Point provides visual feedback to indicate their validity:
- Blue Bounding Box and Grid: This is the standard indicator for a valid plane.
- Red or Yellow Bounding Box and Grid: This signifies an invalid plane, usually due to incorrect placement of the corner nodes. This can happen if the nodes don't form a planar surface or if the aspect ratio is distorted.
Adjusting Planes
Once a plane is created, you can select, edit, move, and resize it using the Create Plane tool.
- Moving and Reshaping: You can drag the bounding box handles to modify the shape of the plane.
- Adjusting Grid Size: To fine-tune the grid that appears within the plane, you can enter a value in the Grid Size text box or use the associated slider.
- Rotating Planes: The Angle text box and slider allow you to adjust the rotation of a plane. Note that rotating a parent plane will affect any child planes derived from it.
Advanced Plane Operations
- Tearing Off New Planes: To create a new plane from an existing one, use the Create Plane tool and Ctrl-drag (Windows) or Command-drag (Mac OS) an edge node. This is essential for mapping perspectives onto multiple surfaces that are part of a continuous object, like different walls in a kitchen that form a continuous surface.
- Allowing Multi-Surface Operations: For more complex scenes where edits might span across multiple planes, you can enable "Allow Multi-Surface Operations" from the Vanishing Point menu. This allows tools like the Brush and Stamp to operate across the boundaries of active planes, providing a more seamless editing experience.
Editing Within Perspective Planes
The true power of the Vanishing Point filter is revealed when you start editing your image within the defined perspective planes. This ensures that all edits, such as painting, cloning, copying, or pasting, are applied with the correct perspective.
Selections and Floating Selections
Making selections within a perspective plane is a fundamental workflow.
- Creating Selections: Using the Marquee tool in Vanishing Point, you draw a selection within a perspective plane. Once drawn, this selection can be cloned, moved, rotated, scaled, filled, or transformed.
- Floating Selections: When you move a selection containing image pixels within Vanishing Point, it becomes a "floating selection." This selection appears to hover above the main image, behaving as if it were on a separate layer, even though it's not on a dedicated layer until rendered.
- Deselecting and Pasting: Clicking outside a floating selection deselects it. Once deselected, the content of the floating selection is permanently pasted into the image, overwriting the pixels beneath it. Cloning a copy of a floating selection also deselects the original.
Painting and Cloning in Perspective
The Brush and Stamp tools are your primary instruments for applying edits.
- Painting with Color or Sampled Pixels: The Brush tool allows you to paint with a selected color or with sampled pixels from your image.
- Cloning with the Stamp Tool: The Stamp tool lets you paint with a copy of existing image pixels. This is incredibly useful for extending patterns, removing blemishes, or seamlessly integrating new elements into the scene while maintaining perspective.
- Cloning Options: Vanishing Point offers specific cloning behaviors:
- Clone: This is the default mode, where the cloned pixels are moved with the selection.
- Offset: This mode moves image content, allowing you to reveal or obscure the image underneath based on the movement of the selection.
- Heal/Color/Luminance: These options allow for more sophisticated cloning that attempts to match the surrounding pixels' color, luminance, and shading, creating a more natural blend.
Transforming Floating Selections
The Transform tool is essential for manipulating floating selections.
- Scaling: To scale a floating selection, select the Transform tool and drag a node. Holding Shift constrains the aspect ratio.
- Rotating: To rotate a floating selection, hover over a node until the cursor changes to a curved double arrow, then drag to rotate.
Expand and Bend Buildings In Photoshop! POWERFUL Photo Manipulation Techniques
Working with Layer and Canvas Considerations
To ensure a smooth workflow and prevent data loss, it's important to consider layers and canvas size before entering the Vanishing Point filter.
- Placing Results on a New Layer: If you want the results of your Vanishing Point work to be on a separate layer, create a new layer before applying the Vanishing Point filter. This keeps your original image intact and allows for non-destructive editing.
- Canvas Size: If you plan to clone content beyond the current boundaries of your image, it's advisable to increase the canvas size beforehand to accommodate the additional content.
- Pasting from Clipboard: If you intend to paste an item from the Photoshop clipboard into Vanishing Point, copy the item before choosing the Vanishing Point command. The copied item can originate from a different Photoshop document. Once pasted into Vanishing Point, it becomes a floating selection that conforms to the perspective of any plane it's moved into.
Measuring and Rendering Grids
The Measure tool is a powerful addition for ensuring accuracy and consistency.
- Measuring Distances and Angles: Select the Measure tool and then click and drag to define a line. This line will represent a distance or angle within the perspective plane.
- Rendering Measurements: You can render these measurements directly into your Photoshop document by choosing "Render Measurements To Photoshop" from the Vanishing Point menu before clicking OK.
- Rendering Grids: Similarly, you can render the perspective grid itself into your document by selecting "Render Grids To Photoshop" from the Vanishing Point menu. These rendered grids are raster, not vector.
- Linking Measurements to Grid: For precise scaling, you can select "Link Measurements To Grid" in the tool options. This ensures that measurements you make are scaled according to the grid spacing of the perspective plane. This is particularly useful when you know the actual size of an object in your scene and want to ensure your edits reflect that scale.
Adjusting Grid Spacing
The grid spacing of a perspective plane can be adjusted independently of any measurements made. This allows for fine-tuning the visual representation of the perspective. When the "Link Measurements To Grid" option is deselected, the grid spacing can be adjusted without affecting the accuracy of existing measurements.
Copying Elements Between Documents
Vanishing Point facilitates the seamless transfer of perspective-aware elements between different Photoshop documents.
- Copy within Vanishing Point: In the source document, open the Vanishing Point filter. Copy the item you wish to transfer. This item will be placed as a floating selection within the Vanishing Point preview.
- Transfer to Clipboard: Copy this floating selection to the clipboard.
- Paste into Target Document: Open the target document and enter Vanishing Point. Paste the item from the clipboard. It will appear as a floating selection and can then be dragged into a perspective plane, automatically conforming to its perspective.
This process is invaluable for creating consistent architectural visualizations or integrating elements from one scene into another while maintaining perfect perspective.
Advanced Techniques and Considerations
- Allowing Multi-Surface Operations: As mentioned, this setting is crucial for complex edits that span across multiple planes. It ensures that tools like the Brush and Stamp can operate cohesively across different surfaces.
- Clip Operations To Surface Edges: This option, found in the Vanishing Point menu, constrains painting or cloning operations to the boundaries of the active plane. This is useful for precise editing where you don't want your edits to bleed into adjacent areas.
- Color and Luminance Matching: When painting or cloning, you can choose to have the edits match the surrounding pixels' color and luminance. This significantly enhances the realism of your edits by ensuring they blend seamlessly with the existing lighting and tone of the image.
- Transforming Selections: When manipulating floating selections, you can scale, rotate, and move them. This allows for precise placement and adjustment of copied or painted elements.
By mastering the tools and techniques within Photoshop's Vanishing Point filter, you can achieve incredibly realistic and compelling perspective-based edits, transforming your images with precision and control.