Procreate, a powerhouse digital art application, offers a versatile array of color interfaces designed to seamlessly integrate with diverse creative workflows. Understanding these tools, particularly the dynamic ColorDrop feature, is fundamental for artists seeking efficiency and precision in their digital painting. This guide delves into the intricacies of Procreate's color selection and application, with a specific focus on harnessing the full potential of ColorDrop.
Navigating Procreate's Color Interfaces
Before diving into ColorDrop, it's essential to grasp the foundational color selection tools within Procreate. The application provides several distinct interfaces, each catering to different user preferences and needs.
The Color Panel: A Gateway to Your Palette
The Color Panel, typically found in the top right of the Procreate interface, serves as the central hub for all color-related activities. It can be repositioned on the canvas by dragging its small grey handle, allowing for a personalized workspace. When detached from the top menu bar, it transforms into a more simplified, floating version known as the Color Companion.
Within the Color Panel, you'll encounter several tabs:
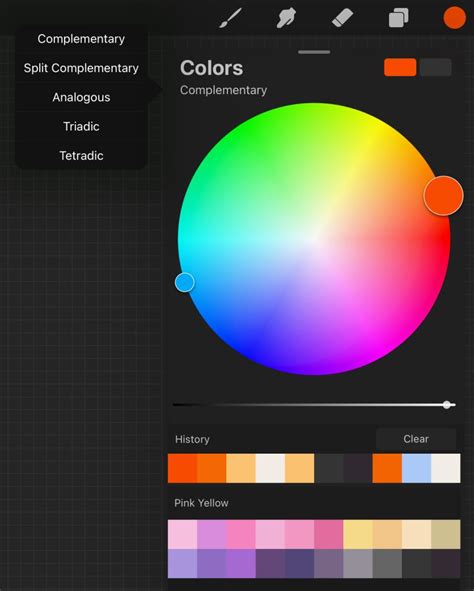
- Color Disc: This is the default view upon opening the Color Panel. It features an outer Hue ring surrounding an inner, zoomable Saturation disc. A clear reticle allows for intuitive color selection. As you drag this reticle, a secondary, smaller reticle displays two colors simultaneously: the currently hovered-over color on the right, and the most recent color from your History on the left.
- Classic: For those who prefer a traditional approach to color picking, the Classic interface offers a familiar color wheel and sliders.
- Harmony: This advanced picker enables the selection of harmonious color schemes. By choosing a harmony algorithm from the top left corner, you can explore color relationships that complement your primary selection.
- Value: This tab provides precise control through a series of sliders for Hue, Saturation, and Brightness. It also allows for direct input of Red, Green, and Blue (RGB) values, including hexadecimal codes. Hexadecimal values are a six-character alphanumeric representation (0-9, A-F) where 00 signifies zero and FF signifies 255 for each color channel. You can tap the alphanumeric field to copy or paste these hex values.

Palettes: Curating Your Color Collections
The Palettes tab is where you manage your color collections. Procreate comes pre-loaded with several standard palettes, but you also have the flexibility to import custom palettes or create your own. The currently active palette is indicated by a tick mark next to its name. You can set a different palette as active by tapping the ellipsis on the far right and selecting 'Set as active'.
Color History and Active Color
At the bottom of the Color Panel, you'll find the active palette. However, you can tap a specific icon to display your Color History instead. When you first open a new artwork, the History section is empty. Colors are automatically added to the History as you select them, with a capacity for up to ten colors. This History serves as a quick reference for recently used hues.
The Active Color itself, displayed prominently in the top right of the Procreate interface, shows your currently selected color. A crucial function of the Active Color is its ability to switch between your current and previous color by simply pressing and holding it. This quick swap feature is invaluable for iterative design processes.
The Power of ColorDrop
ColorDrop is Procreate's intuitive and powerful tool for filling areas with color. It leverages your selected Active Color and allows for dynamic adjustment of how aggressively the color fills a designated space.
Basic ColorDrop: Filling with Ease
To perform a basic ColorDrop:
- Select your desired color using any of Procreate's color interfaces.
- Drag the Active Color from the top right of the interface onto the area of your artwork you wish to fill.
- As you drag, a colored dot will detach from the Active Color, hovering over the canvas to provide a precise indicator of where the fill will originate.
- Tap your canvas to initiate the ColorDrop. The color will spread outwards until it encounters a boundary.
100 PROCREATE TIPS in 15 MIN
ColorDrop with Hover (iPadOS 16.1+)
For users with iPadOS 16.1 or newer on compatible iPads (iPad Pro 12.9-inch, 6th generation, or iPad Pro 11-inch), ColorDrop offers an enhanced "hover" experience. This allows for a more precise placement of the fill before committing. The colored dot will hover over the canvas, giving you a visual preview of the fill's origin point.
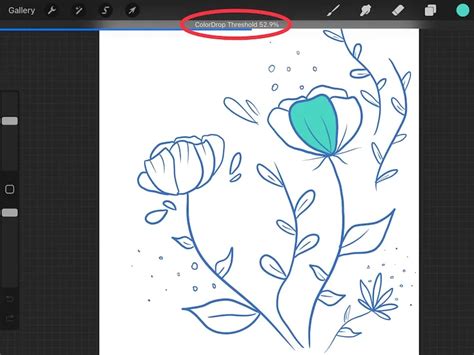
Adjusting the ColorDrop Threshold
The true power of ColorDrop lies in its ability to control the fill's extent. This is managed through the ColorDrop Threshold.
- Activating Threshold: To adjust the threshold, drag the Active Color over the area you want to fill, but do not release your finger. After a brief moment, ColorDrop Threshold will activate.
- Visual Indicator: A thin bar will appear above your artwork, representing the threshold amount.
- Adjusting the Fill: Drag your finger left or right along this bar to modify the threshold:
- Dragging to the left decreases the fill area, confining the color to smaller regions.
- Dragging to the right increases the fill area, allowing the color to spread more aggressively.
- Persistence: ColorDrop remembers your chosen Threshold setting until you manually change it again.
Continue Filling Mode
After performing a ColorDrop, a 'Continue Filling' option may appear at the top of the interface. Tapping this enters Continue Filling mode. In this mode, you can perform subsequent ColorDrops with a simple tap. Furthermore, you can hold down and drag with further taps to adjust the threshold for each individual fill, offering granular control over multiple fills within an artwork.
SwatchDrop: ColorDrop with Palettes
SwatchDrop is a variation of ColorDrop that utilizes colors directly from your selected palettes.
- Initiating SwatchDrop: Touch and hold a color swatch from a Color Palette.
- Dragging to Canvas: Drag the swatch onto any area of your canvas.
- Activating Threshold: To adjust the threshold, continue to touch and hold the swatch color as you drag it over the desired area. A blue line will appear on the top of your screen, indicating that the threshold adjustment is active.
- Adjusting Threshold: Swipe your finger left or right to adjust the fill threshold:
- Swiping left reduces the fill area.
- Swiping right increases the fill area.
- Persistence: SwatchDrop remembers the last Threshold setting used until it is changed again.
Recolor Mode: Transforming Existing Colors
Recolor mode offers a sophisticated way to replace existing colors within your artwork. This feature was a user-requested return and is accessible via QuickMenu.
- Accessing Recolor: First, assign 'Recolor' as a button in your QuickMenu. Then, select Recolor from the QuickMenu.
- Crosshair and Flood Slider: A small crosshair will appear in the center of the screen, indicating the point of color replacement. At the bottom of the screen, you'll find the Flood slider.
- Applying Replacement Color: As you slide the Flood slider, your chosen color will gradually fill with the replacement color. The loupe displays your new color on the top half and the current color on the bottom half, providing a clear visual comparison.
- Hold Modify Button: Holding the 'Modify' button on the sidebar can also invoke a floating Eyedropper, allowing for quick color sampling within the Recolor process.
Color Fill and Selections
The Color Fill setting, once enabled, is remembered even if you exit and re-enter Selections later. Furthermore, Fill Layer respects active selections and Alpha-Lock, ensuring precise and controlled color application.
Advanced Color Manipulation
Procreate provides additional layers of control for color manipulation and application.
Color Dynamics and Secondary Color
Within brush settings, Color Dynamics can be utilized to incorporate your secondary color. The secondary color is typically the second-to-last color you have used. As you drag the secondary reticle in the Color Disc, it displays both the hovered color and this secondary color, facilitating dynamic brushwork.
Fill Layer
The Fill Layer command is a powerful tool that respects existing selections and Alpha-Lock. This means you can apply a color fill to a specific area defined by a selection or to only the painted pixels of a layer, preventing unintended color spills. You can also select, adjust, and then drag and drop color directly into a movie within Procreate, integrating color seamlessly into animation workflows.
Understanding Color Values and Input
For artists who require absolute color accuracy, Procreate's Value picker is indispensable. It allows for the input of precise numerical values for Hue, Saturation, and Brightness, as well as RGB values. The ability to directly input hexadecimal values is particularly useful for matching colors from external sources or adhering to brand guidelines. These hex values, a common standard in digital design, are easily copied and pasted within Procreate.
Conclusion
Procreate's comprehensive suite of color tools, from the intuitive Color Disc to the precise Value picker and the dynamic ColorDrop, empowers artists to achieve their desired aesthetic with unparalleled ease and control. By mastering the nuances of ColorDrop, including its Threshold adjustment and SwatchDrop variant, and understanding the capabilities of Recolor mode and Fill Layer, digital artists can significantly enhance their efficiency and creative output. The platform's commitment to offering multiple pathways for color selection and application ensures that every artist, regardless of their preferred workflow, can find the tools that best suit their needs.