Precise alignment and positioning are essential when creating professional designs in Photoshop. The software offers three powerful alignment tools: guides, grids, and smart guides, which help you create perfectly aligned layouts without guesswork. These visual aids appear as non-printing lines or points that float over your image, providing reference points for positioning elements with precision. Each serves a distinct purpose while working together to help you create polished, professional designs. Understanding and effectively utilizing these tools can significantly elevate the quality and efficiency of your design workflow, whether you're working on print materials, web interfaces, or digital illustrations.
Guides: Customizable Alignment Lines
Guides are customizable, movable lines that help you position specific elements with precision. Unlike grids, which have a fixed structure, guides can be placed exactly where you need them. They appear as non-printing colored lines that float over your image and can be positioned horizontally or vertically at precise coordinates. These guides can be moved, locked, or removed as needed, and their colors can be customized to help organize your layout. Elements will snap to guides when dragged within approximately 8 screen pixels, providing a magnetic pull for accurate placement.
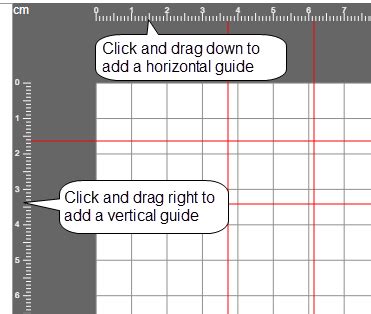
Guides are particularly useful when you need to align elements across different layers or create custom layouts that don't follow a regular grid pattern. It's ideal for creating symmetrical layouts or ensuring consistent spacing between elements. For instance, if you're designing a brochure and need to ensure that text blocks and images align perfectly across multiple pages, custom guides are invaluable. You can drag guides from the rulers at the top and left of the Photoshop interface to mark key alignment points. To show or hide rulers, you can choose View > Rulers or use the keyboard shortcut Cmd + R (Mac) or Ctrl + R (Windows). If you want to change the unit of measurement of your rulers, simply right-click on either the horizontal or vertical ruler.
To place a single guide at a specific location, you can choose View > New Guide. Alternatively, you can add a guide by clicking directly in the ruler area and dragging the guide into the document. The cursor changes to a double arrow, and the guide will appear as a thin line as you drag it into position. Releasing the mouse button drops the guide wherever you want it. The color of your guide line will depend on your preference settings.
Repositioning a guide is straightforward. Select the Move tool (V) from the Tools panel, then position the Move tool directly on top of the guide you wish to move. You can then drag the guide to its new location. Holding down the Shift key while dragging a guide will snap it to the nearest ruler tick marks, offering an additional layer of precision.
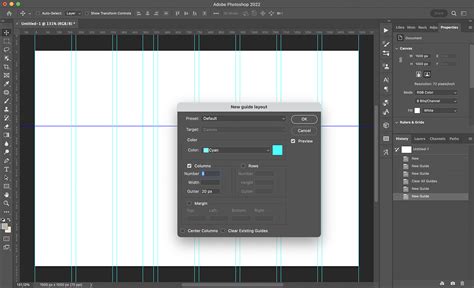
Guides can also be managed in bulk. To add multiple guides at one time, choose View > New Guide Layout. This dialog box allows you to specify the Target (Canvas, Artboards, or Selected Artboards), choose a guide color, set the number of Columns and Rows, define their Width, Height, and Gutters, and set Margin amounts. You can also choose whether to Center the Columns and whether to Clear Existing Guides before applying the new layout. For future use, you can save your custom guide layouts by selecting Presets and then Save Preset.
Removing guides is as simple as selecting them and pressing the Delete key. A quick way to delete a single guide is to Option-click (Mac) or Alt-click (Win) on the guide itself. Double-clicking on a guide will open the Guides, Grid, & Slices Preferences dialog box, allowing for quick adjustments.
For selecting multiple guides, you can use the keyboard modifier Option + Shift-click (Mac) or Alt + Shift-click (Win) on a guide. Once multiple guides are selected, you can use the same keyboard modifiers while dragging to reposition them all at once.
Guides can be locked to prevent accidental movement. To lock or unlock guides, use the keyboard shortcut Command + Option + “;” (Mac) or Control + Alt + “;” (Win), or navigate to View > Lock Guides. When changing the image size of a document, it's important to unlock the guides to ensure they resize proportionally with the image.
Guides, along with paths, can sometimes be difficult to see on high-resolution monitors due to anti-aliasing. To make them appear thicker and more prominent, select Preferences > Performance. Within the Graphics Processor Settings, click Advanced Settings and uncheck "Anti-alias Guides and Paths."
Changing the color of selected guides is also possible. First, select the guides you wish to modify, then choose View > Edit Selected Guides and use the Color options to change their hue.
An advanced method for creating guides is to generate them from existing shapes. You can choose View > New Guide From Shape. This functionality extends beyond just shape layers; you can create guides from Type layers and pixel-based layers as well, offering immense flexibility in defining precise alignment points based on your existing design elements.
Grids: Structured Alignment Patterns
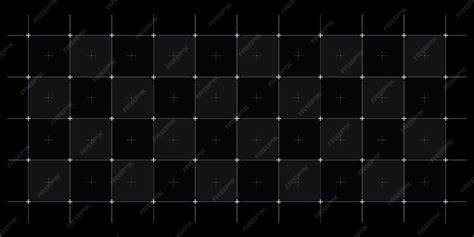
Grids, in contrast to the freeform nature of guides, display as a uniform pattern of non-printing lines or dots across the entire canvas. They maintain consistent spacing between lines, helping you create symmetrical layouts and maintain proportions. The same grid pattern can be applied to all images within a document, ensuring visual consistency. Elements can snap to grid lines when the snap feature is enabled, acting as a framework for your design.
Grids are particularly valuable when designing interfaces, layouts with repeating elements, or when you need to maintain consistent proportions throughout your design. For example, when designing a website layout, a grid can ensure that columns are evenly spaced and that elements align perfectly within their designated areas.
To enable the grid, choose View > Show > Grid, or use the keyboard shortcut Cmd + ‘ (Mac) or Ctrl + ‘ (Windows). By default, gridlines are spaced an inch apart with four subdivisions. However, you can customize the appearance and spacing of the grid in Photoshop's preferences.
In the Preferences dialog box, you can adjust the gridline marks by changing the number in the "Gridline Every" field, and use the dropdown menu next to it to select the grid's unit of measurement: pixels, inches, centimeters, millimeters, points, picas, or percent. The "Subdivisions" field controls how many lines appear between each main gridline, allowing for finer control over your layout. You can also adjust the grid colors by clicking on the swatch and selecting from the available options.
To create a grid that displays the "Rule of Thirds" overlay, which is a compositional guideline, navigate to Preferences > Guides, Grid & Slices. This can be a useful tool for photographers and designers aiming for aesthetically pleasing compositions.
To make objects "snap" onto a guide or grid, choose View > Snap. Enabling snapping makes the guides and grid lines behave almost like magnets, pulling the edges of your objects into place as you move them towards the alignment lines. Once an object aligns to a guide or grid line, you can gently move it along that line to snap it into place with other guides or grid lines, creating complex alignments with ease.
Smart Guides: Dynamic Alignment Assistance
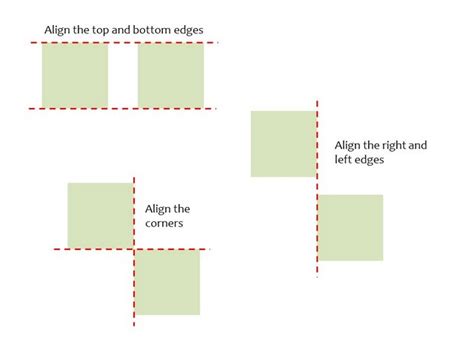
Smart guides are dynamic alignment aids that appear automatically when needed, offering real-time visual feedback as you work. They are special guides that appear onscreen when certain spatial relationships occur between objects on your document. For example, if you were moving an object (let's say a photograph) around, and the top of the photo aligned with the top, center, or bottom of another object (like a piece of text), a smart guide will appear, indicating that alignment. This visual cue tells you precisely what that relationship is.
When you use smart guides for the first time, they can be a little confusing, but as you become accustomed to them, you'll realize they are an incredibly useful tool for aligning objects nicely within your document. They simplify the process of aligning multiple layers and determining distances between them as they are being repositioned.
To ensure smart guides are active, choose View > Show > Smart Guides. By default, they are usually turned on.
The power of smart guides is evident when working with shapes and selections. For instance, as you create shapes or selections, smart guides will dynamically appear, showing you when your creation aligns with the edges or centers of other objects on the canvas, or even with the document boundaries. This is especially helpful for achieving pixel-perfect alignment, which is crucial for web design and UI/UX work.
How to Use Smart Guides in Photoshop
A specific application of smart guides, particularly relevant for pixel-based work, relates to the "Snap Vector Tools and Transforms to Pixel Grid" preference. If you zoom into an image above 500%, a Pixel Grid is displayed on top of the image. This grid is invaluable when trying to align shapes, such as rectangles, so that they begin and end on a full pixel. This prevents the creation of anti-aliased edges on shapes, which can result in blurry or inconsistent appearances, especially in digital interfaces.
Consider the scenario where the first shape was drawn with the "Snap Vector Tools and Transforms to Pixel Grid" preference turned on. This ensures that the shape's boundaries align precisely with the pixel grid. The middle illustration might represent a shape drawn with this preference turned off, where the shape's path might not perfectly align with the pixel grid. The final illustration could show the same rectangle, but with the "Align Edges" option enabled for the shape layer in the Options bar after drawing. Enabling this option forces the fill of the rectangle to align with the nearest pixel grid edges, even if the original path is not perfectly aligned. This demonstrates how smart guides and related preferences work in conjunction to achieve pixel-level precision.
When repositioning layers or shapes, smart guides can indicate when an object's bounding box aligns with the bounding boxes of other objects. This includes aligning tops, bottoms, left edges, right edges, and centers. They also show the distance between objects, allowing you to maintain consistent spacing. For example, when dragging a layer, smart guides might appear showing the distance in pixels to the layer above or below it.
Experimenting with these measurement guides is highly recommended. Try creating patterns by duplicating layers and using smart guides to ensure precise spacing and alignment. For instance, with the Move tool and a selected layer, holding down the Option (Mac)/Alt (Windows) key and dragging the layer creates a duplicate. You can then use smart guides to position this duplicate at a specific distance from the original, or to align it with other elements. Repeat this process to build up repeating elements for a pattern.
The interplay between guides, grids, and smart guides provides a comprehensive toolkit for achieving pixel-perfect designs. Whether you're laying out a complex magazine spread, designing a responsive website, or creating intricate illustrations, these tools are indispensable for ensuring accuracy, consistency, and a professional finish. By mastering their individual functions and understanding how they complement each other, designers can significantly enhance their efficiency and the overall quality of their visual creations.