Photoshop, a powerhouse for digital image manipulation, offers a myriad of tools to achieve specific visual effects. Among these, the conversion of images or elements to pure black and white is a common yet sometimes surprisingly complex task. While many users can readily make backgrounds transparent or achieve a basic grayscale appearance, the precise control needed to transform black elements into white, or to ensure an image consists of only black and white pixels, can be elusive. This article delves into the various methods and considerations for achieving true black and white in your Photoshop projects, from simple inversions to precise thresholding, addressing common pitfalls and offering efficient workflows.
The Challenge of Pure Black and White
The desire to transform black elements into white, or to achieve a stark, pixel-perfect black and white image, often arises when working with icons, logos, or specific artistic styles. A common frustration is that simple grayscale conversion, while removing color, still retains shades of gray. This means that non-black pixels, even if they appear white to the eye, are still technically present as gradients, preventing a truly binary black and white output. This can be particularly problematic in painting projects where accidental key presses can lead to unexpected monochromatic results across all layers, leaving users searching for a quick fix.
Quick Fixes and Inversion Techniques
When dealing with an entire project that has unexpectedly turned black and white, or when specific black elements need to become white, several quick methods can be employed. The fastest way to invert all black pixels to white is by using the keyboard shortcut Ctrl+i (or Cmd+i on a Mac). This command effectively inverts the tonal values of the selected layer or the entire image, turning black into white and white into black. This is a powerful tool for immediate correction, especially if the monochromatic shift was accidental.
For situations where the issue is not an inversion but a loss of color information across multiple layers, the History Panel becomes an invaluable resource. Accessible through Window > History, this panel records every step taken in your Photoshop session. By navigating backward through the history, one step at a time, you can revert the project to a previous state, effectively undoing accidental changes. The step immediately preceding the color loss might reveal the exact action that caused it, such as accidentally toggling layer visibility. Indeed, a common cause for an entire project appearing black and white, or seemingly devoid of color, is the accidental rendering of half of the layers invisible. This can sometimes be triggered by an unintended key press, leading to confusion and embarrassment when the solution is a simple layer visibility toggle.
Leveraging Blending Options for Color Changes
When the background of an image is transparent and the goal is to change the color of specific elements, the Blending Options within Photoshop offer a sophisticated and efficient solution. To access these options, you can double-click or right-click on the desired layer and select "Blending Options." Within the Layer Style menu, the Color Overlay option is particularly useful. By selecting "Color Overlay," you can then choose your desired color. This method is highly effective for recoloring black elements to white or any other hue, while respecting the transparency of the background. It provides a non-destructive way to alter the color of your image.
Achieving True Black and White: The Threshold Function
For those instances where a simple grayscale conversion is insufficient and a strict black and white output is required, the Threshold function is the definitive tool. This function is designed to convert an image into a mode that allows for only black and white pixels, eliminating all shades of gray.
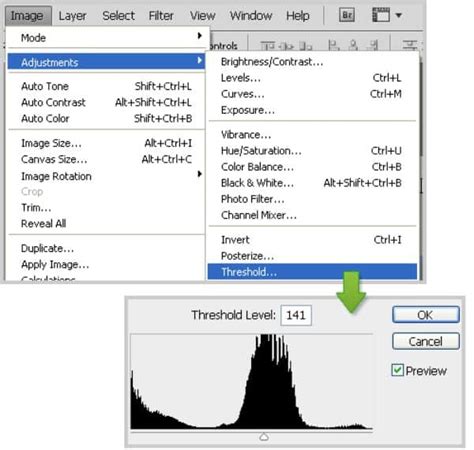
The process begins with ensuring your image is in a suitable color mode. If your image is in RGB mode, you should first convert it to Grayscale. This is done by navigating to Image > Mode > Grayscale. Photoshop will prompt you to discard color information, which is necessary for this process.
Once in Grayscale mode, the next crucial step is to convert to Bitmap mode. Go to Image > Mode > Bitmap. This action will open the "Bitmap" dialog box, which presents "Rendering Options." Here, you can select a Method for converting the grayscale image into pure black and white. Common methods include:
- 50% Threshold: This is the most basic option. Pixels with a brightness value above 50% become white, and those below 50% become black.
- Diffusion Dither: This method attempts to simulate shades of gray by scattering black and white pixels in a dithered pattern. While it doesn't create actual gray pixels, it can create the illusion of them.
- Pattern Dither: This method uses predefined patterns to represent different shades.
- Halftone Screen: This method converts the image into a series of dots of varying sizes and spacing, a technique historically used in printing.
The key to achieving a clean black and white image that meets the requirement of "if a pixel is not white then make it black" lies in selecting the appropriate method within the Bitmap conversion. For a true binary output, the "50% Threshold" is often the most direct approach, though experimenting with other dither options might be necessary depending on the desired aesthetic and the source image's characteristics.
Addressing Feathering and Blending Issues
Sometimes, the perceived issue isn't the conversion to black and white itself, but rather the presence of soft edges or feathered areas around your image elements. This "feathering" is often a result of the Brush Tool or other blending tools in Photoshop, which attempt to smooth the transition between the image and its background. This blending can introduce gray gradients even when you intend for a sharp, defined black and white appearance.
If you encounter such feathering, and the previous methods haven't resolved it, a workaround involves saving the image in a format that inherently supports less color depth and then re-importing it. Saving your work as a .bmp file, opening it in a simpler image editor like Microsoft Paint, and then saving it as a "monochrome bitmap" can effectively flatten and posterize the image to pure black and white. Re-opening this newly saved file in Photoshop will then provide a clean, dither-free black and white image, free from unwanted gray gradients.
Understanding Layer Visibility and Accidental Changes
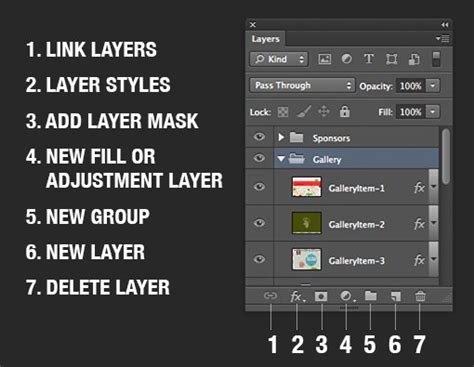
The experience of a whole project turning black and white due to accidentally hidden layers is a common, albeit frustrating, one. Photoshop's interface, with its numerous shortcuts and panels, can sometimes lead to unintended actions. When working with a complex project, it's always advisable to keep an eye on the Layers Panel. The visibility of each layer is controlled by an eye icon next to its name. Clicking this icon toggles the layer's visibility on or off. An accidental press of a modifier key in combination with a mouse click, or a misplaced keyboard shortcut, could inadvertently affect the visibility of multiple layers.
If you find yourself in this situation, the History Panel is your best friend, as mentioned earlier. By stepping back through your recent actions, you can pinpoint the exact moment the layers were hidden and then simply re-toggle their visibility. Understanding how layer visibility works and being mindful of keyboard shortcuts can prevent such occurrences in the future.
Photoshop | Isolate Layer Visibility
Advanced Considerations for Icon Design and Line Art
When working with icons or line art that needs to be a specific color, such as pure white on a transparent background, the Blending Options with Color Overlay is often the most efficient and non-destructive method. However, if you need to ensure that every pixel is either pure black or pure white, and there are no anti-aliased edges or subtle gradients, the Threshold adjustment combined with careful layer management is essential.
For instance, if you have a black icon on a transparent background and want to make it white, you could:
- Ensure the icon layer is selected.
- Apply a Color Overlay using white.
- Then, to guarantee pure black and white, you might need to convert the layer to a Smart Object, apply a Threshold adjustment, and then perhaps convert it back to a regular layer if further editing is required.
The key is to understand that "black and white" can mean different things: a grayscale image, an inverted image, or a strictly binary image. Each requires a different approach in Photoshop.
The Importance of Color Mode
The underlying color mode of your Photoshop document significantly impacts how colors are interpreted and manipulated. As highlighted, converting from RGB to Grayscale and then to Bitmap is a fundamental workflow for achieving true black and white. Understanding the implications of each modeâRGB (Red, Green, Blue for screens), CMYK (Cyan, Magenta, Yellow, Key/Black for print), Grayscale (shades of gray), and Bitmap (only black and white pixels)âis crucial for mastering color conversions and avoiding unexpected results.
For example, trying to apply a Threshold adjustment to an RGB image without first converting it to Grayscale might not yield the desired binary result because RGB contains color information that the Threshold tool isn't designed to directly reduce to a single black or white value.
Conclusion: A Multifaceted Approach
Achieving a perfect black and white conversion in Photoshop is not always a single-click operation. It requires understanding the nuances of different tools and settings. From the rapid inversion of Ctrl+i and the historical backtracking of the History Panel, to the precise control offered by Blending Options and the definitive binary conversion of the Threshold function, Photoshop provides a robust toolkit. By mastering these techniques and understanding the role of color modes and layer visibility, users can efficiently tackle any black and white conversion challenge, ensuring their projects achieve the desired starkness and clarity.