Adding page numbers to an InDesign document can, for some reason, feel like a surprisingly complex task. Yet, once the underlying logic is grasped, the process transforms into something remarkably straightforward. For years, many have grappled with this feature, only to discover its inherent simplicity. This tutorial aims to demystify InDesign's approach to page numbering, explaining the logic, demonstrating how to implement it, and covering essential customization options such as changing numbering styles, skipping initial pages, creating sections, and incorporating section markers and prefixes.
The Strategic Placement of Page Numbers: Leveraging Layers
The effective placement of page numbers is intrinsically linked to the concept of layers within InDesign. Understanding layers is crucial for managing document content and preventing errors. While not strictly mandatory, adhering to best practices regarding layers significantly enhances workflow efficiency.
Lukas Engqvist, a professor and InDesign expert, outlines a recommended layer structure for effective document management: from bottom to top, these layers typically include Background, Images, Text, and finally, Page Numbers/Headers/Footers. For interactive documents, additional layers for animations, interactivity, and navigation would be incorporated.
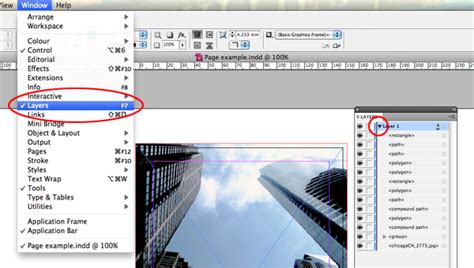
Layers function as containers, with those positioned at the top possessing a higher "priority." Elements residing in top layers are displayed above and will overlay elements in lower layers. Consequently, page numbers should always be situated in a top layer. This ensures that no other content, such as backgrounds or images, can obscure them, guaranteeing their visibility and accessibility to the reader.
Understanding the Mechanics of InDesign Page Numbering
At the core of inserting page numbers in InDesign lies a special placeholder known as the "Current Page Number." This placeholder can be positioned on any document page or, more commonly and efficiently, on a master page. When placed on a master page, the "Current Page Number" placeholder dynamically displays the number of the specific page to which that master page has been applied. Crucially, the number updates automatically as pages are added, removed, or rearranged within the document.
The true power of master pages becomes evident when dealing with page numbers. Any styling applied to the "Current Page Number" placeholder on a master page-such as setting it to bold-will be uniformly applied to all page numbers across every page that utilizes that master page. This centralized control ensures consistency and saves considerable time compared to manually formatting each page number individually.
Therefore, the fundamental principles for inserting page numbers are:
- Place page numbers within the appropriate layer.
- Utilize master pages for efficient and consistent application.
Implementing Page Numbers in Your InDesign Document
With a clear understanding of how page numbers function and the strategic advantage of using master pages, the practical implementation becomes straightforward.
- Access the Pages Panel: Open the Pages panel by navigating to
Window > Pages. If it's not immediately visible, ensure you select it from the window menu. - Select a Master Page: Double-click on a master page thumbnail (often labeled "A-Parent" by default). This action opens the master page spread in your main workspace, allowing you to edit it. Ensure you are working on the correct master page by checking if its name is highlighted in the Pages panel.
- Choose the Correct Layer: If you are using a layered structure, select the designated layer for page numbers before proceeding.
- Create a Text Frame: Using the Type Tool, draw a text frame on the master page where you want the page number to appear. Position it thoughtfully, considering the overall layout and aesthetic.
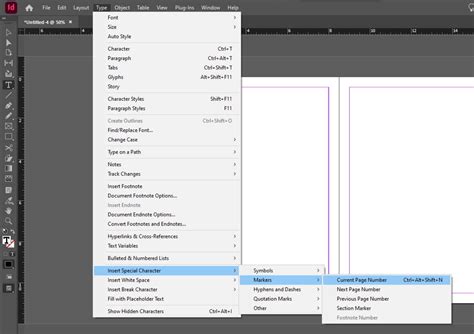
- Insert the Placeholder: With the text frame active, go to
Type > Insert Special Character > Markers > Current Page Number. This action inserts the "Current Page Number" placeholder, which will initially display the master page prefix (e.g., "A") rather than a numerical value. - Handle Facing Pages: If your document is set up for facing pages (common in books and magazines), you will need to replicate the text frame containing the "Current Page Number" placeholder on the opposite page of the master spread. This ensures that page numbers appear on both left and right-hand pages where appropriate.
- Apply the Master Page: Once the page numbers are set up on the master page, apply this master page to the desired document pages by dragging the master page thumbnail onto the document page thumbnails in the Pages panel.
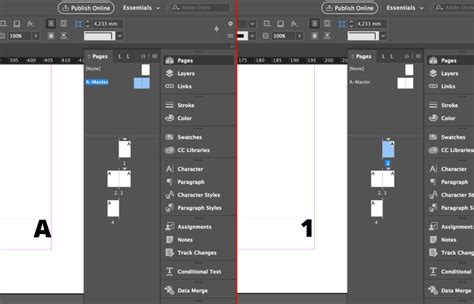
By following these steps, you will have successfully inserted automatic page numbers into your InDesign document, which will update dynamically as you continue to work on your layout.
Customizing Page Number Styles
InDesign offers flexibility in the style of page numbering, allowing you to choose from various formats beyond the default Arabic numerals (1, 2, 3, etc.). You can opt for Roman numerals (i, ii, iii), uppercase Roman numerals (I, II, III), or letters (a, b, c).
To change the page numbering style:
- Navigate to the Pages Panel: Open the Pages panel (
Window > Pages). - Select the Target Page: Right-click on the first page of the section you wish to modify. If you want to change the style for the entire document from the beginning, select the very first page.
- Open Section Options: From the context menu, choose
Numbering & Section Options.... - Choose a New Style: In the dialog box that appears, locate the "Page Numbering Style" dropdown menu. Select your desired format (e.g., Roman numerals).
- Confirm Changes: Click
OKto apply the new style.
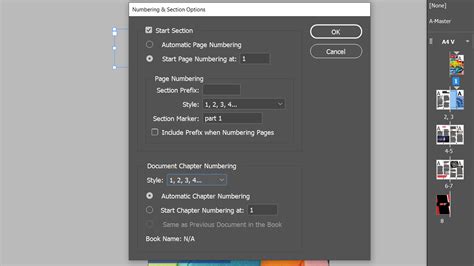
It is important to note that these changes are applied on a section-by-section basis. Therefore, when adjusting numbering styles, always select the first page of the relevant section.
Managing Page Numbering: Skipping the First Page and Creating Sections
By default, InDesign initiates document numbering with page 1. However, there are numerous scenarios where you may need to deviate from this convention. For instance, when the first page of your document is a cover, title page, or copyright page, you might prefer not to display a page number on it, or perhaps start the numbering from a subsequent page. This is achieved by creating and managing document sections.
The "Current Page Number" placeholder reflects the actual page number assigned within InDesign's sectioning system. To control where numbering begins, you manipulate these section settings.
Creating a New Section
When you create a new section and explicitly force numbering to commence at a specific page number on a page other than the document's absolute first page, InDesign may present a warning. This warning arises because your document inherently possesses a default section starting from page 1. You are essentially defining a second section within the existing structure.
To avoid this warning and implement custom starting page numbers gracefully, follow this sequence:
- Define the New Section: In the Pages panel, select the page that you want to be the first page of your new section. For example, if page 1 is the cover and you want page 2 to be numbered as '1', select page 2. Right-click on this selected page and choose
Numbering & Section Options.... For now, simply clickOKto create the section. - Adjust the First Section's Style (Optional but Recommended): To ensure a clean break and consistent numbering across sections, it's often best practice to explicitly set the numbering style for the initial section. Select the very first page of your document, right-click, and choose
Numbering & Section Options.... Adjust the "Page Numbering Style" as desired and clickOK. - Set the Starting Number for the New Section: Return to the page that marks the beginning of your second section. Right-click on it and select
Numbering & Section Options.... Crucially, check the box labeledStart Page Numbering at:and enter the desired starting number (e.g.,1). ClickOK.
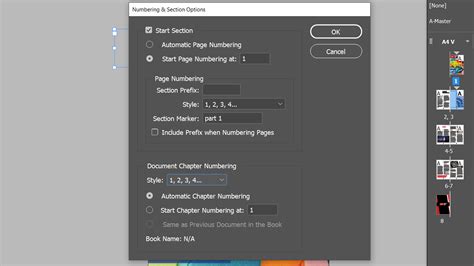
By implementing these steps, you can effectively control where page numbering begins and ensure that pages like covers or title pages are excluded from the sequential numbering if required.
Enhancing Clarity with Section Markers
Section Markers are invaluable tools for providing readers with contextual information about the document's structure. They allow you to label different parts of your publication, such as chapters in a book or sections in a catalog, directly within the pagination. This enhances navigation and comprehension, especially in lengthy or complex documents.
To incorporate Section Markers:
- Edit Section Marker Value: Access the
Numbering & Section Options...dialog for each section (as described above). Within this dialog, you will find a field labeled "Section Marker." Edit this field to provide a descriptive name for the section (e.g., "Chapter 1," "Introduction," "Appendix"). You will need to perform this for every section you wish to mark. - Insert the Section Marker Placeholder: On your master page, select the text frame containing the "Current Page Number" placeholder. Navigate to
Type > Insert Special Character > Markers > Section Marker. This inserts a placeholder that will display the Section Marker text you defined for that specific section. Typically, you would place this placeholder before the "Current Page Number" placeholder to create a label like "Chapter 1: 5".
Adding a Section Prefix for Identification
A Section Prefix serves a similar purpose to a Section Marker but is designed to be a shorter, often alphanumeric, identifier that precedes the page number. This is particularly useful for indicating language, volume, or a specific series.
To add a Section Prefix:
- Access Section Options: Open the
Numbering & Section Options...dialog for the relevant section. - Edit the Prefix: Locate the "Section Prefix" field and enter your desired prefix (e.g., 'EN' for English, 'Vol 2').
- Include the Prefix: Ensure the
Include Prefix when Numbering Pagescheckbox is ticked. - Confirm: Click
OK.
With this enabled, your page numbers will now appear with the prefix, for example, "EN 1," "EN 2," and so on. This provides a concise way to segment and identify different parts of your document, especially when dealing with multilingual publications or multi-volume works.
InDesign How-To: Create Sections and Section Markers (Video Tutorial)
By diligently applying these techniques, you can transform the potentially daunting task of page numbering in InDesign into a controlled and efficient process. Mastering master pages, sections, and special character markers empowers you to create professional, navigable, and polished documents with ease. The ability to automate these elements not only saves time but also ensures accuracy and consistency, crucial for any publication, regardless of its complexity or length.