A sudden red highlight appearing on layers within Adobe Photoshop can be a disorienting experience for users, especially when it disrupts the editing workflow. This phenomenon is often triggered by an accidental keystroke or a misunderstanding of specific tool modes. While it might initially appear as a system error or a new, unwanted feature, the red highlight is typically a visual indicator of Photoshop's Quick Mask Mode being active. Understanding its purpose and how to manage it is crucial for a smooth and efficient editing process.
The Nature of Quick Mask Mode
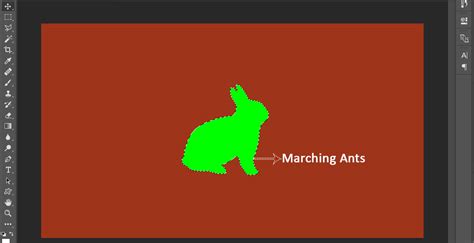
Quick Mask Mode is a specialized feature within Photoshop designed to facilitate the creation and refinement of selections. Instead of relying solely on the standard "marching ants" to delineate the boundaries of a selection, Quick Mask Mode employs a semi-opaque red overlay. This overlay serves as a visual aid, allowing users to see areas that are either selected or unselected more clearly.
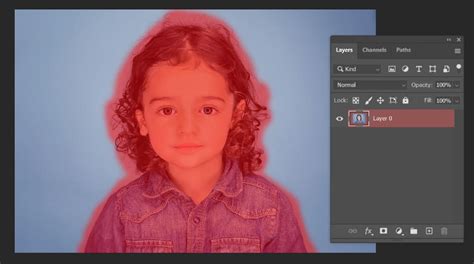
When Quick Mask Mode is active, the way selections are displayed changes. Areas that are unselected are represented by the red colored highlight. Conversely, areas that are selected appear normal, without any colored highlight. This inversion of visual cues is central to how Quick Mask Mode functions. If you find yourself in this mode unintentionally, the red highlight on your layers can indeed be distracting, making it difficult to concentrate on the primary editing tasks. For individuals who are neurodivergent, such visual interruptions can significantly impede their ability to use the application effectively, as the unexpected visual element draws attention away from the intended focus. This can lead to a situation where the entire application becomes challenging to navigate and utilize for its intended purpose.
Navigating and Deactivating Quick Mask Mode
The most common reason for encountering the red highlight on a Photoshop layer is the accidental activation of Quick Mask Mode. Fortunately, exiting this mode is straightforward. The fastest method is to press the 'Q' key on your keyboard. Alternatively, if keyboard shortcuts are not preferred, the Quick Mask icon, typically located at the bottom of the Photoshop toolbar, can be clicked to toggle the mode on and off.
How To Remove Quick Mask In Photoshop
For those who might not have an active selection when entering Quick Mask Mode, the primary visual feedback will be the red highlight appearing on the layer itself. This can be particularly confusing if the user is unaware of the mode change. The purpose of Quick Mask Mode is to provide a more intuitive way to view and adjust active selections. It transforms the selection process from a series of precise "marching ants" into a more painterly approach, where the red overlay clearly indicates what is being masked or protected from edits.
Investigating Persistent Red Highlights and Layer Inaccessibility
In some specific instances, users may encounter persistent red highlights or find that their layers become inaccessible, even after exiting Quick Mask Mode. One user noted an issue in Photoshop CC 2017 where layers in a particular file were uneditable, with only channels being accessible. This occurred in a CMYK document that was originally shot in TIFF format. The user found a temporary workaround by creating a duplicate layer, which allowed for operations like extend-crop and fill. However, upon reopening the file, the extended-crop area was again highlighted red, raising concerns about how such an area would print and if the original layer could be restored.
When dealing with an inaccessible layer, especially if it's confined to a single file, it's essential to consider several factors. The color mode (e.g., CMYK) can sometimes influence layer behavior, particularly when working with specific file types like TIFF. While creating a duplicate layer can offer a temporary solution, understanding the root cause of the inaccessibility is key to a permanent fix.
Troubleshooting Layer Issues
If you encounter a situation where a layer is highlighted red and seems inaccessible, here's a step-by-step approach to troubleshoot:
- Verify Quick Mask Mode: The first and most common cause is still Quick Mask Mode. Ensure you are not in this mode by pressing 'Q' or checking the toolbar icon.
- Check Layer Blending Modes and Opacity: Sometimes, extreme blending modes or an opacity of 0% can make a layer appear to be "missing" or visually altered, though this wouldn't typically result in a red highlight.
- Examine Layer Properties and Masks: Look for any active layer masks or clipping masks that might be obscuring the layer's content or affecting its visibility. A mask that is entirely black will hide the layer.
- Color Mode and Document Settings: As mentioned, the document's color mode (CMYK, RGB, Grayscale) can sometimes interact with specific layer types or operations. Ensure the document's settings are appropriate for your intended edits. For print work, CMYK is standard, but for web or digital display, RGB is generally preferred.
- File Corruption: In rare cases, the Photoshop file itself might be corrupted. Saving a copy of the file under a new name or attempting to open it on a different system can help diagnose this. Photoshop's "Save As" function often performs a minor clean-up of the file.
- Software Glitches or Preferences: Occasionally, software bugs or corrupted preferences can lead to unusual behavior. Resetting Photoshop preferences (usually by holding Ctrl+Alt+Shift on Windows or Cmd+Option+Shift on macOS immediately after launching the application) can resolve such issues.
The Purpose of Visual Indicators in Photoshop
Photoshop employs various visual indicators to communicate the status of selections, masks, and active modes. The red highlight in Quick Mask Mode is one such indicator, designed to enhance clarity during selection processes. Similarly, "marching ants" are used to show the active boundaries of a selection in standard mode. These visual cues, while sometimes distracting if misunderstood, are fundamental to the software's functionality.
The context in which these indicators appear is vital. If you are actively trying to refine a selection, the red overlay can be incredibly useful. It allows you to "paint" with black and white to add or subtract from the selection, with the red area clearly showing what is being affected. For example, if you are carefully selecting a person's hair, the red overlay can help you see exactly which strands are being included or excluded from the selection.
User Experience and Accessibility Considerations
The introduction of visual elements that significantly impact the user experience, especially for individuals with specific sensory needs, is a critical consideration for software developers. The concern raised by a user about the potential for the red highlight to impede editing for neurodivergent individuals underscores the importance of user interface design that is both functional and accessible.
For a person who finds the visual distraction of the red highlight profoundly disturbing, even to the point of making editing "almost impossible," the lack of an immediate option to disable this visual cue can be a significant barrier. This highlights a broader point about software design: while a feature might be intended to aid a specific workflow, its implementation should ideally include options for customization to accommodate a wider range of user preferences and needs. This is where the debate often lies: balancing the utility of a feature with the user's ability to control their environment.
If a feature like the red highlight in Quick Mask Mode is to remain a core part of Photoshop, providing users with the ability to turn it off, adjust its opacity, or change its color would significantly improve its accessibility. Such customization options allow users to tailor the Photoshop interface to their individual working styles and sensory requirements, ensuring that the tool enhances, rather than hinders, their creative process. The goal is to empower users, not to create obstacles, and offering control over visual feedback is a key aspect of achieving this.
Layers and Selections: A Deeper Dive
Understanding the relationship between layers and selections is fundamental to mastering Photoshop. Each layer in a Photoshop document acts as a separate transparent sheet, allowing you to stack and manipulate images or elements independently. Selections, on the other hand, are temporary boundaries that define which areas of a layer (or multiple layers) are affected by editing operations.
When you load a selection by Ctrl (Windows) or Command (macOS) + clicking on the thumbnail of an image in the Layers panel, you are essentially creating a selection based on the transparency or pixel data of that layer. This is a powerful technique for isolating specific parts of your image.
The "marching ants" are the visual representation of this active selection. If these animated lines are difficult to discern against the image content, switching to Quick Mask Mode (pressing 'Q') provides an alternative visual representation using the red overlay. This red overlay acts as a mask, where the unmasked areas (those not covered by red) are the ones actively selected and available for editing.
The act of resizing an image, or even just checking it for "holes" before scaling, involves understanding how selections and layer content interact. If there are transparent areas or "holes" in your image layer before scaling, these will remain transparent after the resize operation, unless specific fill or content-aware options are used. Loading a selection from a layer with holes would result in a selection that excludes those holes. If you then entered Quick Mask Mode, the red outline would appear around those holes, indicating they are not part of the selection.
The scenario where an extended-crop area is highlighted red after creating a duplicate layer warrants careful examination. This might indicate that the "fill" operation on the extended area, or the cropping itself, has created a new mask or selection state that is being interpreted by Photoshop in a particular way, especially if the original layer had certain properties or masks applied. Understanding the exact sequence of operations and the properties of the original and duplicated layers is key to deciphering such behavior.
The Underlying Mechanics of Image Editing
At its core, Photoshop manipulates pixels. Layers provide a way to organize and non-destructively edit these pixels. Selections allow for targeted manipulation. Quick Mask Mode is simply a different visual language for defining those targets. The red highlight is not an error; it's a communication.
When considering how an image with an extended-crop area highlighted red will print, it largely depends on whether that red highlight signifies an actual masked area that will not print, or if it's a temporary visual indicator related to Quick Mask Mode that will disappear upon exiting. If the red highlight is indeed a mask preventing content from printing, then the extended area will not appear in the final output. If it's a Quick Mask Mode indicator, then the content within the extended area should print normally once the mode is deactivated.
The distinction between editing layers in one specific file versus others, especially when encountering issues like layer inaccessibility or unexpected red highlights, often points to file-specific settings, embedded metadata, or perhaps a more complex interaction of adjustments applied within that particular document. Recreating the problematic adjustments on a new, blank document or a duplicate of a working file can sometimes help isolate whether the issue lies with the file itself or a global Photoshop setting.
The journey of a Canadian photographer and photo retoucher turned founder, as described, highlights a common path: mastering a tool like Photoshop to then share that knowledge. The emphasis on "no-fluff videos and written guides" aims to cut through the complexity, much like understanding the function of the red highlight aims to demystify a specific Photoshop behavior. The aspiration to help others "decode the mystery of photo editing" is a sentiment shared by many professionals who have navigated the intricacies of such powerful software.
Conclusion on the Red Highlight Phenomenon
In summary, the red highlight on a Photoshop layer is almost invariably a visual cue for Quick Mask Mode. This mode offers an alternative method for viewing and refining selections, where the red overlay indicates unselected areas. While it can be a powerful tool for detailed selection work, its accidental activation can be a source of confusion and frustration. Fortunately, it can be easily toggled on and off by pressing the 'Q' key or clicking the corresponding icon in the toolbar. Persistent issues with layer accessibility or unexpected red highlights in specific files may require deeper investigation into color modes, layer properties, masks, or potential file corruption, but understanding the primary function of the red highlight is the first step in resolving such anomalies. For users who find this visual element disruptive, advocating for customization options within Photoshopâs interface is a valid approach to ensure a more inclusive and adaptable user experience.
tags: #photoshop #layers #are #highlighted #red