Adobe InDesign is a powerful tool for graphic design, enabling the creation of everything from single-sided business cards to extensive books comprising thousands of pages. As soon as a project extends beyond a single page, the ability to effectively manage document pages becomes paramount. This includes adding, moving, deleting, and organizing pages to ensure a cohesive and professional final product. This tutorial will delve into the various methods for adding and managing pages within InDesign, offering insights into efficient workflows and advanced techniques.
Navigating the Pages Panel: Your Central Hub for Page Management
The cornerstone of page management in InDesign is the Pages panel. While some page-related features can be accessed through the Layout menu, the Pages panel provides a comprehensive overview and direct control over all pages, spreads, and master pages within your document. To access this essential panel, navigate to Window > Pages.
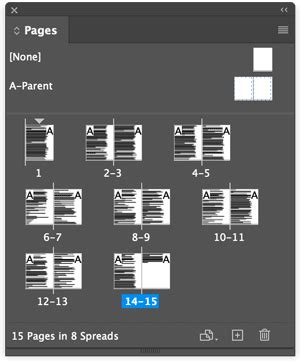
The Pages panel displays miniature representations, or thumbnails, of all the pages in your document. This visual aid allows for quick navigation. For instance, double-clicking on the page numbers beneath a spread will instantly transport you to that specific spread, centering it within your InDesign window. For those working with lengthy documents, scrolling through a vertically stacked panel can become cumbersome. In such cases, you can opt to display the spreads horizontally for a more manageable layout. To do this, access the Pages panel menu (located in the upper right-hand corner of the panel) and select View > Horizontally. This arrangement can significantly improve efficiency when navigating through numerous pages.
Adding New Pages: Multiple Approaches for Every Need
InDesign offers several intuitive ways to introduce new pages into your document, catering to different workflow preferences and project requirements.
The Quickest Method: The New Page Icon
For an immediate addition of a single page, the most straightforward method is to utilize the "Create New Page" icon located at the bottom of the Pages panel. Simply click this icon, and InDesign will swiftly add a new, blank page directly after the currently selected page or spread. This action will automatically renumber subsequent pages and adjust spreads accordingly, especially in documents set up with facing pages.
Inserting Multiple Pages at Once
When you need to add more than one page, or wish to specify their placement, the "Insert Pages" feature is your go-to option. This can be accessed through the Pages panel menu by selecting Insert Pages. This dialog box allows you to precisely define the number of pages you wish to insert and their exact location within the document, such as at the end or before a specific page.
How to Add Pages in InDesign
Duplicating Existing Pages for Efficiency
A particularly useful technique for accelerating page layout is duplicating an existing page. This is especially helpful when you have a page layout that closely resembles what you need for a new page. To duplicate a spread, select it by clicking once on its corresponding page numbers beneath the thumbnail. Then, hold down the Option (Mac) or Alt (Windows) key and drag the selected spread to your desired location within the Pages panel. A small vertical gray bar will appear, indicating where the duplicate will be placed upon releasing the mouse button. This method is excellent for maintaining design consistency rapidly.
Specifying Pages During Document Creation
It's worth noting that you can also pre-define the total number of pages required when initially creating a new InDesign document via File > New. This foresight can save time later in the process.
Leveraging Master Pages for Consistent Design Elements
Master pages, often referred to as parent pages in InDesign, are fundamental for ensuring design consistency across multiple pages in a document. They function as templates that can contain elements such as page numbers, headers, footers, and recurring graphic elements. Any changes made to a master page are automatically applied to all document pages to which that master page has been applied.
Applying and Editing Master Pages
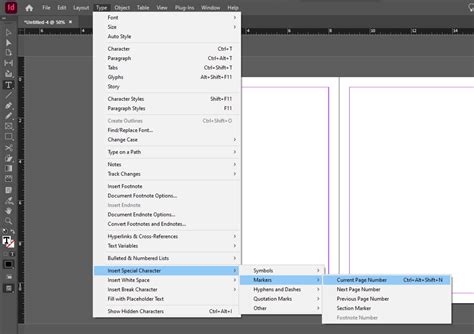
To access and edit master pages, double-click on the master page icon (commonly labeled "A-Master") in the Pages panel. Here, you can add elements like background colors, page number markers, running headers, and borders. For instance, to add automatic page numbering, use the Type Tool (T) to create a text frame in the desired location (e.g., the bottom corner of a page). Then, go to Type > Insert Special Character > Markers > Current Page Number. This special character will dynamically update to reflect the actual page number. You can then copy and paste this text frame to other pages or master spreads as needed.
Creating Multiple Master Pages
For complex documents, such as books with distinct chapter structures, creating multiple master pages can be highly beneficial. For example, you might design one master page for chapter opening pages and another for the content pages within chapters. To create a new master page, access the Pages panel menu and select New Master. This opens a dialog box where you can define the number of pages in the master spread and its naming convention.
Organizing and Rearranging Pages
The Pages panel offers extensive flexibility for reorganizing your document's flow. Pages and spreads can be freely dragged and dropped within the panel to change their order. This is akin to rearranging photos on a tray; you can move them to any position. As you drag, look for the vertical or horizontal line that indicates where the page or spread will be inserted.
Moving Pages Between Documents
You can also move pages between different InDesign documents. To do this, open both documents and ensure that in the destination document's Pages panel menu, the option Allow Document Pages To Shuffle is deselected. This prevents InDesign from automatically reordering pages in a way that might not be intended when copying from another source. When copying a page from a document with different dimensions, be aware that the positioning of elements might require minor adjustments in the destination document.
Deleting Pages from Your Document
Removing unwanted pages is a simple process within the Pages panel. Select the page(s) you wish to delete by clicking on their thumbnails. For multiple selections, you can hold down the Shift key to select a contiguous range of pages or the Command (Mac) or Ctrl (Windows) key to select non-adjacent pages. Once selected, click the trash can icon located at the bottom of the Pages panel. InDesign may prompt you with a warning if the pages contain objects, asking for confirmation before deletion.
Advanced Page Management Features
InDesign provides further capabilities for fine-tuning page management:
Page Numbering Styles
Beyond simply adding page numbers, InDesign allows you to customize their formatting. You can specify different numbering styles (e.g., Roman numerals, letters) or include prefixes. This is typically done within the Document Setup or Master Page Options dialogs. You can also create text frames large enough to accommodate the longest possible page number and any accompanying text, ensuring a clean and professional appearance.
Spread Management
Most documents utilize two-page spreads, mimicking the layout of a book or magazine. However, InDesign can accommodate spreads of up to ten pages. You can control how spreads are displayed in the Pages panel by selecting Show Vertically or Show Horizontally from the View submenu. You can also hide or show entire spreads, which can be useful for managing drafts or sections of a document that are not yet ready for final review. Hidden spreads remain invisible by default, and you can toggle their visibility through the Pages panel menu.
Page Tool and Parent Page Overlay
The Page tool allows for direct manipulation of pages. When you select a page with the Page tool and enable the Show Parent Page Overlay option, a shaded box appears over the selected page, visually indicating the area influenced by the applied master page. This can be helpful for understanding how master page elements are affecting your document pages.
By mastering these page management techniques in Adobe InDesign, you can significantly enhance your efficiency and the overall quality of your long-form documents, ensuring a polished and professional final product.