Text-wrapping is a dynamic and essential design technique within Adobe InDesign, capable of significantly enhancing the visual appeal and readability of a page layout. Designers frequently leverage text-wrapping to complement the organic shapes of illustrations, photographs, and other graphic elements, creating a more cohesive and engaging reading experience. This guide will delve into the intricacies of applying and customizing text wraps, from basic setups to advanced techniques, ensuring your layouts are both professional and aesthetically pleasing.
Activating and Understanding the Text Wrap Panel
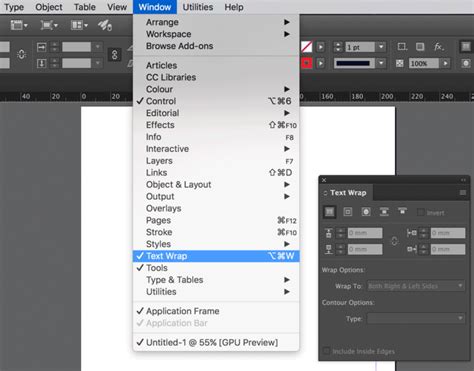
To begin manipulating text wrap settings, you first need to access the Text Wrap panel. This can be done by navigating to the "Window" menu at the top of your InDesign interface and selecting "Text Wrap." The panel itself presents a series of icons that dictate how text will interact with an object.
The icon positioned furthest to the left is the default setting, indicating "No Text Wrap" applied to your selected frame or shape. By clicking on other objects in your layout - be they images, text frames, or shapes - and then selecting one of the available wrap icons, you can dynamically alter how text flows around them.
The Core Text Wrap Options
Within the Text Wrap panel, you'll find five primary icons, each offering a distinct method for applying a wrap effect:
- No Text Wrap (A): As mentioned, this is the default state where text flows freely without any interaction with the object.
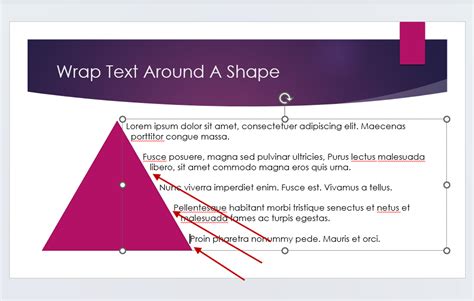
- Wrap Around Bounding Box (B): This is a straightforward option that wraps text around the rectangular boundary of the selected object. It's ideal for simple geometric shapes or when you want a consistent margin around any object.
- Wrap Around Object Shape (C): This powerful option allows InDesign to create a text wrap boundary that closely follows the actual shape of the object. This is particularly useful for irregularly shaped images or illustrations, providing a more organic and fitted appearance. It can also detect the edges of an image, enabling text to flow around the subject matter itself.
- Jump Object (D): This setting forces the text to flow either above or below the object. The text will not appear alongside the object at all, effectively creating a visual break.
- Jump To Next Column (E): This option is invaluable for controlling text flow across multiple columns or text frames. It compels the surrounding paragraph to move to the top of the next available column or text frame, ensuring text doesn't break awkwardly around an object.

Implementing Basic Text Wraps
The simplest approach to setting up your document for text-wrapping involves positioning your text frame(s) behind the image frame or shape you intend to apply the wrap effect to. Once your object is in place, you can then proceed to apply the desired text wrap.
For instance, if you wish to wrap text around a photograph, you would first use the "Selection" tool to click on the image frame. Then, you would activate the Text Wrap panel and choose one of the wrap options.
Wrap Around Bounding Box
To apply the "Wrap Around Bounding Box" effect, select the object and then choose the corresponding icon in the Text Wrap panel. This will wrap text around all sides of the photo or graphic frame, creating a uniform buffer.
Wrap Around Object Shape
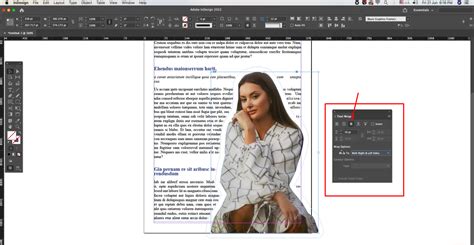
When you select the "Wrap Around Object Shape" option, InDesign attempts to create a boundary that precisely contours the selected object. This is where the "Contour Options" become crucial, especially when working with images.

Adjusting the Distance Between Text and Object
Once a text wrap is applied, you'll often want to fine-tune the spacing between the text and the object. This is achieved by adjusting the offset values within the Text Wrap panel. These offset values create a buffer zone around the object, preventing the text from appearing too close and improving readability.
You can personalize this boundary further. By selecting the object with the "Direct Selection Tool" (the white arrow) or the "Pen Tool," you can manually adjust anchor points and manipulate the path of the wrap boundary. This level of control allows for highly customized text flow.
Detecting Image Edges for Precise Wrapping
One of the most powerful features of InDesign's text wrap functionality is its ability to detect the edges of an image. This allows text to wrap not just around the bounding box, but around the actual subject within the image, creating a much more integrated design.
To utilize this, select "Wrap Around Object Shape" in the Text Wrap panel and then, under "Contour Options," choose "Detect Edges." InDesign will analyze the image and generate a boundary that follows its contours.
Advanced Edge Detection Options
Beyond simple edge detection, InDesign offers more sophisticated methods for generating wrap paths:
- Select Subject: This option leverages Adobe's artificial intelligence to automatically detect the main subject within an image and create a wrap path around it. This is incredibly useful for quickly wrapping text around people, animals, or prominent objects without manual intervention.
- Alpha Channel: If your image has an alpha channel (often found in PNG or PSD files with transparency), InDesign can use this channel to define the wrap boundary. This is excellent for images with complex transparent backgrounds.
- Photoshop Path: For images originally created or edited in Adobe Photoshop, you can save specific paths within the Photoshop file. InDesign can then import and use these saved paths to generate the text wrap boundary. This offers precise control if the paths were meticulously created in Photoshop.
- Clipping Path: If an image has a clipping path defined (either by Photoshop or InDesign), you can use this path to create the text wrap. This is similar to the Photoshop Path option but can also utilize paths created directly within InDesign.
- Graphic Frame: This option uses the bounding box of the image frame itself, essentially defaulting to the "Wrap Around Bounding Box" behavior.
Wrapping Text Around Images with Captions
When an image includes a caption, it's often best to treat the image and its caption as a single unit for text-wrapping purposes. The most effective way to achieve this is by grouping the image frame and the text frame containing the caption. Once grouped, you can apply the text wrap settings to the entire group. This ensures that the text wraps consistently around both elements as if they were one object. Anchoring the group can further solidify its position within the text flow.
Text Wrap with Anchored Objects and Inline Objects
InDesign offers different ways to incorporate images and other objects into your text flow. They can be positioned freely on the spread, placed as inline objects, or anchored to specific points within the text.
When an object is anchored or treated as an inline object, its text wrap properties have a specific behavior. The wrap effect will only influence the lines of text that follow the anchor marker. The line containing the anchor marker itself, and any lines preceding it, will not be affected by the text wrap.
Apply Text Wrap three ways in Adobe InDesign
Text Wrap and Master Pages
Objects placed on master pages can also have text wrap effects applied. By default, when a text wrap is active on a master page object, it affects all text frames on the document pages. However, you can refine this behavior by selecting the "Apply to Master Page Only" option. This restricts the text wrap to only affect text that resides directly on the master page itself, leaving text on document pages unaffected by that specific master page object's wrap. If you need text on a document page to wrap around an object from a master page, you will typically need to override that master page item on the document page first.
Text Wrap and Hidden Layers
By default, an object with a text wrap applied will influence text frames across all layers, even if the layer containing the object is hidden. This can sometimes lead to unexpected layout shifts if you're not aware of it. To alter this behavior, you can enable the "Suppress Text Wrap When Layer Is Hidden" option within the Layer Options dialog box. When this is active, a hidden layer's objects will not affect text wrapping on other layers. Be mindful that enabling or disabling this option can sometimes cause a recomposition of text on other layers.
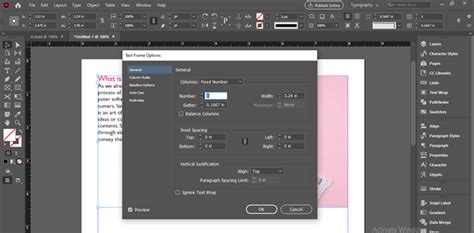
Ignoring Text Wrap in a Text Frame
There are instances where you might want a specific text frame to disregard any text wrap settings applied to objects within its vicinity. This is particularly useful for headlines or pull quotes that should not be interrupted by surrounding graphic elements.
To achieve this, select the text frame you want to modify. Then, go to "Object" > "Text Frame Options" (or use the shortcut Cmd+B on macOS or Ctrl+B on Windows) and check the "Ignore Text Wrap" option. This ensures that the selected text frame will flow unimpeded by any text wrap boundaries.
Wrapping Text Inside an Image or Shape (Inverting Text Wrap)
Conversely, you might want text to flow within the boundaries of an image or shape, rather than around it. This is often referred to as an "inverted" text wrap.
To accomplish this, select the object you want the text to wrap inside. Apply the "Wrap Around Object Shape" setting and ensure "Detect Edges" is chosen under Contour Options. Then, place your text frame above the object. By adjusting the offset values, you can control how close the text comes to the edges. Similar to other wrap adjustments, you can further refine the boundary using the "Direct Selection Tool" or the "Pen Tool."
Troubleshooting Text Wrap Misbehavior
Occasionally, text wrap settings can lead to unexpected or undesirable results, causing frustration for designers. If you encounter issues with text wrap not behaving as expected, several resources can help diagnose the problem. The InDesignSecrets website offers a valuable checklist for identifying common text wrap problems. Additionally, understanding the interplay between different wrap options, object stacking order, and the "Ignore Text Wrap" setting is crucial for resolving most issues.
Common Scenarios and Solutions
- Text not wrapping around an image's subject: Ensure "Wrap Around Object Shape" is selected and that "Detect Edges," "Select Subject," "Alpha Channel," or "Photoshop Path" is correctly chosen in the Contour Options, depending on your image type.
- Wrap interfering with a headline: Use the "Ignore Text Wrap" option within the headline's Text Frame Options.
- Text flowing too close to the object: Increase the offset values in the Text Wrap panel.
- Wrap not affecting text on a master page: Check if "Apply to Master Page Only" is enabled or if you need to override the master page item.
- Wrap still affecting text when an object's layer is hidden: Ensure "Suppress Text Wrap When Layer Is Hidden" is activated in the Layer Options.
When applying a text wrap, especially one that detects edges or uses an alpha channel, you might need to adjust the "Tolerance" setting. A higher tolerance can lead to a more simplified path, while a lower tolerance captures finer details. Similarly, the "Threshold" setting can influence how the edges are detected.
Advanced Techniques and Considerations
Wrapping Around Grouped Objects
As mentioned with image and caption scenarios, grouping multiple objects allows you to apply a single text wrap to the entire group. This treats the combined elements as one entity for text flow purposes.
Text Wrap and Imported Graphics
When importing graphics, particularly from Adobe Illustrator, you can often achieve precise text wraps. If the Illustrator graphic has defined paths, InDesign can utilize these paths for wrapping. For vector objects created within InDesign itself, the "Wrap Around Object Shape" with edge detection or manual path manipulation offers excellent control.
The "Wrap To" Menu
The "Wrap To" menu in the Text Wrap panel provides further granular control. You can specify whether the wrap should apply to:
- Both Right and Left Sides: The default, wrapping text on all sides of the object.
- Right Side Only: Text wraps only to the right of the object.
- Left Side Only: Text wraps only to the left of the object.
- Largest Area: This option is useful for asymmetrical objects, where text will wrap around the side offering the most space.
- Through the Spine: This option is relevant for facing pages, allowing text to wrap around an object positioned near the gutter (spine) of the spread.
Fine-Tuning Contour Paths
For complex shapes or images where automatic edge detection isn't perfect, you can manually refine the wrap path. Use the "Direct Selection Tool" to move existing anchor points or the "Pen Tool" to add or delete points, precisely shaping the boundary that repels the text.
When working with images, consider the "Include Inside Edges" command. This option allows the text wrap to follow internal boundaries within an image, such as the space between a person's arm and their body, if that area is transparent or a distinct part of the image.
By mastering these techniques, you can transform your InDesign layouts from static pages to dynamic, visually engaging documents where text and imagery work in perfect harmony. Experimenting with the various options and understanding their implications will empower you to achieve professional-level results.