In the dynamic world of video creation, text is far more than just words on a screen; it's a crucial element for guiding your audience, enhancing your message, and adding a professional polish to your projects. Whether you're crafting explainer videos, engaging YouTube tutorials, or compelling marketing content, the ability to effectively integrate text can elevate your video editing skills significantly. DaVinci Resolve, a powerful and versatile video editing software, offers a robust suite of tools to achieve this, from simple subtitle overlays to sophisticated animated titles and 3D effects. This guide aims to demystify the process, covering everything from the basics of adding text to advanced animation techniques and best practices to make your videos truly stand out. Ready to elevate your video editing skills? Let’s get started!
Navigating Text Tools in DaVinci Resolve
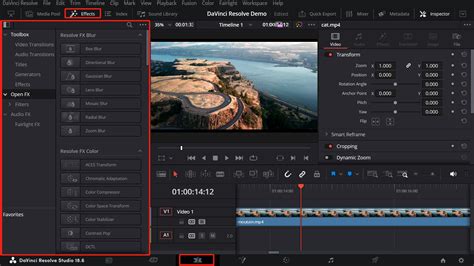
To begin adding text, ensure you have DaVinci Resolve open with your video project loaded. The primary workspace for timeline-based edits is the Edit Page. Once you're on the Edit Page, locate the Effects Library, typically found on the left-hand side of the interface. Within the Effects Library, scroll down to the "Titles" section. Here, you'll discover a variety of text tools designed for different needs:
- Text: This is the go-to option for basic titles or subtitles. It's simple, lightweight, and perfect for conveying essential information quickly.
- Fusion Titles: For more advanced and visually striking text, Fusion Titles offer sophisticated options. These include 3D text capabilities, dynamic animated effects, and even particle systems, allowing for cinematic-quality text animations.
For beginners, it is highly recommended to start with the "Text" option. Its straightforward nature makes it ideal for adding captions or subtitles without a steep learning curve.
Adding Text to Your Timeline
Once you've chosen your desired text type from the Effects Library (e.g., "Text" or a specific "Fusion Title"), simply drag and drop it onto your timeline. It's important to place this text layer above your video layer. This action creates a new text clip on your timeline, ready for customization. The default length for a title clip is typically 5 seconds, but this can be easily altered by dragging the edges of the clip inwards or outwards on the timeline. DaVinci Resolve's snapping capability, usually activated by default with a magnet icon above the timeline, can assist in aligning the text clip precisely with edit points or the playhead.
Alternatively, you can precisely adjust the duration by clicking on an edge of the text clip (it will turn green), typing '+' or '-' followed by a value, and then hitting 'Return'. This offers a more controlled way to set the exact length of your text element.
Customizing Your Text: Font, Size, Color, and More
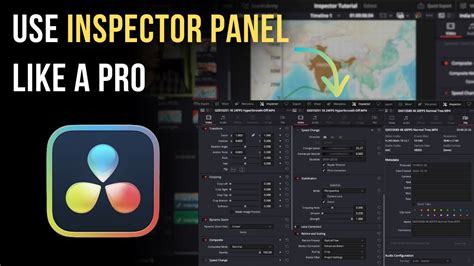
With your text clip on the timeline, the next step is to tailor its appearance. Select the text layer, and then direct your attention to the Inspector Panel, usually located in the top-right corner of the screen. This panel is your central hub for all text modifications.
Here's a breakdown of what you can adjust:
- Fonts: DaVinci Resolve offers a diverse selection of fonts. Choose from clean sans-serifs like Arial or Montserrat for professional projects, or explore more decorative script fonts for creative videos.
- Size and Color: Utilize the provided sliders to adjust the text size. Select colors that offer good contrast with your video's background to ensure readability.
- Shadows and Outlines: To further enhance visibility, especially over busy backgrounds, you can add a drop shadow or an outline to your text.
- Alignment and Positioning: The Inspector Panel also houses alignment tools. You can center your text, align it to the left or right, or manually adjust its position using X and Y sliders within the "Transform" section.
Pro Tip: For professional videos, sticking to clean, legible fonts such as Arial, Montserrat, or Open Sans is crucial. For more creative content, feel free to experiment with decorative fonts, but always prioritize readability. If you wish to use fonts not included in DaVinci Resolve, you can learn how to install and use custom fonts by consulting guides on adding fonts in DaVinci Resolve.
Bringing Text to Life: Animation with Keyframes
Static text can sometimes feel unengaging. DaVinci Resolve empowers you to animate your text, adding dynamism and visual interest. The key to creating custom animations lies in keyframes.
Keyframes allow you to define specific properties of your text at different points in time. DaVinci Resolve then interpolates between these keyframes to create a smooth transition or animation. Here’s how to implement them:
- Select the Property: In the Inspector Panel, find the property you wish to animate (e.g., Position, Opacity, Scale, Rotation). To the left of the property's name, you'll see a small diamond icon. Click this icon to set a keyframe at the current playhead position.
- Advance the Playhead: Move the playhead on your timeline to a different point in time.
- Adjust the Property: Modify the property's value. DaVinci Resolve will automatically create a new keyframe at this new position, animating the change from the previous keyframe.
For instance, to create a fade-in effect for your text:
- Place the playhead at the very beginning of your text clip.
- In the Inspector, find the "Opacity" property. Click the diamond icon to set the first keyframe (usually at 100% opacity).
- Move the playhead slightly forward.
- Reduce the Opacity to 0%. DaVinci Resolve will automatically create the fade-in animation.
Similarly, you can animate the text's position to create sliding effects, or its scale for zoom-in/zoom-out animations.
Pro Tip: Animations like the "typewriter effect," where letters appear one by one, are particularly popular and effective for tutorials and video intros. This can often be achieved using the "Write On" property, which also supports keyframing.
Keyframing Made Easy: A Davinci Resolve Tutorial for Noobs
Advanced Text Effects with Fusion Titles
For those seeking more sophisticated visual flair, Fusion Titles are the answer. These titles are built within DaVinci Resolve's powerful node-based compositing environment, Fusion, and offer a wealth of advanced customization:
- 3D Text: Create text that can rotate, spin, and exist in three-dimensional space, adding significant depth to your visuals.
- Particle Effects: Incorporate dynamic particle systems, such as explosions, trails, or shimmering effects, to enhance your text.
- Glows and Gradients: Apply intricate lighting effects, glowing edges, and complex gradient fills for a truly cinematic look.
- Fine-Grained Animation Control: Fusion Titles provide granular control over animations, allowing for intricate and highly customized motion graphics.
Warning: Fusion Titles can be resource-intensive. Ensure your system is optimized for smooth editing when working with these advanced effects, as they require more processing power.
Understanding Text+ vs. Basic Text in DaVinci Resolve
A common point of confusion for new DaVinci Resolve users is the distinction between the basic "Text" tool and the more advanced "Text+" tool, often found within Fusion. The "Text" tool is a rich text editor, akin to a basic word processor, offering straightforward text manipulation. However, it has limitations, particularly when it comes to applying effects directly to individual characters or achieving complex animations.
"Text+", on the other hand, originates from DaVinci Resolve's Fusion page. It treats text at a more fundamental level, where each character can be considered a separate layer or element. This granular control allows for:
- Individual Character Animation: Animate rotation, shear, or other properties of specific letters.
- Advanced Styling: Apply multiple shading layers, complex outlines, and detailed stroke effects.
- Node-Based Compositing: Integrate Text+ seamlessly into complex Fusion compositions with extensive control over every aspect.
While Text+ offers immense power, it can appear more complex due to its node-based workflow. For simple titles, captions, or subtitles, the basic "Text" tool is often sufficient and more efficient. If you need intricate animations, unique styling, or integration into more elaborate visual effects, Text+ and the Fusion page are the way to go.
Best Practices for Adding Text to Videos
Regardless of the tools you use, adhering to best practices will ensure your text enhances, rather than detracts from, your video:
- Keep It Simple: Avoid cluttering your video with excessive text. Focus on conveying essential information clearly and concisely.
- Use Contrast: Ensure your text stands out against the video background. Choose colors that provide sufficient contrast.
- Maintain Consistency: Use the same fonts, sizes, and styles for similar text elements throughout your video to create a cohesive and professional look.
- Readability is Key: Prioritize legibility, especially for subtitles and important information.
- Save Custom Templates: If you frequently use specific text styles or animations, save them as custom templates within DaVinci Resolve to save time on future projects.
- Consider Your Audience: Tailor the complexity and style of your text to your target audience and the overall tone of your video.
Pro Tip: If you need design inspiration for text overlays or creative elements, tools like Canva can be invaluable. You can design elements there and then import them into DaVinci Resolve. For efficiently updating multiple text elements at once, explore dedicated workflows or plugins designed for this purpose.
Exporting Your Video with Text
Once you are satisfied with your video edits, including all text overlays and animations, it’s time to export your project. The text elements you’ve added serve multiple purposes:
- Highlight Key Information: Draw attention to crucial details or statistics.
- Improve Accessibility: Subtitles and captions make your content accessible to a wider audience, including those who are hard of hearing or watching with the sound off.
- Branding: Incorporate logos, watermarks, or branded titles to reinforce your identity.
Mastering the text tools within DaVinci Resolve is a significant step towards producing polished, professional-looking videos that effectively communicate your message and captivate your audience.
Why Add Text in DaVinci Resolve?
Text in video is a powerful communication tool. It can clarify your message with subtitles or instructions, highlight key points in your content, create dynamic, branded video intros and outros, and add a professional polish with animated titles or credits. DaVinci Resolve's flexibility allows you to tailor text to any style, from minimalist titles to complex animated sequences, ensuring your message is delivered effectively and engagingly.
FAQ: Adding Text in DaVinci Resolve
How do I add text in DaVinci Resolve?Open the Effects Library, navigate to the Titles section, and choose between "Text" for basic titles or "Fusion Titles" for advanced animated text. Drag your chosen text type onto the timeline above your video layer.
Where can I find text effects in DaVinci Resolve?Text effects are located in the Effects Library under the Titles section. You can choose from simple text overlays or advanced Fusion Titles with 3D animations and motion effects.
How do I customize text in DaVinci Resolve?Select your text layer, open the Inspector Panel, and adjust the font, size, color, position, and effects. You can add drop shadows, outlines, and change text alignment to fit your video.
How do I animate text in DaVinci Resolve?To animate text, use the Transform section in the Inspector Panel. Add keyframes to properties like Position, Opacity, and Scale to create fade-ins, zooms, or sliding effects.
What are Fusion Titles in DaVinci Resolve?Fusion Titles are advanced text effects created using DaVinci Resolve's Fusion page. They allow you to create 3D text, glowing animations, and particle effects, offering cinematic-quality text animations.
How do I make text fade in and out in DaVinci Resolve?In the Inspector Panel, adjust the Opacity keyframes at the beginning and end of your text clip. Lower the opacity at the start and end to create a smooth fade effect.
Can I create a typewriter text effect in DaVinci Resolve?Yes, you can create a typewriter effect by using keyframes in the "Write On" property, typically found under the Text+ settings within Fusion. Adjust the keyframes so letters appear one by one.
How do I align text in DaVinci Resolve?In the Inspector Panel, use the Alignment tools to position your text. You can center it, align it left or right, or adjust its position manually using the X and Y sliders in the Transform section.
What’s the best font to use for subtitles in DaVinci Resolve?For optimal readability, use clean, simple fonts like Arial, Montserrat, Open Sans, or Roboto. These fonts are designed for clarity and legibility, especially at smaller sizes.
Beyond Basic Text: Exploring Text+ and Fusion
While the standard "Text" tool is excellent for straightforward overlays, DaVinci Resolve's "Text+" generator, accessible through the Fusion page or directly from the Effects Library as a "Fusion Title," offers significantly more power and flexibility. Text+ breaks down text into individual elements, allowing for per-character animation, advanced shading, and integration into complex node-based workflows.
To access Text+ from the Edit page, go to the Effects Library, find "Fusion Titles," and drag a "Text+" effect onto your timeline. This provides a bridge to Fusion's capabilities without needing to fully immerse yourself in the Fusion page for simpler advanced tasks.
Within the Text+ settings in the Inspector, you'll find numerous tabs for detailed control:
- Shading Tab: This is where you can apply multiple layers of styling (up to 8) to your text, enabling intricate outlines, glows, and textured fills.
- Layout Tab: Control the arrangement of text, including paragraph justification, spacing, and alignment. You can even switch the layout to follow a "Path."
- Transform Tab: Fine-tune spacing between characters, words, or lines, and apply transformations like rotation or shear at a character level.
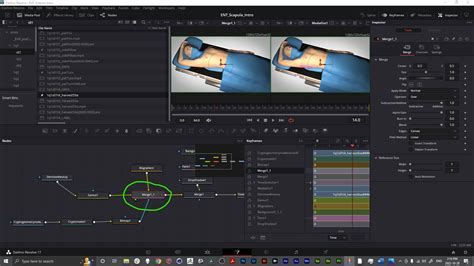
For truly dynamic animations, the Fusion page itself offers unparalleled control. Working with nodes, you connect different processing elements (like text generators, blurs, color correctors, and transform nodes) to build complex visual effects. While the node-based system can appear daunting initially, it provides a powerful and organized way to manage intricate animations and effects. You can animate properties like position, scale, rotation, and opacity using keyframes within Fusion, and even utilize curves for more precise control over animation timing and easing.

Integrating Text and Subtitles Seamlessly
In today's media landscape, especially with the prevalence of social media platforms where many viewers consume content without audio, subtitles and closed captions are no longer optional but essential. DaVinci Resolve provides robust tools for this.
You can create subtitles by adding a new subtitle track and then editing the text content and timing within the Inspector. For more efficient subtitle workflows, third-party tools like Simon Says can integrate directly with DaVinci Resolve, offering automated transcription and captioning in numerous languages, significantly speeding up the process from hours to minutes.
Final Thoughts on Text in DaVinci Resolve
Adding text to your videos in DaVinci Resolve is a fundamental skill that can dramatically enhance the professionalism and impact of your content. From simple, legible subtitles to eye-catching animated titles and intricate 3D text, the software provides the tools to meet a wide range of creative needs. By understanding the different text options available, mastering customization within the Inspector, and leveraging the power of keyframes and Fusion, you can effectively communicate your message, engage your audience, and elevate your video projects to a new level. The journey from basic text overlays to advanced motion graphics is accessible within DaVinci Resolve, empowering creators of all levels to tell their stories more effectively.