Achieving rounded corners on an image in Photoshop is a frequently performed task, and it's surprisingly straightforward once you understand the fundamental steps. This tutorial will guide you through various methods to transform sharp, angular edges into smooth, appealing curves, catering to both novice and experienced users. Whether you're looking to refine a photograph for a portfolio or create a specific design element, mastering this technique is an invaluable skill.
The Foundation: Understanding Layers and Tools
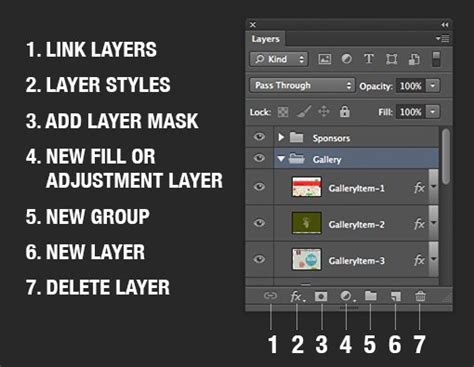
Before diving into the specifics of rounding corners, it's crucial to have a basic understanding of Photoshop's layer system and essential tools. The Layers panel, typically found on the right side of your workspace, is where you manage different elements of your image. If your image layer is locked, you'll need to click the lock icon to unlock it, allowing you to make modifications.
The primary tools you'll be utilizing are the Rectangle Tool and the Move Tool. The Rectangle Tool, found in the toolbar on the left, allows you to draw shapes. Its settings, accessible in the top toolbar, are key to creating rounded rectangles. The Move Tool, also in the left toolbar, is used for repositioning elements within your document.
Method 1: Using the Rectangle Tool and Clipping Masks
This is a popular and effective method for applying rounded corners to an existing photograph.
- Prepare Your Layers: Begin by ensuring your image layer is unlocked in the Layers panel. If you don't see the Layers panel, navigate to
Window > Layers. - Activate the Rectangle Tool: Select the Rectangle Tool from the left toolbar.
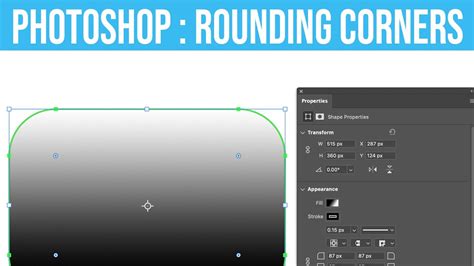
- Draw a Rounded Rectangle: In the top toolbar, you'll find options to adjust the rectangle's settings. Look for the corner radius options. You can either click and drag the small circle near one of the corners of the rectangle tool preview and drag it toward the center, or directly input numerical values in the radius boxes. The link button near the radius boxes is important; clicking it synchronizes all corners, ensuring they have the same radius. Alternatively, if you want to change only one corner individually, hold down the Alt (Windows) or Option (Mac) key while dragging the anchor point. This will keep the other corners unchanged.
- Position and Size: Draw a rounded rectangle over your image, covering the area you want to retain. Bright blue guides often appear to assist with precise positioning.
- Access Properties: Once you've drawn your rectangle, the Properties panel should automatically open. If it doesn't, go to
Window > Properties. - Adjust Corner Radius: In the Properties panel, under the "Appearance" section, you'll find the corner radius options. You can drag the cursor over one of the corners until a hand icon appears, then drag left or right to adjust the radius. Alternatively, you can input specific numerical values into the radius boxes. For instance, entering "65 px" will set a corner radius of 65 pixels.
- Apply as a Clipping Mask: Now, you need to use this rounded rectangle to mask your image. Hover your cursor in the space between the rectangle layer and your image layer in the Layers panel. While pressing the Alt (Windows) or Option (Mac) key, click. This action will create a clipping mask, effectively clipping your image to the shape of the rounded rectangle. Your photograph will now appear with rounded corners.
Method 2: Vector Masks for Precise Control
This method utilizes vector masks, offering a high degree of scalability and editability.
- Unlock Your Image Layer: As before, ensure your image layer is unlocked in the Layers panel.
- Select the Move Tool: Choose the Move Tool from the left toolbar.
- Create a Vector Mask: Go to the overhead menu, click on
Layer, selectVector Mask, and then chooseReveal Allfrom the drop-down menu. This adds a vector mask to your layer. - Activate the Rectangle Tool: Select the Rectangle Tool.
- Draw a Rounded Rectangle: Draw a rounded rectangle over your image, defining the area you want to keep. Adjust the corner radius in the Properties panel as described in Method 1.
- Refine the Mask: With the rectangle layer selected, you can now adjust its shape and corner radius in the Properties panel. The link button is again useful for uniform rounding.
- Convert to Selection: Press and hold the Control (Windows) or Command (Mac) key and click on the layer thumbnail of the rectangle you just created. This loads the shape of the rectangle as a selection.
- Invert Selection and Delete: Select the Move Tool, then go to the overhead toolbar and click
Select > Inverse. Your cursor will now show a tiny scissors icon. Click on the outer side of the dashed line (the area outside your rounded rectangle). This action, combined with the inverse selection, effectively "cuts" away the sharp corners of your image, leaving you with rounded edges. You can then reposition the image with the Move Tool if necessary.
Method 3: The Shape Layer Approach (for Pre-existing Shapes)
If you're working with a document that already contains a shape layer (like the edit-rounded-rectangles.psd file mentioned), the process is slightly different and focuses on editing existing shapes.
- Open the File: Open the relevant PSD file in Photoshop.
- Locate the Layers Panel: Ensure the Layers panel is visible (
Window > Layers). - Select the Rectangle Tool: Choose the Rectangle Tool from the left toolbar.
- Set Fill Color: In the Options at the top of your workspace, select white for the color fill. This ensures the rectangle itself is white.
- Edit Existing Rectangle: To edit a rectangle that has already been drawn, you must first select it. Press "A" on your keyboard to select the Path Selection Tool, or click to select this tool from the toolbar. Click on the "Location" square (or the shape you wish to edit) to select it.
- Adjust Live Shape Properties: In the Properties panel, you can now change the corner radius of this "live" rectangle. Experiment with different values by clicking the link icon to sync all corners or by entering specific numbers. You can also change the stroke and fill color of the shape. For instance, selecting a light blue color for the stroke will add a colored outline.
- Apply to Image: If this shape is intended to mask an image, you would then use this edited shape layer as a clipping mask to your image layer, similar to Method 1.
Additional Techniques and Considerations
- Rasterizing Shapes (Older Versions/Specific Workflows): In older versions of Photoshop (like CS2) or for specific workflows, you might encounter a method involving rasterizing a shape layer. This involves creating a shape layer, rasterizing it (converting it to pixels), and then using the Magic Wand tool to select the area outside the shape. With the selection active, you switch to your image layer and then use
Edit > ClearorEdit > Fillto remove the unwanted sharp corners. The rasterized shape layer is then discarded. - Crop Tool with Radius: While not explicitly detailed in the provided text, some versions of Photoshop offer a Crop Tool that can be set to create rounded corners directly during the cropping process. This is a more integrated approach if your primary goal is to crop and round simultaneously.
- Collages and Aspect Ratios: If you're working with collages, especially when re-importing images into software like Lightroom, it's important to note that the cells in the collage will need to be in the same aspect ratio as your images for the rounded corners to appear correctly.
Rounded Rectangle Tool Learn Adobe Photoshop CS6 from Scratch
Understanding the Corner Radius Adjustment
The ability to adjust the corner radius is a core feature when working with shapes in Photoshop. When you draw a rectangle or other shape that supports corner rounding, you'll see options to control this.
- Direct Manipulation: Often, you can click and drag a small circular handle directly on the shape in the document window or on a visual representation in the Properties panel.
- Numerical Input: For precise control, you can type numerical values into dedicated fields. These values are typically in pixels, but can sometimes be relative to the overall size of the shape.
- Linking Corners: The "link" icon is a critical feature. When active, changing the radius of one corner affects all corners identically. Disabling this link allows you to adjust each corner independently, providing flexibility for asymmetrical designs.
- Individual Corner Control: Holding down the Alt (Windows) or Option (Mac) key while dragging a corner handle is a common shortcut to modify only that specific corner, leaving the others untouched.
Why Rounded Corners? Design and Usability
The prevalence of rounded corners in graphic design is not merely aesthetic; it serves several practical purposes.
- Softer Visual Appeal: Sharp corners can sometimes appear harsh or aggressive. Rounded corners create a softer, more approachable, and visually pleasing aesthetic. This is particularly important in user interface design, branding, and photography where a welcoming feel is desired.
- Reduced Visual Clutter: In complex layouts or collages, rounded corners can help to visually separate elements without introducing hard lines, leading to a cleaner and less cluttered appearance.
- Emphasis on Content: By softening the edges of an image or element, the focus is naturally drawn to the content within.
- Ergonomics (in UI/UX): In digital interfaces, rounded corners are often considered more ergonomic for the eye to scan and interact with.
- Branding Consistency: Many brands incorporate rounded corners into their logos and marketing materials, and extending this to their digital assets ensures brand consistency.
The choice of radius size also plays a role. A subtle rounding might be used for a professional portfolio, while a more pronounced radius could be suitable for a playful or modern design.
Troubleshooting Common Issues
- Layer Locked: The most common issue is attempting to modify a locked layer. Always ensure your image layer is unlocked.
- Tool Not Selected: Make sure you have the correct tool (Rectangle Tool, Path Selection Tool) active when attempting to draw or edit shapes.
- Properties Panel Not Visible: If you can't find the Properties panel, go to
Window > Propertiesto display it. - Clipping Mask Not Working: Double-check that you are hovering between the correct layers in the Layers panel and holding down the Alt/Option key when clicking. The order of layers matters.
- Aspect Ratio Mismatches: In collage work, if rounded corners aren't appearing as expected, investigate the aspect ratios of your image cells and the collage template.
By understanding these methods and the underlying principles of Photoshop's tools, you can confidently add rounded corners to your images, enhancing their visual appeal and professional polish.