Watermarking your photographs is a crucial step in protecting your intellectual property and establishing your brand identity. Adobe Lightroom, a powerful tool for photographers, offers robust features for adding watermarks to your images efficiently. This guide will walk you through the process of creating, customizing, and applying watermarks in Lightroom, ensuring your work is always protected and professionally presented.
Creating Your Watermark in Lightroom
The journey to watermarking your images begins with accessing Lightroom's Watermark Editor. Regardless of which module you are currently in - be it Library, Develop, or any other - navigate to the "Edit" menu. On Windows, you'll find the option under "Edit" > "Edit Watermarks." For macOS users, the path is "Lightroom Classic" > "Edit Watermarks." This action will launch the dedicated Watermark Editor window, your central hub for all watermark-related operations.
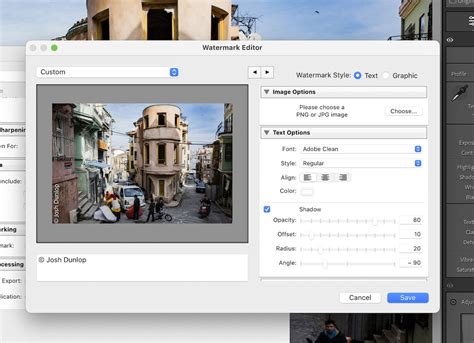
Upon opening the Watermark Editor, your attention will be drawn to the upper left corner, where a drop-down menu resides. This menu presents three distinct options: "Custom," "Save Current Settings as a new preset," and "Restore Default Presets." For the purpose of creating a new watermark, ensure that "Custom" is selected. This option allows you to build your watermark from the ground up or modify existing settings.
Choosing Your Watermark Style: Text or Graphic
Within the Watermark Editor, you are presented with two primary styles for your watermark: Text and Graphic.
Textual Watermarks
If you opt for a textual watermark, select the "Text" option. This choice enables you to input any desired text directly into the designated input area located beneath the preview pane. The "Text Options" section provides a comprehensive suite of tools to customize your text. Here, you can select your preferred font, adjust the font style (such as bold or italic), choose a color that complements your image, and precisely control the alignment of your text - be it left, right, or center. The color picker offers an extensive palette, allowing you to select any shade and hue imaginable, ensuring your text stands out or blends subtly as needed.
Furthermore, Lightroom provides the capability to add a shadow effect to your text. By placing a tick next to the "Shadow" option, you unlock a range of adjustments. You can fine-tune the opacity of the shadow, control its offset from the text, adjust its radius for a softer or sharper edge, and even dictate its angle. These adjustments can be made intuitively using scroll bars or by directly typing in the necessary numerical values, offering a high degree of precision.
Graphic Watermarks (Logos)
Alternatively, if you have a pre-designed logo or a graphic element that you wish to use as your watermark, select the "Graphic" option. You can then click on "Choose" within the "Image Options" section to upload your logo file. Lightroom will automatically switch to the "Graphic" mode upon recognizing the image file.
It is crucial to understand that Lightroom operates with a distinct limitation: you must choose between a textual watermark and a logo. It is not possible to apply both a text and a graphic watermark simultaneously. If you upload a logo file, the textual watermark options will be automatically disabled, and vice versa. Your logo file should ideally be in PNG or JPG format. While not strictly mandatory, having your logo on a transparent background can often yield more professional and seamless results. It's important to note that Lightroom cannot create a logo watermark from scratch. You will need to have your logo designed elsewhere, perhaps using software like Photoshop, by a professional designer, or through an online logo maker.
Customizing Your Watermark's Appearance and Placement
Once you have chosen your watermark style, the "Watermark Effects" section allows for further refinement of its appearance and positioning. This section is consistent for both text and graphic watermarks, offering a unified set of controls.
Opacity and Size Adjustment
The "Opacity" slider allows you to control the transparency of your watermark. You can make it as subtle or as prominent as you desire, ensuring it doesn't overpower your image. To adjust the size of your watermark, simply select it within the preview pane and drag its corners with your cursor. Alternatively, you can use the provided scroll bar or type in the necessary value. However, it's important to note that size adjustments are only possible when the "Proportional" option is selected. If you choose "Fit" or "Fill," the size becomes fixed.
The "Fill" option will enlarge your watermark to occupy the entire image, which can be useful for certain branding strategies. Conversely, the "Fit" option can be particularly advantageous, especially when watermarking multiple photos of varying sizes and orientations (both horizontal and vertical). With "Fit" selected, Lightroom will automatically scale your watermark up or down to maintain its position and relative size across all exported images.
Positioning with Inset and Anchor
The "Inset" option, adjustable via scroll bars or direct numerical input, provides fine-grained control over the watermark's position. It allows you to slightly reposition your watermark horizontally or vertically, moving it away from the edges or towards specific points within the frame.
For more precise placement, the "Anchor" option is invaluable. It offers nine distinct anchor points, enabling you to position and lock your watermark to a specific location on the image. You can, for instance, place your watermark directly in the center, in any of the four corners, or slightly off-center for a more dynamic look.
Rotation
While not offering precise angle selection, Lightroom provides "Rotate" arrows that allow you to rotate your watermark incrementally to the left or right. This can be useful for subtle stylistic adjustments.
How To Add Watermarks in Adobe Lightroom
Saving and Managing Your Watermark Presets
After meticulously customizing your watermark to your satisfaction, the next step is to save these settings for future use. Click the "Save" button within the Watermark Editor. You will then be prompted to enter a name for your watermark preset. Choose a descriptive name that will help you easily identify it later. Once you've entered the name, click "Create." You have the flexibility to create and save as many different watermark presets as you need, catering to various branding requirements or project types.
To edit an existing watermark, simply select it from the preset menu within the Watermark Editor and make the desired changes. To save these modifications, you can either click "Save" to overwrite the existing preset or choose "Save Current Settings As New Preset" to create a new variation.
Applying Your Watermark During Export
With your watermark presets created and saved, the final stage is to apply them to your photographs during the export process.
Selecting Images for Export
First, select the images you intend to export. If you need to select several consecutive images, click on the first image, then hold down the "Shift" key and click on the last image in the sequence. This will select all images between the first and the last. For selecting individual images that are not contiguous, hold down the "Ctrl" key (on Windows) or the "Command" key (on macOS) and click on each image you wish to include. To select all photos within a folder, use the shortcut "Ctrl + A" (Windows) or "Command + A" (macOS).
The Export Process
Once your images are selected, right-click on one of them and navigate to "Export" > "Export…". Alternatively, you can go to "File" > "Export…". This action will open the Export window.
Scroll down within the Export window until you locate the "Watermarking" section. Place a tick in the checkbox next to "Watermark." From the drop-down menu that appears, select the watermark preset you wish to apply. You also have the option to access the Watermark Editor directly from this menu if you need to make last-minute adjustments or create a new preset.
After specifying all other desired export settings (such as file format, resolution, and destination), click the "Export" button. Once the export process is complete, navigate to your export folder to review your watermarked images.
Beyond Lightroom: Exploring Alternative Watermarking Solutions
While Lightroom offers a capable and integrated solution for watermarking, it's worth acknowledging that other specialized software exists, providing potentially more advanced features. Visual Watermark is one such example. While it requires an extra step of exporting from Lightroom first and then importing into Visual Watermark, it offers functionalities that Lightroom does not.
These advanced features can include a "Tile" option, which repeats your watermark across the entire image in a tiled pattern, with options for straight or diagonal tiling and adjustable spacing. Unlike Lightroom's limitation of choosing between text or a logo, Visual Watermark allows you to combine both text and logo watermarks, either as grouped elements or as separate entities. Furthermore, Visual Watermark offers more extensive logo editing capabilities, including changing color and adding effects like shadows, and provides greater flexibility in positioning watermarks anywhere on the image with intuitive drag-and-drop functionality. For photographers who require highly customized or complex watermarking strategies, exploring these external tools might be beneficial, though for most standard watermarking needs, Lightroom's built-in features are more than sufficient and significantly streamline the workflow.