Adobe Photoshop is a powerhouse for digital artists and designers, and at its core lies the versatile Brush Tool. With a vast array of brush options and settings, it can be confusing and intimidating, especially for newcomers. However, fear not! This tutorial will guide you through the essential aspects of using and creating Photoshop brushes, transforming you from a curious beginner to a confident digital creator.
Understanding the Basics: What Are Photoshop Brushes?
If you’re a newbie to Photoshop, you might be scratching your head and wondering, “What in the world are Photoshop brushes?” Simply put, Photoshop brushes are digital tools that mimic traditional art instruments like paintbrushes, pencils, or even unique implements, allowing you to paint, draw, and create textures within the digital canvas. They are not just simple dots; each brush has a defined shape, behavior, and can be customized with a multitude of settings to produce an endless variety of marks and effects. From soft, ethereal glows to sharp, defined lines, the possibilities are virtually limitless.

Installing New Brushes: Expanding Your Creative Toolkit
Before you can start using brushes in Photoshop, you need to install them. This is a straightforward process that unlocks a world of pre-made and custom brush sets created by artists and designers worldwide.
- Locate Your Brush Files: Navigate to the folder where you have downloaded or extracted your desired brush set. Photoshop brushes typically come in files with the
.abrextension. - Importing into Photoshop: There are a couple of ways to install brushes:
- Double-Click: The simplest method is to double-click the
.abrfile. Photoshop should automatically recognize it and load the brushes into your Brush Presets panel. - Brush Settings Panel: Alternatively, you can open the Brush Settings panel (Window > Brush Settings), click the flyout menu in the top-right corner, and select "Import Brushes." Then, navigate to your
.abrfile and select it. - Presets Manager: Another method is to go to Edit > Presets > Presets Manager, select "Brushes" from the dropdown menu, click "Load," and then select your
.abrfile.
- Double-Click: The simplest method is to double-click the
Once you’ve installed some brushes, it’s time to start using them and exploring their unique characteristics.
Navigating the Brush Tool and its Options
Familiarizing yourself with the Brush Tool and its associated settings is crucial for effective brushwork.
The Brush Tool: The Brush Tool is located in the toolbar on the left-hand side of the screen. It's usually represented by an icon resembling a paintbrush. Selecting this tool activates your digital brush.
The Options Bar: Once the Brush Tool is selected, the Options Bar at the top of the screen becomes your command center for brush customization. Here, you'll find essential controls:
- Brush Size: This slider or numerical input allows you to adjust the diameter of your brush tip. A larger size covers more area, while a smaller size offers more precision.
- Opacity: This setting controls the transparency of your brush strokes. A lower opacity will result in lighter, more translucent marks, allowing underlying layers to show through. This is key for building up color and tone gradually.
- Flow: Similar to opacity, flow determines how much paint is "applied" with each stroke. A lower flow means you'll need to go over an area multiple times to achieve full coverage, mimicking the way paint might build up with a physical brush. Adjusting both opacity and flow allows for a nuanced control over the intensity of your brush marks.
Exploring Different Brush Types
Photoshop offers a wide variety of brush types, each designed to create distinct visual effects. Understanding these categories will help you choose the right tool for your artistic intent.
- Round Brushes: These are the most basic and versatile brushes, offering a clean, circular tip. They come in hard-edged varieties (for sharp lines and defined shapes) and soft-edged varieties (for smooth blending and ethereal effects).
- Textured Brushes: These brushes incorporate pre-defined textures within their shape, such as paper grain, canvas, or even photographic elements. They are excellent for adding a realistic or stylized surface quality to your artwork.
- Scatter Brushes: As the name suggests, scatter brushes distribute instances of their tip shape randomly along a path. This is perfect for creating effects like dust, stars, confetti, or foliage, adding a sense of organic distribution or controlled chaos.
- Art Brushes: These brushes stretch or repeat a defined shape along a path, often used for decorative borders, vines, or other linear elements.
- Dual Brush Brushes: This advanced option allows you to combine two different brush tips, creating complex and unique textures by blending their characteristics.
Delving Deeper: The Brush Settings Panel
For unparalleled control and the ability to craft truly unique marks, the Brush Settings panel (Window > Brush Settings) is indispensable. This panel offers a granular level of customization, allowing you to fine-tune every aspect of your brush's behavior.
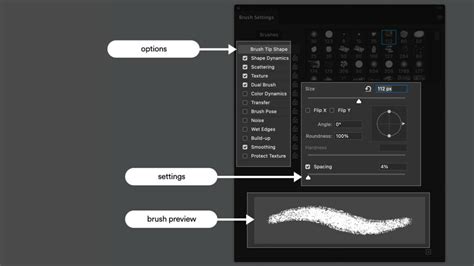
Here are some of the key settings you can explore:
- Brush Tip Shape: This is where you select the fundamental shape of your brush tip. You can choose from a vast library of pre-made shapes, including basic rounds, squares, and even import custom shapes. You can also adjust the diameter, hardness, spacing, and angle of the tip.
- Spacing: This setting determines how far apart the brush tip instances are placed as you drag your cursor. Low spacing creates a continuous stroke, while high spacing results in distinct dabs or dots.
- Shape Dynamics: This crucial setting controls how the brush shape changes as you paint.
- Size Jitter: Introduces randomness to the size of your brush strokes, making them appear more natural and less uniform.
- Angle Jitter: Varies the angle of the brush tip as you paint, which is particularly useful for creating organic textures and avoiding repetitive patterns.
- Roundness Jitter: Adds variation to the roundness of the brush tip, allowing for more dynamic and less perfectly circular marks.
- Minimum Diameter: Sets a lower limit for the brush size when jitter is applied, ensuring your strokes don't become too thin.
- Scattering: This setting allows you to distribute the brush tip instances randomly around the center point of your stroke.
- Scatter: Controls the degree of randomness in the placement of brush tips.
- Count: Determines how many brush tips are scattered within a given area.
- Texture: This option allows you to apply a pattern or texture to your brush strokes, giving them a more tactile and realistic feel. You can choose from Photoshop's built-in patterns or import your own.
- Scale: Adjusts the size of the texture.
- Brightness/Contrast: Fine-tunes the appearance of the texture.
- Mode: Determines how the texture interacts with the brush stroke.
- Dual Brush: As mentioned earlier, this allows you to combine two different brush tips. You can select a primary brush tip and then a secondary one, and then control how they interact through various blending modes and settings. This is a powerful tool for creating complex and unique textures.
- Color Dynamics: This setting introduces variations in color within your brush strokes.
- Foreground/Background Jitter: Varies the color between your foreground and background colors.
- Hue Jitter: Randomly shifts the hue of the color.
- Saturation Jitter: Varies the intensity of the color.
- Brightness Jitter: Introduces randomness to the lightness or darkness of the color.
- Transfer: This setting controls how the opacity and flow of your brush strokes change, often in response to pen pressure (if using a graphics tablet).
- Opacity Jitter: Varies the opacity of individual brush marks.
- Flow Jitter: Varies the flow of paint.
- Other Settings: The Brush Settings panel also includes options for Noise, Wet Edges, Build-up, Smoothing, and Protect Texture, each offering further control over the subtle nuances of your brushwork.
Experimenting with these settings is key to unlocking the full potential of Photoshop brushes. Don't be afraid to play around and see what interesting effects you can achieve.
Master Brush Tool from Start to Finish - Photoshop for Beginners | Lesson 12
Creating Your Own Custom Brushes: Unleash Your Uniqueness
While pre-made brush sets are great, sometimes you need a brush that’s tailored specifically to your needs. Creating your own custom brushes in Photoshop is a fantastic way to add a unique touch to your digital art and design projects, allowing you to replicate specific textures, shapes, or effects that you can't find elsewhere.
Here's the general process:
- Choose Your Image or Shape: First, find or create the image or shape that you want to turn into a brush. This could be a photograph of a texture, a hand-drawn element, a scanned object, or even a simple geometric shape.
- Select and Edit the Image:
- Open your chosen image in Photoshop.
- Use selection tools (like the Marquee Tool or Lasso Tool) to isolate the part you want to use as your brush tip.
- It’s often beneficial to convert your selection to grayscale. Go to Image > Adjustments > Desaturate (Shift+Ctrl+U or Shift+Cmd+U). This ensures that the brush will be based on luminosity rather than color. White areas will be transparent, black areas will be opaque, and shades of gray will create varying levels of transparency.
- Make any necessary edits to the selected area, such as adjusting contrast or cleaning up imperfections.
- Define the Brush Preset: Once you're happy with your selection, go to Edit > Define Brush Preset.
- Name Your Brush: A dialog box will appear asking you to name your new brush. Choose a descriptive name so you can easily identify it later.
- Save and Use the Brush: Click "OK" to save your new custom brush. It will now appear at the bottom of your Brush Presets list in the Brush Tool's dropdown menu. You can then select it and adjust its settings in the Brush Settings panel just like any other brush.
By mastering custom brush creation, you can develop a signature style and streamline your workflow by having readily available tools for recurring elements or textures.
Best Practices for Using Photoshop Brushes
As you delve deeper into the world of Photoshop brushes, keep these best practices in mind to enhance your workflow and the quality of your artwork:
- Use Brushes Sparingly: Overusing a single brush type or a very complex brush can make your work look repetitive and uninteresting. Variety is the spice of art! Mix different brushes, techniques, and tools to keep your creations dynamic and engaging.
- Choose the Right Brush for the Job: Not all brushes are created equal, and not every brush is suitable for every task. A hard-edged brush is great for sharp lines, while a soft brush is better for blending. A scatter brush is ideal for foliage, but not for drawing a smooth curve. Select brushes that align with the specific effect you want to achieve.
- Leverage Opacity and Flow: These settings are your best friends for subtle control. Instead of relying solely on brush size, use opacity and flow to build up color and tone gradually. This leads to more realistic and nuanced results, especially when working with soft brushes or trying to achieve painterly effects.
- Experiment with Brush Settings: The true power of Photoshop brushes lies in their customizability. Don't just stick to the defaults. Open the Brush Settings panel and play with Shape Dynamics, Scattering, Texture, and Color Dynamics. Even subtle adjustments can lead to dramatically different and more interesting brush strokes.
- Utilize Layer Masks: When applying brush strokes, especially those with opacity or flow adjustments, consider using layer masks. This non-destructive approach allows you to easily refine your brushwork, hide or reveal parts of the stroke, and make changes later without permanently altering the pixels.
- Practice! Like any skill, using Photoshop brushes effectively takes practice. The more you experiment with different brush types, settings, and techniques, the more intuitive it will become. Don't be afraid to make mistakes; they are valuable learning opportunities. Try to replicate textures you see in the real world, or invent entirely new ones.
The Incredible Versatility of Photoshop Brushes
As we wrap up, I want to emphasize the incredible versatility and power of Photoshop brushes in helping artists and designers achieve a wide range of effects and styles in their digital work. From hyper-realistic painting to abstract designs, from intricate illustrations to subtle textural enhancements, brushes are a fundamental tool in the digital artist's arsenal. It’s important to experiment with different techniques and tools to find what works best for you and your projects. Thanks for sharing Janet. I saw Paul at Max last year, and he was great value, and just a little bit out there - well short of the other dimension that Jason Levine and Russell Brown reside in, but half way through the wormhole that leads you there. I don't remember if he covered brushes in his presentation, but my memory of the rest of his session is overpowered with the image of his OTT laptop cover design……and the unfortunate (we assume it was not deliberate) visual in his demo of Muse right at the end of his presentation. The journey into mastering Photoshop brushes is an ongoing one, filled with discovery and creative exploration.