Photoshop design templates are invaluable tools for designers of all levels, offering a structured and efficient way to create professional-looking graphics. Whether you're a seasoned professional or just beginning your design journey, understanding how to effectively utilize these templates can significantly streamline your workflow and elevate the quality of your final output. This guide will delve into the intricacies of Photoshop design templates, from opening and customizing them to saving and leveraging their full potential, drawing upon expert insights and practical advice.
Understanding Photoshop Design Templates (PSDs)
At its core, a Photoshop design template, commonly referred to as a PSD file, is a layered image file created using Adobe Photoshop. The fundamental advantage of a PSD lies in its ability to preserve individual layers. This means that elements such as text, shapes, images, and special effects are kept separate, allowing for unparalleled customization without the need to start a design from scratch. This layered structure is the cornerstone of why templates are so powerful and versatile.
The concept of layers in Photoshop is crucial. Imagine a stack of transparent sheets, each containing a different element of your design. You can move, resize, recolor, or even delete individual sheets without affecting the others. This is precisely how a PSD template functions, providing a flexible framework for your creativity.
Opening and Accessing Template Files
When you acquire a Photoshop template package, you'll typically find a variety of files. The primary file you'll want to work with is the native Photoshop file, denoted by the .PSD extension. To open a PSD file, you can usually just double-click it, and it will launch directly within Adobe Photoshop.
However, not all template packages exclusively provide PSD files. In some instances, you might receive a PDF file as an alternative. If a PSD file is not available, you can still import a PDF into Photoshop. To do this, navigate to the top menu within Photoshop and select "File" > "Open." Then, choose the PDF file. A dialog box titled "Import PDF" will appear, allowing you to configure import settings before proceeding. It's vital to pay attention to these settings to ensure the template is imported correctly and maintains its intended structure.
Compatible Software for PSD Files
While Adobe Photoshop is the native software for PSD files and offers the most comprehensive editing experience, other compatible tools can also be used. These include Photopea, a free web-based photo editor, and GIMP (GNU Image Manipulation Program), a free and open-source image editor. However, for optimal compatibility, access to all features, and the smoothest workflow, Adobe Photoshop remains the recommended choice. The robust feature set of Photoshop ensures that you can fully exploit the potential of any PSD template.
Customizing Your Photoshop Templates
The true power of design templates lies in their customizability. They are not meant to be used as-is but rather as a starting point for your unique creations. The layered nature of PSD files makes this process intuitive and efficient.
Working with Layers: The Key to Customization
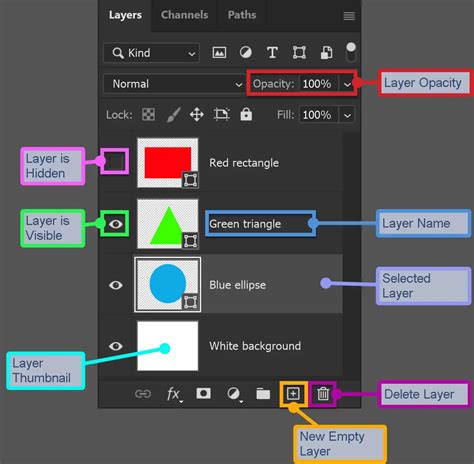
When you open a PSD template, you'll notice a "Layers" panel, usually located on the right side of the Photoshop interface. This panel displays all the individual elements of the template, organized into distinct layers. To customize your design, you'll primarily interact with these layers.
Very Important: When you begin working on a template, it is highly recommended to create a new layer above the template's guide layer. This ensures that you do not accidentally design directly on the layer containing the template's guides or original content. By working on a separate layer, you can freely modify your artwork without compromising the integrity of the template's structure.
Placing Your Artwork and Images
Once you have your working layer set up, you can start placing your own artwork, images, and text. Photoshop offers several ways to do this:
- Drag and Drop: You can drag image files directly from your computer's file explorer into your Photoshop document.
- "Place Embedded" or "Place Linked": Go to "File" > "Place Embedded…" or "File" > "Place Linked…". "Place Embedded" embeds the image directly into your PSD file, making the file larger but self-contained. "Place Linked" creates a link to the original image file; if the original image is updated, the linked version in your PSD will also update. This is useful for managing large projects.
When placing your content, it's crucial to ensure that it fits harmoniously with the template's layout and intended purpose. You can resize, rotate, and reposition your placed elements using Photoshop's transform tools (Edit > Free Transform, or Ctrl/Cmd + T).
Very Important: As you incorporate your artwork, be extremely careful not to flatten your template guides as part of your artwork. Flattening merges all layers into a single background layer, which would cause the template guides to print on your finished piece, detracting from the professional look you aim to achieve. Always ensure your guides remain on their designated layers or are hidden before saving your final output.
Customizing Text and Colors
Templates often include placeholder text and default color schemes. You can easily modify these to match your branding or project requirements:
- Text: Select the Text tool (T) in Photoshop. Click on the text layer you wish to edit, and you can then type your new content. You can also adjust the font, size, color, and alignment of the text using the Character and Paragraph panels.
- Colors: Many templates use Smart Objects or adjustment layers for colors. You can often double-click a Smart Object layer to open it in a separate window, where you can edit its contents, including colors. Adjustment layers, such as Hue/Saturation or Color Balance, can be applied to specific layers or the entire document to alter color schemes non-destructively.
Saving Your Customized Designs
Once you've finished customizing your template, the next critical step is to save your work in a format suitable for its intended use. Photoshop offers various saving options, each with its own purpose.
Saving as a Photoshop PDF
For professional printing, saving your design as a Photoshop PDF is often the preferred method. This format preserves vector information, high-resolution images, and essential print-ready settings.
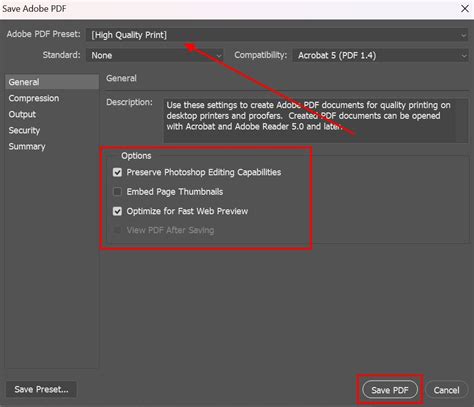
- From the top menu in Photoshop, select "File" > "Save As…".
- In the "Save As" window, enter your desired file name and choose a location on your computer to save the file.
- Crucially, select "Photoshop PDF" from the "Format" (or "Save as type") dropdown menu.
- Click the "Save" button.
- This will open the "Save Adobe PDF" window. Here, you need to select an appropriate Adobe PDF preset. For professional printing, "[PDF/X-4:2008]" is a highly recommended preset. This standard ensures color consistency and compatibility with most professional printing workflows.
- After selecting your preset, click the "Save PDF" button.
Understanding PDF/X-4:2008
The PDF/X-4:2008 standard is a crucial element for professional printing. It's designed to be an exchange format that minimizes the chances of errors during the printing process. Key features include:
- Transparency Support: Unlike older PDF/X standards, PDF/X-4:2008 supports transparency, which is essential for modern design workflows.
- ICC Color Management: It ensures that colors are handled consistently across different devices and workflows by embedding ICC profiles.
- No Font Substitution: It embeds all necessary fonts, preventing the printer from substituting them with less desirable alternatives.
- High-Quality Output: It's optimized for high-resolution printing, ensuring sharp details and accurate color reproduction.
Other Saving Formats
While Photoshop PDF is ideal for print, you might need to save your design in other formats depending on its intended use:
- JPEG (.jpg): Best for web use, photos, and general sharing. It's a compressed format, so it results in smaller file sizes but can lead to a loss of quality if over-compressed.
- PNG (.png): Ideal for web graphics that require transparency (e.g., logos, icons). It supports lossless compression, meaning no quality is lost.
- TIFF (.tif): Often used for high-quality print output and archiving. It supports lossless compression and can include layers.
- PSD: Always save your working file as a PSD to retain all layers and editing capabilities for future modifications.
Leveraging Templates from Online Resources
The availability of high-quality design templates has exploded in recent years, thanks to numerous online platforms. These platforms offer a vast array of resources that can cater to virtually any design need.
Freepik: A Premier Source for PSD Templates
Freepik is a popular platform that offers thousands of high-quality PSD files. Their collection includes templates for a wide range of applications, such as:
- Posters and Flyers: For events, promotions, and marketing materials.
- Social Media Graphics: For platforms like Instagram, Facebook, and Twitter.
- Branding Kits: Logos, business cards, and stationery.
- Presentations: For professional or academic use.
- And much more: Their library is constantly expanding.
All files available on Freepik are professionally designed and fully editable. They are meticulously organized by theme, making it easy to find precisely what you're looking for.
Quality Assurance and Design Standards
Freepik emphasizes quality. Every PSD file uploaded to their platform undergoes a manual review by their content team. This process ensures that each template meets specific technical, visual, and usability standards. The focus is on clean organization, ease of use, and strong, appealing design principles. This rigorous vetting process gives users confidence in the quality and reliability of the templates they download.
Ease of Use for All Skill Levels
A common concern for less experienced users is whether they can effectively use PSD templates. The good news is that most PSDs are designed with user-friendly, organized layers. This means that even if you're not a seasoned Photoshop expert, you can easily customize text, swap out images, change colors, and apply effects. The templates provide a structured starting point, simplifying complex design tasks.
How To EASILY Make A Collage In Photoshop (+ FREE Templates)
Licensing and Usage Rights
When using templates from online resources like Freepik, understanding the licensing terms is crucial, especially for commercial projects.
- Free PSDs: These can typically be used for commercial purposes, but they may require attribution to the original creator. Always check the specific license terms on the download page for each resource.
- Premium PSDs: These often offer more flexibility, including unlimited downloads and no attribution requirements. They are ideal for professionals who frequently use design assets and need greater freedom.
It's essential to always review the license agreement associated with each download to ensure compliance and avoid any legal issues.
Accessing Premium Resources
If you're looking for exclusive and high-quality assets, platforms like Freepik offer premium subscriptions. Premium users typically benefit from:
- Unlimited downloads of all resources.
- Access to exclusive PSDs not available to free users.
- No attribution requirements for any downloads.
- A broader and more diverse selection of designs.
To find premium resources, look for items marked with a "Premium" label or utilize the search filters on the platform to display only premium-only results. This streamlines the process of finding top-tier assets.
Best Practices for Working with Templates
To maximize your efficiency and the quality of your final output when working with Photoshop templates, consider these best practices:
- Understand the Template's Purpose: Before you start editing, take a moment to understand what the template is designed for. Is it for print, web, social media, or something else? This will inform your saving and export settings.
- Maintain Layer Organization: As you add your own elements, try to keep your layers organized. Use descriptive names for your layers and group related elements together. This will make future edits much easier.
- Use Smart Objects: Whenever possible, convert your placed images and complex elements into Smart Objects. This allows for non-destructive editing, meaning you can resize, transform, and apply filters without permanently altering the original pixel data.
- Color Management: Pay close attention to color profiles. For print, ensure you are working in CMYK and have the correct ICC profiles embedded. For web, use RGB.
- Resolution Matters: For print templates, ensure your images and the template itself are at a high resolution (typically 300 DPI). For web, lower resolutions (72 DPI) are usually sufficient.
- Test Your Output: Before sending a design to print or publishing it online, always preview it carefully. Check for any errors, misalignments, or unintended artifacts. If possible, print a draft copy to check colors and layout.
By embracing Photoshop design templates and understanding the best practices for their use, you can unlock a new level of efficiency and creativity in your design projects. They serve as a powerful foundation, allowing you to build upon existing professional structures and deliver polished, impactful results.