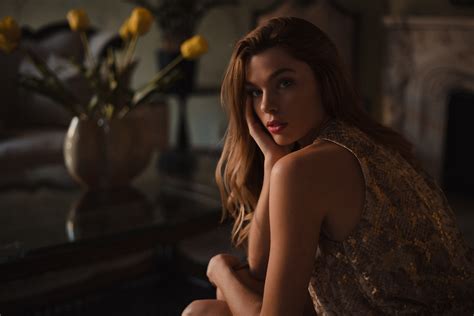
A gritty and dramatic photo catches your eye and stands out from the crowd, and when you’re looking for a way to stylize your images, a preset is a great place to start. The allure of dark and moody photography lies in its ability to evoke strong emotions, create a sense of depth, and draw the viewer into the scene. This editing style, characterized by dark, mysterious earthy tones, lifted shadows, and muted colors, has become exceedingly popular, particularly on platforms like Instagram. Achieving this look in Adobe Lightroom involves a series of deliberate adjustments that go beyond simply applying a pre-made filter. It's about understanding how different settings interact to sculpt light, color, and tone, transforming an ordinary photograph into a compelling visual narrative.
Understanding the Dark & Moody Aesthetic
What characterizes Dark & Moody presets? At its core, this aesthetic is about creating a dramatic and atmospheric feel. It's a departure from bright, airy images, opting instead for a more introspective and intense visual language. This style is often achieved by intentionally darkening images, increasing contrast, and selectively muting or enriching certain color palettes. The goal is to guide the viewer's eye, emphasize the subject, and imbue the photograph with a specific emotional resonance. This is not merely about making a photo dark; it's about sculpting light and shadow to tell a story.
The "dark" aspect refers to the overall reduction in brightness, often achieved by lowering exposure and darkening shadows. The "moody" element comes from the interplay of contrast, color saturation, and tonal shifts that create a sense of drama, mystery, or introspection. Dark & Moody presets intelligently increase contrast, richen warmer shades, and mute colors while preserving skin tone. They can be applied to a whole series of images, creating a cohesive style for your entire collection.
The Foundation: Capturing the Moody Image
While presets can work wonders, the foundation of a great moody photograph is laid during the capture phase. To edit moody photos in Lightroom, start by taking the picture in the right way. Look for good lighting, such as on cloudy days or during sunset, as these conditions naturally lend themselves to softer, more diffused light that can be easily manipulated. Use a lens with a wider aperture to help you focus on your subject and blur the background, creating a shallow depth of field that isolates the subject and enhances the mood. Keep the camera ISO settings low to avoid grainy pictures and bad colors, as noise can detract from the desired aesthetic. Crucially, choose a darker background to add to the mood of the photo. Just as an author carefully chooses the right words, set your camera settings and create a composition that FEELS moody before you even start editing.
Core Adjustments for Dark & Moody Tones
When it comes to editing in Lightroom, several key areas are manipulated to achieve the Dark & Moody look.
Light and Contrast Manipulation
The first step in many Dark & Moody editing workflows involves significant adjustments to the light and contrast settings. This is where the dramatic shift in mood begins.
- Exposure and Contrast: A common starting point is to bring the exposure down. For instance, you might turn your Exposure down about -.5. Simultaneously, you'll increase Contrast, perhaps by +35 to 50, to create more pronounced separation between light and dark areas. Increasing contrast is a bit trickier than moving a single slider. However, presets are designed to preserve highlights, lower midtones, and darken the shadows without crushing them. This means maintaining detail even in the darkest parts of the image.
- Highlights and Shadows: To further control the tonal range, highlights are typically brought down significantly, often to -100. This prevents blown-out areas and adds to the subdued feel. Conversely, shadows are often lifted, sometimes to +100, to reveal detail and prevent the image from becoming a silhouette. This technique is key to maintaining a balance between darkness and clarity.
- Whites and Blacks: Adjusting the whites and blacks sliders is also crucial. Whites might be set to +25ish, while blacks are brought down to -25. These subtle shifts help to define the dynamic range and can contribute to a richer, more impactful look.
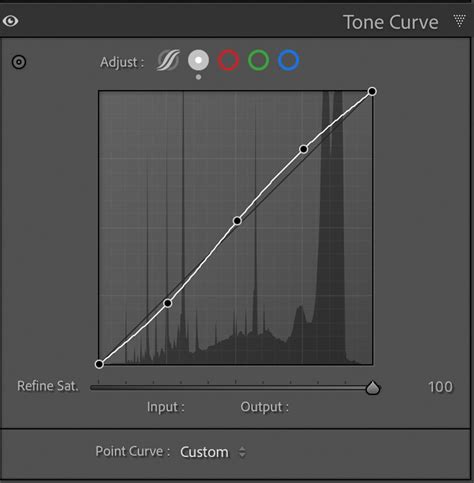
- Tone Curve: The Tone Curve is a powerful tool for fine-tuning contrast and mood. A fairly strong S-Curve is often created. This involves lifting the shadow point up about .75 stops. This specific adjustment can create a subtle "matte" effect and lift the darkest areas just enough to retain detail while still maintaining a dark overall feel.
Color Grading and Saturation
Color plays a vital role in establishing the mood of an image. For moody photos, the approach is often about subduing and desaturating colors to create a more subtle and emotional look.
- Temperature and Tint: To achieve a moody aesthetic, you might cool the image down a touch by dropping the Temperature, perhaps by -10. Additionally, sliding the Tint towards green, say to -5, can contribute to a more earthy or desaturated feel, especially in natural or outdoor scenes.
- Saturation: A significant drop in overall Saturation is a hallmark of the dark and moody style, often reduced to around -50. This mutes the colors, making them less vibrant and more subdued. Moody images come from more subdued, desaturated colors. Color is made up of hue, saturation, and luminance. By reducing the brightness of colors, you can create a more subtle and emotional look.
- Color Mixer and Specific Hues: In some workflows, particularly when preserving skin tones is important, the Color Mixer is used. For instance, you might set the orange saturation to +10 and luminance to +30 to 50, depending on how bright you want the skin tones to be. This ensures that while the overall image is desaturated, essential elements like skin remain natural-looking. Furthermore, you might set the saturation from green to magenta to -100, effectively removing or significantly reducing these specific color casts and keeping the focus on the subject or the intended mood.
Enhancing Texture and Atmosphere
Beyond basic light and color, other adjustments can further refine the moody aesthetic.
- Clarity and Dehaze: In the Effects tab, Clarity is often turned down slightly, which can soften the image and give it a more dreamy quality. Conversely, Dehaze might be turned up slightly to add a bit of atmospheric depth or grit, especially in landscapes.
- Split Toning: A very light Split Tone can be applied to add subtle color variations. For example, adding some green to the highlights and purples or blues to the shadows can introduce a sophisticated color harmony that enhances the mood. The saturation for split toning is usually kept low, no more than +10, to avoid an overly stylized or unnatural look.
- Vignette: A light vignette usually helps to sell this look by subtly darkening the edges of the image, drawing the viewer's attention towards the center and enhancing the dramatic feel.
Detail and Finishing Touches
The final stages of editing focus on sharpening and adding subtle textures.
- Sharpening: It's important to sharpen all images, whether in Lightroom or Photoshop. However, this should be done selectively. Apply sharpening carefully, not to your whole image. Instead, use these adjustments carefully to give your photo a dreamy look. By softening some parts of the image, you create a magical atmosphere. It’s like adding a soft filter to a light, making everything look gentle and dreamy.
- Grain: To finish your moody photo, try adding some film-like grain. Adding grain makes a modern photo look like an old-fashioned one, which adds charm and a tactile quality.
- Selective Brightness Adjustments: Changing the brightness of certain areas, often through local adjustments or the Tone Curve, creates shadows and highlights, making the mood even stronger.
How to Edit DARK TONES Separation Effect in Lightroom!
Customizing Presets for Your Vision
While presets are a fantastic starting point, they are rarely a one-click solution for every image. Customizing presets for specific subjects or genres is key to achieving consistent and professional results.
Adapting to Different Subjects and Genres
Our Dark & Moody Lightroom Presets intelligently increase contrast, richen warmer shades, and mute colors while preserving skin tone. Plus they can be applied to a whole series of images, creating a cohesive style for your entire collection. A bright afternoon may be what you shot, but it may not be the look you’re going for. Download my free moody Lightroom presets that will give your photos dark & moody looks in just one click. You can add dramatic effects, saturated dark moods, muted tones and our presets carefully increase brightness, add warm tones and give a moody feel to images while protecting skin tones. Get Free Lightroom Presets including Dark & Moody, Airy Landscape & many more. These presets will bring the exposure down and you’ll have dark tones in your image as you see in the before/after imagery below. Sometimes the presets will give you a high contrast moody look. But don’t worry you can easily create a soft moody look by reducing the contrast. You can also increase the shadows levels for soft effect using the Curve Tool.
Customization is essential because:
- Lighting Varies: The same preset can look drastically different on a dimly lit indoor shot versus a brightly lit outdoor scene.
- Color Palettes Differ: An image with dominant greens will react differently to a preset than one with dominant blues or reds.
- Subject Matter Impacts Tone: A portrait might require different adjustments to skin tones than a landscape.
To customize presets for consistent results, start by applying the preset and then making targeted adjustments. If the image is too dark, slightly increase the exposure. If colors are too muted, selectively boost saturation in specific color channels. If skin tones look unnatural, use the Color Mixer to refine them.
Warm Tone Presets vs. Dark & Moody
It's important to distinguish between different types of presets. What are warm tone presets in Lightroom? Warm tone presets aim to enhance the warmer hues in an image, such as reds, oranges, and yellows, often giving the photo a cozy, inviting, or nostalgic feel. How do you create warm tones in Lightroom? This is typically achieved by increasing the Temperature slider, adding yellow to the Tint, and potentially boosting saturation in the warm color channels.
What's the difference between Moody and Dark & Moody presets? While "moody" can encompass a range of atmospheric styles, "Dark & Moody" specifically implies a darker overall tone, higher contrast, and often desaturated colors, as discussed. A "moody" preset might simply enhance drama without necessarily darkening the image significantly.
Can warm tone presets work for all types of photography? While warm tones can be applied universally, they are often most effective in specific genres like autumn landscapes, portraits with warm lighting, or lifestyle photography where a cozy atmosphere is desired. They might not be the ideal choice for a crisp, cool-toned cityscape or a high-key product shot.
Maintaining Image Quality
A common concern when using dark presets is maintaining image quality. How do you maintain image quality when using dark presets? The key lies in the editing process itself.
- Shoot with Good Exposure: As mentioned earlier, starting with a well-exposed image is paramount. Overly dark or underexposed RAW files will have less latitude for manipulation without introducing noise or losing detail.
- Use RAW Files: Always shoot in RAW format. RAW files contain much more data than JPEGs, allowing for greater flexibility in adjusting exposure, recovering highlights, and lifting shadows without significant degradation.
- Smart Adjustments: Avoid pushing sliders to their extreme limits. Subtle, incremental adjustments are more likely to preserve image quality. For example, instead of drastically increasing contrast, use a combination of contrast, tone curve, and black/white point adjustments.
- Selective Sharpening: Over-sharpening can introduce artifacts and make noise more apparent. Use sharpening judiciously and often in conjunction with noise reduction.
- Noise Reduction: If you find that lifting shadows introduces noise, use Lightroom's noise reduction tools carefully. Apply it only where necessary and be mindful of how it affects fine details.
Aesthetic Presets in Professional Work
Are aesthetic presets suitable for professional work? Yes, aesthetic presets, including Dark & Moody ones, can be highly suitable for professional work, provided they are used thoughtfully. How do aesthetic presets differ from regular presets? Aesthetic presets are designed to impart a specific artistic style or mood, often trending towards a particular look. Regular presets might focus on basic corrections like exposure or white balance.
For professional photographers, presets serve as a powerful tool for efficiency and consistency. They can:
- Speed up Workflow: Apply a base edit quickly and then fine-tune.
- Ensure Consistency: Maintain a uniform look across an entire wedding gallery, a series of client portraits, or a product catalog.
- Develop a Signature Style: Use customized presets to cultivate a recognizable artistic voice.
However, it's crucial that the chosen aesthetic aligns with the client's expectations and the nature of the work. A wedding photographer might use a brighter, more classic preset, while a fashion photographer might opt for a more dramatic, stylized look. The ability to customize and refine presets ensures that they serve the photographer's artistic vision and client needs, rather than dictating them.
Making moody photos is like painting with emotions. From capturing the perfect moment to adding the final touches in Lightroom, each step contributes to the enchanting story your photo will tell. By following the simple techniques in this moody Lightroom editing tutorial, you’ll discover the power of artistry and storytelling through photography. So, let your imagination run wild, and have fun making photos that resonate with the souls of your audience.