Adobe Lightroom Classic is an indispensable tool for photographers seeking to refine their craft, offering a robust suite of features organized into distinct modules. This tutorial delves into the intricacies of utilizing Lightroom Classic on Mac OS X, providing insights into its organizational structure, editing capabilities, and performance optimization strategies. Understanding these elements is crucial for any photographer, from beginner to professional, aiming to streamline their workflow and enhance their digital asset management.
Navigating the Lightroom Classic Workspace
Lightroom Classic's interface is structured into several key areas, each serving a specific purpose in the photographic workflow. The workspace is organized into modules, with the Library module serving as the central hub for managing and organizing your photo collection. Within the Library module, you'll encounter the Library Filter bar, which allows for quick filtering of images based on various criteria. The main display area is where your selected photos are shown, whether as a grid of thumbnails or a single larger image. The Identity plate, typically found at the top, identifies the current Lightroom Classic version and catalog.
The core of your interaction with source photos occurs in dedicated sections designed for working with source photos. A crucial element for navigating and selecting images across different modules is the Filmstrip, a horizontal strip usually located at the bottom of the workspace. The Filmstrip displays thumbnails of the contents of the folder, collection, keyword set, or metadata criteria that is currently selected in the Library module. Each module utilizes the contents of the Filmstrip as the source for the tasks performed within it. To change the selection in the Filmstrip, you must return to the Library module and select different photos.
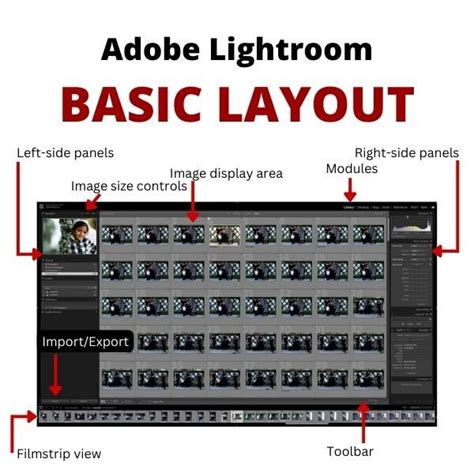
Before diving into editing, it's essential to select the images you intend to work with. This is primarily done within the Library module. Lightroom Classic offers flexible panel management. You can click on a panel header to reveal or conceal its contents. The concept of "Solo mode" can be applied independently to a set of panels, meaning only one panel within a group will be open at a time. To group panels, you can click the Show/Hide Panel Group icon, indicated by a solid icon when the panel group is showing. To toggle the visibility of side panels, navigate to Panels > Toggle Side Panels or use the keyboard shortcut Tab. For a more comprehensive screen real estate, you can toggle all panels on and off using Shift-Tab.
Lightroom Classic offers several viewing modes to suit different workflows and screen sizes. You can cycle through these modes by pressing the F key. These modes include the standard view, Full Screen mode, and Full Screen And Hide Panels mode. On Mac OS, both Full Screen modes have the added benefit of hiding the Dock, maximizing your viewing area.
Optimizing Your Lightroom Classic Workflow
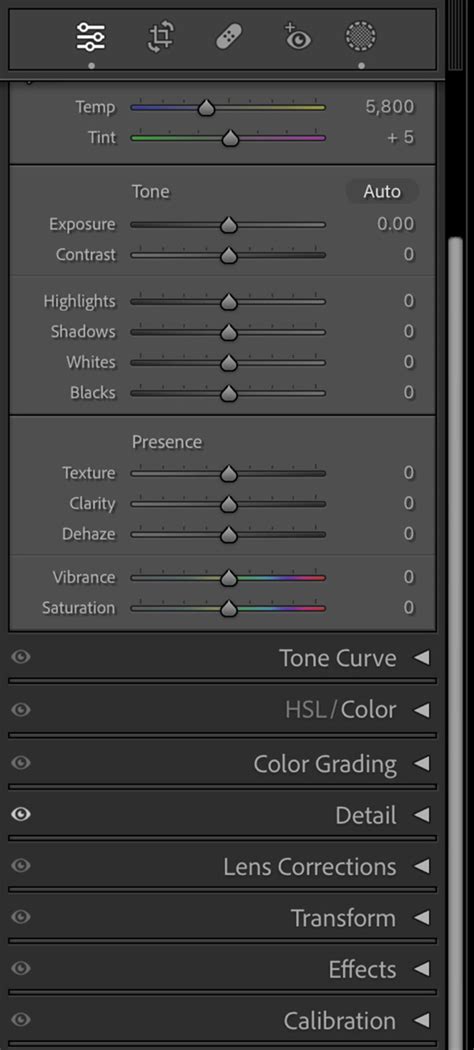
Efficiently working within Lightroom Classic involves understanding how to manage its various panels and settings. The Develop panel, for instance, can be rearranged or customized to reflect your personal work preferences. This allows for a more intuitive and faster editing process.
The application provides tools for quick image assessment and culling. These include applying ratings, flags, or labels to your photos, allowing you to quickly identify your best shots or those requiring further attention.
Enhancing Lightroom Classic Performance
Improving Adobe Lightroom Classic performance is a common goal for photographers, especially when dealing with large image libraries. Several factors can impact speed, and understanding them is key to a smoother experience.
One significant factor is Syncing images. This process uses CPU and system resources to create previews and upload/download images from Creative Cloud. If you are actively importing and editing images on your desktop, it can be beneficial to Temporarily pause Sync With Lightroom until these intensive tasks are completed.
The creation and management of image previews play a vital role in Lightroom Classic's performance. There are three main types of previews:
- Minimal: These are the smallest, lowest-resolution JPEG previews embedded within the photos, generated by the camera itself. They are the quickest to create and are useful for initial sorting.
- Standard: Lightroom Classic generates these previews using the Camera Raw engine. They offer a better representation of the image than minimal previews and can sometimes appear different, especially if adjustments have been made in the Develop module. You can specify the size of Standard previews based on your display resolution.
- 1:1: These previews offer a 100% view of the actual pixels. Similar to Standard previews, they are processed by the Camera Raw engine. When Lightroom Classic generates 1:1 previews, it also creates minimal and standard previews, making all three types available. However, due to the significant amount of data processed, 1:1 previews can take a considerable amount of time to create.
To display and work with photos effectively, Lightroom Classic requires either a Standard or 1:1 preview, depending on the task. If you only instruct Lightroom Classic to generate Minimal or Embedded previews upon import, the program will automatically create Standard and 1:1 previews as you work, which can hinder performance. To increase productivity and reduce this disruption, it's advisable to manage when and how you render your 1:1 previews.
To render 1:1 previews during import, use the File Handling panel within the import window and choose Render Previews > 1:1. Alternatively, for a speedier import process, you can opt to render minimal or standard previews on import. Later, you can select multiple photos in the Grid view of the Library module and choose Library > Previews > Render 1:1 Previews.
Rendering standard previews also takes time, but it doesn't tax the system as heavily as 1:1 previews. For Standard Preview Size, select an amount closest to the longest edge of your screen resolution, but not shorter than it. Larger monitors with higher resolutions require Lightroom to perform more calculations to generate previews and update pixels when adjustments are made.
Because 1:1 previews can consume significant disk space, Lightroom Classic offers the option to discard them regularly - daily, weekly, or monthly. As long as disk space is not a constraint, keeping 1:1 previews for as long as possible optimizes performance. However, be aware that the file containing these previews, the [Catalog name] Previews.lrdata file, can grow very large if the option to delete previews is set to "Never" or "30 days." This file resides in the same folder as your catalog file. If you encounter low hard disk space issues, checking the size of this file is a good first step.
By default, the [Catalog name] Previews.lrdata file is stored alongside the catalog file ([Catalog name].lrcat). If you move the catalog file or store it separately from its cache, Lightroom Classic will need to regenerate the previews, impacting performance.

Managing Edits and Metadata
Changes made to files within Lightroom Classic-such as adding keywords or fixing red-eye-are typically stored within the Lightroom Classic catalog. However, for other applications like Adobe Bridge and Camera Raw to recognize these edits, they are saved as XMP (Extensible Metadata Platform) data. In Lightroom, edits can be saved to XMP either automatically or manually.
If you frequently switch between Lightroom Classic, Adobe Bridge, and Camera Raw, enabling automatic saving of changes to XMP is the most convenient approach, as it eliminates the need for manual intervention. However, this can significantly degrade Lightroom Classic's performance. If you don't regularly work with multiple applications, consider turning off the autowrite preference. Even with autowrite XMP disabled, you can still manually save metadata changes to individual files at any time. Notably, Lightroom Classic now temporarily pauses automatic XMP writing during imports, resuming only after the import process is complete.
Lightroom Classic continuously writes changes to the catalog file (.lrcat). When performance begins to slow down, optimizing the Lightroom Classic catalog by selecting File > Optimize Catalog can be highly beneficial. To further enhance performance and catalog stability, when exiting Lightroom Classic and backing up your catalog, consider choosing the options Test Integrity Before Backing Up and Optimize The Catalog After Backing Up.
Understanding and Utilizing Previews
Every time you view or edit raw images in the Develop module, Lightroom Classic generates up-to-date, high-quality previews. It uses the original image data as its foundation and then updates the preview to reflect any processing or adjustments applied. This process is accelerated if the original image data is stored in the Camera Raw cache. By default, Lightroom Classic allocates 5 GB to the Camera Raw cache. To further improve speed, ensure this cache is located on a fast hard disk.
Soft Proofing in Lightroom Classic
It's important to note that tools like the Spot Removal Tool and Local Adjustments Brush are not optimized for handling hundreds or thousands of corrections on a single image. If you find yourself making numerous corrections, it's advisable to check your History panel. The History panel has no limits and is not deleted unless explicitly instructed. This applies particularly to local corrections; each slider adjustment made with local corrections or the gradient filter affects the entire correction area. Some sliders default to a value that activates them automatically.
Your thumbnails, small previews, and 1:1 (full-size) previews are all stored within the Previews.lrdata file. Lightroom Classic's preferences include an option to determine when the largest previews, the 1:1 previews, are deleted. Deleting these 1:1 previews reduces the size of the Previews.lrdata file. The default setting for automatically discarding 1:1 previews is one week. While deleting these large previews shrinks the preview file, the entire file is not removed unless you manually delete it. The file only becomes excessively large if you rarely or never delete the 1:1 previews. Whether this impacts your hard disk depends on your available disk space.
It is crucial not to confuse the Previews.lrdata file discussed here with the [Catalogname] Smart Previews.lrdata file, which specifically contains all your Smart Previews. If the option to "Automatically Discard 1:1 Previews" is set to "Never" or "After 30 Days," your preview file can grow to a substantial size, potentially consuming many gigabytes of space. If your hard disk suddenly becomes full, checking the size of this file is a recommended troubleshooting step. You also have the option to change the location of this cache by clicking "Choose."
The addition of numerous presets to Lightroom Classic, whether self-created or from third-party sources, can sometimes lead to performance degradation. This is because the Develop module generates thumbnails in the Navigator panel for each preset, a process that becomes more noticeable with 2,000 or more presets.
Choosing the Right RAW Development Tool: A Long-Term Perspective
Selecting the appropriate tool for developing RAW files is a significant decision, as it's likely to be a cornerstone of your editing workflow for an extended period. The migration path to a different software can be complex if you later decide to switch. As a software developer, I understand the considerable cost, in terms of both time and effort, associated with migrations. My spare time is limited, and I've witnessed friends invest significant time migrating libraries between various tools, often driven by the allure of a new, cutting-edge feature. My approach has always been to avoid such disruptions, and I encourage fellow enthusiasts to do the same.
Having experimented with numerous photography tools over the years, my most important piece of advice is this: many of them offer remarkably similar features. Therefore, do not be afraid of choosing what appears to be the "wrong" one. If you opt for well-established and proven software, such as Adobe Lightroom or Apple Aperture (though now discontinued), you are unlikely to miss any critical functionality.
My personal commitment to Adobe Lightroom stems from my initial experience with it. It is an exceptional tool - powerful yet remarkably user-friendly, and available across multiple platforms. Lightroom functions as both an editing tool and a library manager. When comparing software and making your decision, consider more than just its RAW developing capabilities and editing tools. It's vital to assess often-overlooked aspects that can profoundly impact your workflow as a photographer in the years to come.
Here are key aspects to evaluate:
- Handling Large Quantities of Files: As you progress in photography, your library will inevitably grow. RAW files are typically large, and this trend is likely to continue with increasing sensor resolutions. Your chosen software must effectively manage vast collections.
- Library Organization: A large library is of little use if you cannot navigate it efficiently. The software's organizational features, such as keywords, collections, and smart collections, are paramount.
- Distributed Storage Systems: There's often no compelling reason for monolithic libraries; storing your entire collection on a single hard disk is not a sustainable long-term strategy. This is due to several factors: your PC might lack a redundant storage system. Even if it does, you might prefer to split your library across different storage systems according to your criteria, rather than backing up and restoring the entire library if something goes wrong. If you don't have a redundant storage system, regular backups are even more critical, performed at least every time you import new files. Unfortunately, many photographers neglect this, and when a hard disk fails, it's too late for regrets. Let's face it: your hard disk will eventually fail.
- Integration with Other Tools: Depending on your workflow, you may use multiple applications. Manually exporting a file from your library, editing it in another tool, and then re-importing it is inefficient and contradicts the core purpose of a library manager. Even if you don't need it now, assess how your preferred tools integrate with other software in your workflow.
- Ecosystem and Community Support: The benefits of a large user base extend beyond pricing. A wider audience often leads to better overall user experience, more tutorials, and a more robust community for support.
- Supported Systems: Regardless of a system's quality, I am unwilling to be locked into a single platform. In today's virtualized world, this is becoming less of an issue, but it remains critical in certain cases. For example, Apple Mac OS X can only run on Apple's hardware. If you commit to Mac-only software, you are also committing to using Apple hardware.
My decision to choose Lightroom was based on its superior performance when measured against this comprehensive evaluation matrix. It proved to be the best tool that aligns with my specific needs and long-term photographic aspirations.