DaVinci Resolve 18 offers a robust suite of tools for video editing, and mastering the art of background creation is fundamental to producing polished and professional content. Whether you're aiming for a clean, minimalist look with a white background, a vibrant splash of color, or dynamic gradients, Resolve provides intuitive methods to achieve these effects. This guide will walk you through the essential techniques for adding and customizing backgrounds, from simple solid colors to more complex gradient compositions, and how to integrate them seamlessly with your video elements.
The Foundation: Understanding DaVinci Resolve's Background Defaults
By default, when you import clips into DaVinci Resolve 18, the program presents a black background behind them. This is a neutral starting point, but often, a more deliberate background is required to convey specific moods, enhance readability, or establish branding. Understanding how Resolve handles backgrounds is the first step to manipulating them effectively. The program's structure, with its various specialized pages for different tasks, allows for a layered approach to editing, where backgrounds can be treated as distinct elements that interact with your primary footage.
Adding Solid Color Backgrounds: A Versatile Starting Point
Adding a solid-colored background in DaVinci Resolve 18 is a very easy process, offering a quick way to establish a base for your video. The most straightforward method involves utilizing the "Solid Color" generator, which is readily accessible within the software.
To begin, you'll need to locate the media on your computer or PC. Once you've identified your desired media, select it and click ‘Open‘ to import it into the Media Pool. Within the Media Pool, you'll find various templates and generators. For solid color backgrounds, you'll typically look for a "Solid Color" option, often found under the "Generators" category.
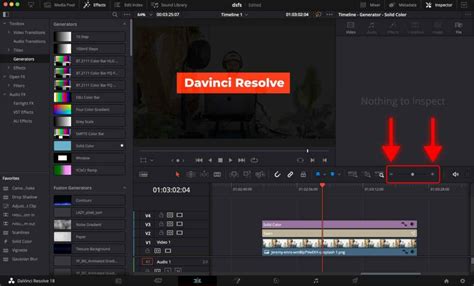
Once you've found the "Solid Color" generator, you can place it onto your timeline. The most effective way to use it as a background is to drag it onto a track positioned above your existing video clips. This layering ensures that the solid color appears behind your main footage. As soon as you position it as desired in the timeline, you can then proceed to change its color.
By default, the solid color will be black, which is why you observe a black background as soon as you add the solid color clip to the timeline. To alter this, select the "Solid Color" clip on your timeline. Then, navigate to the Inspector panel, typically located in the upper-right section of the interface. Within the Inspector, you will find color selection options.
A new window for the color selection will appear, offering a range of choices. The color you choose can be previewed in real-time on the Viewer, allowing you to see the effect instantly. It’s in your hands whether you choose a color from the Color Wheel, Color Palettes, Hex Colors, or by inputting specific RGB values. This granular control ensures you can precisely match any desired hue.
Once you have picked your preferred color, simply click ‘OK‘ to apply it. The solid color background will now reflect your selection. If you wish to adjust the zoom level of the clip itself (though less common for a solid color background unless you intend to scale it for a specific effect), you can click and drag on the X or Y values. Dragging downwards typically decreases the size, and dragging to the left can increase the size, depending on the specific parameter.
Creating a White Background and Overlaying Images
Building upon the solid color technique, you can specifically create a white background and then overlay transparent images, such as logos or graphics, on top of it. This is a common requirement for brand presentations, explainer videos, or any scenario where a clean, professional aesthetic is paramount.
To start, you will once again go to the location where the media is placed on your computer or PC. Choose your desired media and click ‘Open‘ to display it in the DaVinci Resolve 18 Media Pool.
Next, click and drag the "Solid Color" option to the timeline, just as you did before. This time, however, your primary goal is to select the color white. Within the color selection window, choose white (often represented by R:255, G:255, B:255 or a Hex code of #FFFFFF) and click ‘OK‘.
With your white solid color background established on the timeline, you can now drag your transparent image from the Media Pool onto a track positioned above the white background clip. In this example, let's assume the Instagram logo will be placed on top of the white background. Ensure the image file you are using has an alpha channel (transparency) for the desired effect; otherwise, it will appear with a solid background itself.
Once the image is on the timeline, you can manipulate its appearance using the transform settings in the Inspector. The zoom setting would change the size of the image. The position setting changes the location of the image based on the X and Y-axis values, allowing you to precisely place it on the canvas. The rotation setting changes the angle of the image clip based on the slider, enabling you to orient it as needed. Alongside these core transform settings, you can experiment with other options available in the Inspector, such as scaling, cropping, and opacity, to get the best output and integrate the image harmoniously with your background.
Animate Logos and Icons in DaVinci Resolve! - The Easiest Way!
Advanced Backgrounds: Crafting Gradient Effects with Fusion
For more dynamic and visually interesting backgrounds, DaVinci Resolve's Fusion page offers powerful tools, particularly for creating gradient effects. These gradients can add depth, transition, and a sophisticated visual flair to your videos.
To add gradients, you need to start by adding a Fusion Composition generator to your timeline. You can typically find this under the "Generators" section in the Effects Library. Drag the Fusion Composition onto your timeline, usually above your other clips.
Once the Fusion Composition is in place, double-click it to enter the Fusion page. On the Fusion page workstation, you'll want to add a "FastNoise" node. You can find this node in the Fusion page toolbar. Drag and drop the FastNoise node onto the workstation.
Next, select the FastNoise node. Go to the Inspector panel, which is usually located on the right side of the Fusion interface. Within the Inspector, navigate to the "Color" tab. By default, the FastNoise node might present two colors. To create a gradient, change the "Color Type" to "Gradient".
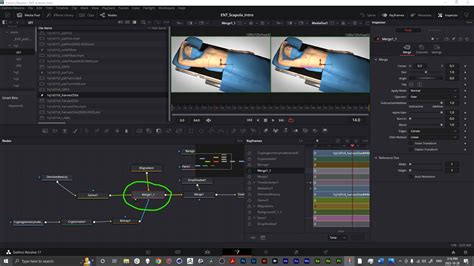
With the Color Type set to Gradient, you can now select your desired colors. Choose any preferred color by clicking on the color swatches. To add more colors to your gradient and create complex transitions, keep clicking on the Gradient slider. Each click will add a new control point, allowing you to define additional colors and their positions within the gradient. You can adjust the blend and distribution of these colors to achieve a wide range of visual styles.
To further enhance your composition, you can add a "Merge Node". Press ‘Shift + Space‘ to open the Select Tool dialog, type "Merge", and select the Merge Node. Connect the output of the FastNoise node to the foreground input of the Merge Node. The Merge Node allows you to composite elements together, and in this context, it's essential for combining your gradient with other visual elements or preparing it for output.
While the Fusion page is the primary hub for creating these advanced effects, you can still access and modify certain gradient properties from the Edit page. After creating your Fusion Composition with the gradient, click on the title clip on the Edit page. Then, go to the Inspector. Under the gradient option (which might be exposed through the Fusion Composition's controls), you can often pick preferred color combinations and gradients to apply.
If you want to change the gradient color after its initial creation, click on the little triangle on the color swatches within the Fusion page's Inspector. This will allow you to fine-tune or completely alter the colors used in your gradient.
To create animated gradients, you can repeat the above steps by changing the frame using the playhead on the timeline as many times as you require, or by keyframing the parameters of the FastNoise node or the gradient itself within the Fusion page. This allows for evolving backgrounds that can add significant dynamism to your video project.
Integrating Backgrounds with Text and Graphics
The process of adding backgrounds, whether solid colors or gradients, is often the first step in a larger workflow that involves overlaying text, graphics, or other video elements. The layered nature of the timeline in DaVinci Resolve is crucial here. By placing your background on a lower track and your foreground elements (text, logos, video clips) on higher tracks, you ensure that the backgrounds are visible but do not obscure your primary content.
When working with text, DaVinci Resolve's Text+ or basic Text generators provide ample customization options. You can choose fonts, sizes, colors, and apply animations. The key is to ensure sufficient contrast between your text and the background for optimal readability. A white background, for instance, pairs well with dark text, while a dark or colored background might benefit from lighter or more vibrant text.
Similarly, when overlaying images or logos, the transparency of the image file is critical. For a professional look, images with transparent backgrounds (like PNG files) are essential, allowing the background to show through the non-image areas. The transform controls in the Inspector are your primary tools for scaling, positioning, and rotating these overlaid elements to achieve the desired composition.
Beyond Static: Animated Backgrounds
While this guide has focused on static and gradient backgrounds, DaVinci Resolve's Fusion page also opens the door to creating complex animated backgrounds. This could involve particle systems, procedural animations generated by nodes, or even imported animated assets. The principles remain the same: create the background element, place it on a lower track, and then layer your primary content above it. Experimentation with the vast array of nodes and effects within Fusion can lead to truly unique and captivating animated backdrops for your videos.
The ability to add and manipulate backgrounds effectively in DaVinci Resolve 18 is a fundamental skill that can dramatically elevate the visual quality of your video projects. From the simplicity of a solid color to the complexity of custom-generated gradients, Resolve provides the tools to bring your creative vision to life. By understanding the layering system and utilizing the specific generators and the powerful Fusion page, you can create visually appealing and contextually appropriate backgrounds that enhance your storytelling.
tags: #white #background #davinci #resolve