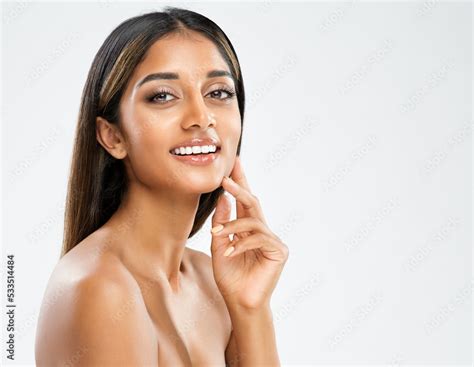
The allure of magazine-ready skin, seemingly perfect and blemish-free, has long captivated audiences. While diligent skincare plays a role, a significant part of this idealized appearance is often achieved through digital manipulation, specifically airbrushing in Photoshop. This tutorial aims to demystify the process, guiding you through techniques to achieve a natural, glowing skin tone similar to that seen in professional publications, without resorting to artificial-looking results. The key is to strike a balance, enhancing the skin's smoothness while preserving its natural texture and detail. Overdoing airbrushing can quickly lead to an unnatural, plastic-like finish, which is precisely what we aim to avoid.
Preparing Your Image: Duplicating Layers for Non-Destructive Editing
Before diving into the editing process, it's crucial to set up your Photoshop workspace correctly. The power of Photoshop lies in its ability to allow for extensive editing without permanently altering the original image. This is achieved through the use of layers. Layers act as transparent sheets stacked on top of each other, enabling you to modify specific elements of your image independently. If you're not satisfied with an edit on one layer, you can simply remove or adjust that layer without affecting the underlying image. Photoshop is a fantastic tool to make any customizations necessary to a photo or an image.
To begin, open your chosen photograph in Photoshop by navigating to File > Open and selecting your image. The next essential step is to create duplicate layers of your background image. This is vital for the techniques we will employ, as they rely on comparing and blending different versions of the same image.
To create a new layer, locate your Layers panel, typically found in the bottom right corner of your screen. Within this panel, right-click on the layer containing your image and select "Duplicate Layer." Alternatively, you can use the keyboard shortcut CTRL+J (or Cmd+J on a Mac) to duplicate the selected layer. You will need two duplicate layers, so repeat this process one more time, resulting in a total of three layers: your original background layer and two duplicates.
Once you have your duplicate layers, it's good practice to rename them for clarity. Double-click on the layer name (e.g., "Layer 2 copy") to edit it. We will rename one layer "Low" and the other "High." This naming convention will help us keep track of their respective roles in the airbrushing process.
The "Low" Layer: Achieving Initial Smoothness with Surface Blur
The "Low" layer will be used to create a foundational smoothness for the skin. This is where we will begin to soften imperfections. Ensure that the "Low" layer is highlighted in your Layers panel.
Now, we will apply a specialized blur filter. Go to the top menu bar and select Filter > Blur Menu. From the dropdown, choose "Surface Blur." The Surface Blur filter is particularly useful for skin retouching because it blurs pixels while intelligently preserving edge detail. This means it can smooth out skin tones without making the entire face appear indistinct or blurring important features like eyes, lips, or the jawline into the background.
The Surface Blur dialog box presents two key sliders: "Radius" and "Threshold." The "Radius" slider controls the extent and intensity of the blur. A larger radius will create a more pronounced blur. The "Threshold" slider determines the range of pixel values that the filter will consider for blurring. In essence, it helps to define the areas where the blur will be applied. Filters give us a lot of options to customize photos.
Your goal with the "Low" layer is to adjust the "Radius" and "Threshold" sliders until the image appears noticeably blurry, but crucially, you can still discern the underlying features of the face. Experiment by moving the sliders back and forth. Once you achieve a satisfactory level of blur, you will then lower the "Threshold" slider. Lowering the threshold will bring back some of the definition and detail that was lost in the initial blurring process. Don't be concerned if some bumps or pores are still visible at this stage; the "High" layer will address these remaining details.
The "High" Layer: Restoring Detail and Texture with Blending Modes
With the "Low" layer set up, we now turn our attention to the "High" layer. Make sure this layer is highlighted and visible (its eye icon in the Layers panel should be active).
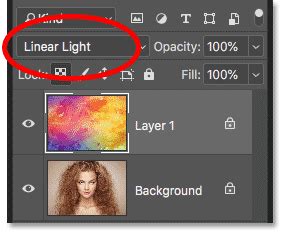
For this layer, we will utilize a powerful blending mode called "Linear Light." In your Layers panel, find the dropdown menu that currently says "Normal" (this is the default blending mode). Click on it and select "Linear Light" from the options. This blending mode will interact with the layer below it in a specific way, which is key to restoring detail.
Next, we need to create a layer mask for the "High" layer. Look at the bottom of your Layers panel and click the icon that resembles a grey rectangle with a white circle inside it. This action will add a white layer mask to your "High" layer. Layer masks allow you to selectively reveal or hide parts of a layer.
Now, we will apply the image to this layer mask. Go to Image > Apply Image in the top menu bar. In the "Apply Image" dialog box, ensure that the "Layer" dropdown is set to "Layer 0" (your original background layer) and that the "Channel" is set to "RGB." Click "OK." You should now observe that the thumbnail next to your "High" layer in the Layers panel has turned into a black and white version of your image. This black and white representation is crucial for the next step.
Fine-Tuning with High Pass and Adjustments
With the "Apply Image" step complete, we will now refine the details. Click on the colored thumbnail of the "High" layer (not the black and white mask thumbnail) to make sure you are working with the actual layer content.
To further enhance the skin details, we will use the "High Pass" filter. Navigate to Filter > Other > High Pass. A dialog box will appear, allowing you to adjust the "Radius" slider. The goal here is to subtly bring out the skin's texture and imperfections that the "Low" layer blurred away. Adjust the "Radius" in small increments. You want to see the skin's natural contours and subtle details begin to emerge, making the image look more natural rather than overly smooth. Finding the right balance is key, as too high a radius can reintroduce too much harshness.
After applying the High Pass filter, you might notice that the entire image has become a bit blurry or that the skin tone appears somewhat off. This is where we will make some adjustments to the "High" layer's mask to isolate the effect to the skin and refine the overall tone.
Go back to your Layers panel and click on the black and white thumbnail of the "High" layer. This selects the layer mask. Now, navigate to Image > Adjustments > Brightness/Contrast. You can make subtle adjustments here to fine-tune the mask's effect. This step is about controlling how the detail from the "High" layer is blended with the blurred layer below.
Isolating the Skin and Refining the Effect
At this point, while the skin might be smoother, the effects of the blur and detail restoration might be visible across the entire image, including the background. To ensure that our airbrushing is confined to the skin, we need to group our layers and then use a layer mask to paint the effect precisely where it's needed.
First, select both the "Low" and "High" layers by holding down the CTRL key (or Cmd on a Mac) and clicking on each layer in the Layers panel. Once both are selected, press CTRL+G (or Cmd+G) to group them. This will create a new folder icon labeled "Group 1" (or similar) in your Layers panel, containing your "Low" and "High" layers.
Now, we need to create a mask for this entire group that will hide everything initially. With the group highlighted, go to Layer > Layer Mask > Hide All. You will see a black thumbnail appear next to the group folder. This black mask means that the contents of the group are completely hidden.
HOW to SMOOTH SKIN using FREQUENCY SEPARATION in Photoshop | Skin Retouching Tutorial
Next, create a new layer above the "Low" layer but still within the group. Click the "Create a new layer" icon at the bottom of your Layers panel (it looks like a dog-eared page). This new layer will serve as a visual aid for painting our mask. With this new layer highlighted, go to Edit > Fill. In the Fill dialog box, select "Color" from the dropdown menu and choose a bright red color. Click "OK." This red layer will allow us to easily see where we are painting on our mask.
Now, it's time to paint! Click on the black thumbnail associated with the "Group 1" layer (the group mask). Activate your Brush tool by pressing the B key on your keyboard. Begin painting over the areas of the skin you want to airbrush. As you paint, the red color will appear, indicating the areas where the effects of the "Low" and "High" layers are being revealed. It will look red for now, but this is just to guide your painting.
Once you have painted over all the desired skin areas, you can delete the red fill layer. With the red layer highlighted, simply press the Delete key or drag it to the trash icon in the Layers panel. You should now see the smoothed and refined skin within the areas you painted.
Advanced Techniques: Noise, Color Correction, and Channel Information
Another approach to achieving a natural airbrushed look involves a slightly different layering and blending strategy, particularly focusing on preserving texture and preventing a "plastic" look.
Open your photo in Photoshop and duplicate the background layer (Ctrl+J). Place this duplicated layer into a group by pressing Ctrl+G. Name this group "Airbrush" and the layer inside it "Blur."
Ensure the "Blur" layer is selected. Apply the "Surface Blur" filter (Filter > Blur > Surface Blur) as described previously. This filter is excellent for smoothing skin while retaining essential edge details, unlike a standard Gaussian Blur. Your image should look similar to the previous method, with details like the eyes still intact. If features become too blurred, your "Surface Blur" settings are likely too strong.
Create a new layer and position it directly above the "Blur" layer within the "Airbrush" group. Name this new layer "Texture." Change the blending mode of the "Texture" layer to "Hard Light." This layer will be used to reintroduce subtle texture and prevent the skin from appearing overly smooth or "plastic."
With the "Texture" layer selected, press Shift+F5 or go to Edit > Fill. In the Fill tool, set the contents to "50% Gray" and choose "Color" as the blending mode. Click "OK." This fills the layer with a neutral gray.
Now, go to Filter > Noise > Add Noise. Enter settings that add a subtle amount of noise to the image. This noise will help break up any flat areas and prevent the skin from looking artificial. The exact amount will depend on the image resolution and your preference.
Next, apply a "Gaussian Blur" to the "Texture" layer (Filter > Blur > Gaussian Blur). This blur will soften the noise and gray, making it blend more subtly.
To correct the color and tone of the "Texture" layer, we'll use the Eyedropper tool and the Hue/Saturation adjustment. Select the Eyedropper tool and sample an area of the skin that represents an average skin tone. Then, go to Image > Adjustments > Hue/Saturation (or Ctrl+U). Check the "Colorize" option. Adjust the Hue, Saturation, and Lightness sliders to match the sampled skin color. You might need to experiment here, as the exact values will vary per image. The goal is to create a subtle tint that complements the underlying skin.

Select the "Airbrush" group in the Layers palette and add a layer mask by going to Layer > Layer Mask > Hide All. This creates a black mask for the group, hiding all its contents.
Now, set your foreground and background colors to default black and white by pressing D on your keyboard. Zoom in to 100% and use a soft brush to paint over the skin areas on the group's layer mask. As you paint with white, the effects of the "Blur" and "Texture" layers will become visible, smoothing the skin and adding subtle texture.
To refine the color and tone of the skin further, select the "Texture" layer and go back to Image > Adjustments > Hue/Saturation (Ctrl+U). Adjust the Hue, Saturation, and Lightness sliders. Often, the Hue might be close to correct, but the Saturation may need to be reduced significantly to avoid an overly vibrant or artificial look. Lightness adjustments should be subtle, as they have a pronounced effect.
Finally, to restore skin details that might have been lost, we can use the "Apply Image" feature. Go to Image > Apply Image. For the "Source," select your "High" layer (if you followed the first method) or the "Blur" layer (if following the second method). For the "Channel," choose the "Red" channel. The Red channel often contains the least amount of distracting detail like shadows or highlights, making it a good candidate for restoring texture. Click "OK." This step merges specific channel information back into the layer, helping to reintroduce fine details.
The result should be a naturally smoothed skin tone with preserved texture, avoiding the common pitfall of an overly plastic appearance. The presence of the "Texture" layer and careful application of noise and color adjustments are crucial for achieving this natural look. Even at 100% zoom, subtle skin bumps should remain visible, contributing to the overall realism.
Additional Resources and Tools
For those looking to expedite their workflow or explore more advanced techniques, several resources are available. Photoshop actions are pre-recorded sequences of commands that can automate complex tasks. Skin retouching actions can be found that, once played, apply a series of adjustments and allow you to paint over the skin to achieve a polished look. These actions can also be used for tasks like mattifying skin, restoring blown-out highlights, and more.
A more specialized technique, often referred to as "Frequency Separation," is also highly effective for skin retouching. This method separates the image into two layers: one for color and tone (low frequency) and another for texture and detail (high frequency). This allows for independent editing of each aspect, providing immense control.
There are readily available Photoshop actions that implement similar Frequency Separation techniques. Some advanced actions even leverage Photoshop's face detection technology for automated retouching. The "Pro" versions of these actions often support higher bit-depth images (16 and 32-bit) and offer both modern and traditional Frequency Separation methods.
Modern Frequency Separation, as hinted at in this tutorial's use of the Surface Blur filter, tends to yield more natural results. Traditional Frequency Separation, which often employs the Gaussian Blur filter instead of Surface Blur, can produce a softer, more diffused look. Understanding these distinctions can help you choose the approach that best suits your desired outcome.