Adobe Photoshop is a powerful and versatile software application that has become an industry standard for image editing, graphic design, and digital art. Whether you're a complete novice who has never opened the program before, or you've dabbled and found yourself struggling, this comprehensive tutorial is designed to guide you through the essential tools and techniques. This course is for you if you're looking for a Photoshop for newbies course. We will embark on a journey to demystify Photoshop, transforming your ability to create beautiful images. Sharing is who I am, and teaching is where I am at my best. I'm a digital designer and a certified Adobe instructor, and I'll explain all the topics we'll cover and what you need to get started.
Setting Up Your Photoshop Workspace for Success
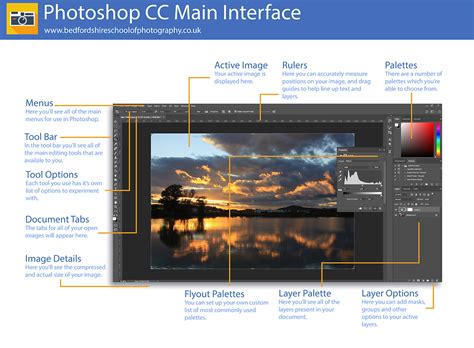
Before diving into the creative process, it's crucial to establish an efficient workspace. A well-organized workspace can significantly enhance your productivity and make navigating the software more intuitive. This initial step ensures you can complete all the Photoshop tutorials for beginners in the rest of the course with ease. We will explore how to customize panels, arrange tools, and set up preferences that align with your workflow. Understanding the fundamental layout of Photoshop is the bedrock upon which all advanced techniques are built.
Navigating and Organizing Your Images
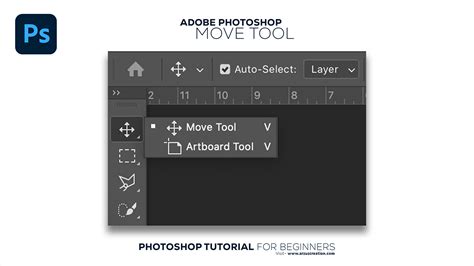
Once your workspace is optimized, the next logical step in this Photoshop for starters tutorial is to master navigation. This involves understanding how to open, view, and manage multiple images simultaneously. We'll cover essential commands like File > Open and introduce the Move Tool. The Move Tool is fundamental for repositioning elements; by clicking on an image and dragging it, you can transfer it onto the tab of another image. This technique is invaluable for combining various visual assets, and you'll learn to align them as necessary, creating cohesive compositions.
Enhancing Images with Photo Adjustments
These are some quick and easy techniques to help you make your images look better. While automatic adjustments are a good starting point, truly unlocking Photoshop's potential requires a deeper understanding of manual controls. We will delve into the crucial concept of image "levels," which refers to the distribution of tonal values from shadows to highlights. The first step in correcting any photograph is getting the highlights, midtones, and shadows correct. Mastering this ensures your images have proper contrast and depth.
Mastering Color Correction and Color Casts
The second step for achieving beautiful images is to ensure your colors are the best they can be! Continuing our work with Photoshop levels, let's look at how to change the color levels in Photoshop. Sometimes you need to adjust the colors in more detail. So now let's explore how to fix the color cast of an image. A color cast is an unwanted tint that can make an image look unnatural. You will also learn how to change a specific color in an image, offering precise control over the aesthetic of your photographs and designs. This capability is essential for everything from correcting white balance to achieving specific artistic effects.
Fix EXTREME Color Cast with a Quick Photoshop Trick!
The Art of Typography in Photoshop
Text is a powerful design element, and Photoshop offers extensive capabilities for its manipulation. This Photoshop for newbies learning chapter is all about working with text. The design so far looks OK, but you can do so much more with text in Photoshop. We will move beyond basic text entry to explore more advanced typographic techniques. So now let's look at how to create curved text in Photoshop. Typing on a path is as simple as selecting the regular Type Tool and hovering your cursor over a shape or path until you see it change to the Type on a Path icon. To do this, we'll look at how to type on a path in Photoshop. This opens up a world of creative possibilities for headlines, logos, and decorative text elements.
Layer Styles: Adding Depth and Dimension
Layer styles are a cornerstone of non-destructive editing in Photoshop, allowing you to apply a wide range of effects to your layers without altering the original pixel data. Let's go to the next Photoshop for starters tutorial: Layer styles allow you to add all sorts of effects to your designs. So in this part of the course, you'll learn how to add a drop shadow in Photoshop. A drop shadow can give text or objects a sense of depth, making them appear to lift off the background. Want to dive into more detail on Bevel & Emboss layer styles? These styles can create the illusion of 3D surfaces, adding a polished and professional finish to your work. We will explore various layer styles, understanding their parameters and how to combine them for unique visual outcomes.
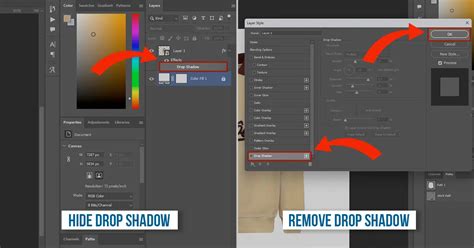
Image Resizing, Cropping, and Resolution: Preserving Quality
Speaking of must-have PSD tutorials for beginners, now you'll learn how to crop an image in Photoshop. Cropping is essential for refining composition and removing unwanted areas. Of course, creating a beautiful image is no good if you don't have the right resolution and image quality. This is where understanding resolution becomes paramount. We will cover how to crop an image effectively and, critically, how to resize an image in Photoshop without losing quality. You'll discover how resolution works and how it affects image quality and file size. This knowledge is vital for ensuring your images are suitable for both web and print applications.
Mastering Selections and Masks: Isolating Elements
Selections are the foundation of nearly every editing task in Photoshop, allowing you to isolate specific parts of an image for modification. Looking for Photoshop tutorials for beginners to impress? What if you want to put the universe inside a coffee cup? This is a great way to pick up specific parts of an image. We will introduce you to fundamental selection tools, including the Rectangular Marquee Tool and the Elliptical Marquee Tool, which are excellent for selecting basic shapes.
Advanced Selection Techniques with Select and Mask
You'll get some practice using both the Rectangular Marquee Tool and the Elliptical Marquee Tool in this part of the Photoshop for beginners course. Beyond basic selections, Photoshop offers sophisticated tools for complex tasks. Clipping Masks are a quick, simple way to put images inside shapes and even text. Watch the video to see how to take the image on the left and put it inside the letter shown on the right. It's a powerful technique, and it's easier than you'd think! To learn Adobe Photoshop, you often need to take an image off its background so that you can put it somewhere else. For example, what if you wanted to extract this flower from its black background so that you can add it to the design shown below? The flower we worked on before was quite easy to select because of its sharp edges and plain black background. But what if you need to make more complex selections, such as selecting a person with out-of-focus strands of hair? Then you'll need Photoshop's Select and Mask feature. Let's see how to tidy up selections made with the Quick Selection Tool, starting with simple masks and then working through to harder ones. This feature is indispensable for tasks like background removal and intricate composite work.
Fix EXTREME Color Cast with a Quick Photoshop Trick!
The Power of Smart Objects for Non-Destructive Editing
Another key technique in the area of non-destructive editing is a Smart Object. Smart Objects allow you to scale, rotate, and transform rasterized content non-destructively. This means you can apply transformations and edits to a Smart Object, and then revert those changes or re-edit them later without losing image quality. This is particularly useful when working with logos, vector graphics, or any element that might need resizing or repositioning multiple times throughout the design process. Understanding Smart Objects is crucial for maintaining flexibility and quality in your projects.
Creative Transformations with the Warp Tool
Photoshop's Warp Tool offers a unique way to creatively distort and manipulate images. What if you wanted to put this logo onto this coffee cup? The solution is the Warp Tool in Photoshop. This tool allows you to bend, twist, and reshape elements to fit them realistically onto curved or irregular surfaces. It's an excellent tool for creating compelling visual effects and ensuring that placed elements integrate seamlessly with their new environment.

Essential Retouching: The Spot Healing Brush
Now it's time to learn about an important retouching Photoshop tool: the Spot Healing Brush. This intuitive tool is designed to quickly remove blemishes, dust spots, and other imperfections from images. I'll teach you how to do all of those things, so watch the video and follow along on your own computer using the source files provided! By simply brushing over an unwanted area, the Spot Healing Brush intelligently samples surrounding pixels to blend the imperfection away, making it an indispensable tool for portrait retouching and general image cleanup.
Expanding Your Canvas: Content-Aware Fill
Sometimes, the dimensions of an image need to be altered, either to fit a specific layout or to accommodate new content. What if you need to make an image wider? Of course, you don't want to just stretch it and make everything distorted. Photoshop's Content-Aware Fill feature offers a remarkably intelligent solution. This powerful tool analyzes the surrounding pixels and generates new content that seamlessly fills the expanded area, making it appear as if the image was originally captured with those dimensions. This is invaluable for extending backgrounds, removing unwanted objects, or recomposing shots.
Fix EXTREME Color Cast with a Quick Photoshop Trick!
Exporting Your Masterpieces from Photoshop
The final stage of any design project is exporting your work in the appropriate format. Here's the last of the Photoshop tutorials for beginners. So now let's look at how to export in Photoshop. We will cover various export options, discussing the differences between file formats like JPEG, PNG, and GIF, and when to use each. Understanding export settings is crucial for optimizing file size, maintaining image quality, and ensuring compatibility across different platforms and devices.
Your Next Steps in the Photoshop Journey
Congratulations! So now you're ready to move on and work on new projects. In this concluding video, we'll talk about what the next steps should be as you continue to learn how to use Photoshop more effectively. This course has provided a solid foundation, but the journey of mastering Photoshop is ongoing. We'll discuss strategies for continued learning, exploring advanced features, and applying your newfound skills to real-world projects. Still want to learn more about Photoshop? Or if you prefer written tutorials, try our huge library of free Photoshop tutorials. The possibilities with Photoshop are virtually limitless, and with practice and continued exploration, you'll be creating stunning visuals in no time.