Ensuring your images possess the correct resolution is paramount for a variety of applications, from web display to professional printing. Adobe Photoshop offers a robust suite of tools to modify image resolution and dimensions, allowing users to optimize files for specific needs without compromising visual fidelity. Understanding the interplay between pixel dimensions, resolution (measured in pixels per inch or PPI), and file size is key to achieving desired outcomes. This guide delves into the various methods for changing image resolution in Photoshop, exploring both traditional techniques and advanced AI-powered features.
Understanding Image Dimensions and Resolution
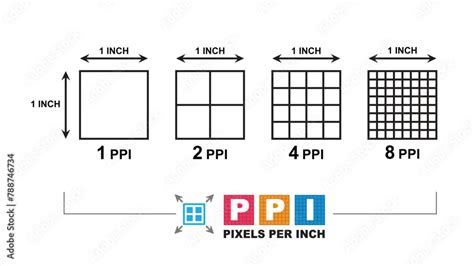
At its core, a digital image is a grid of pixels. The pixel dimensions refer to the total number of pixels an image contains, expressed as width by height (e.g., 1920 pixels wide by 1080 pixels high). Resolution, on the other hand, dictates how densely these pixels are packed within a given physical space, typically measured in pixels per inch (PPI). A higher PPI means more pixels are squeezed into each inch, resulting in a sharper, more detailed image. Conversely, a lower PPI means pixels are spread further apart, potentially leading to a softer or more pixelated appearance when viewed at a specific size.
Large photos or those with a high resolution-images with a greater number of pixels-can take a long time to download and require a large amount of space to store. The higher the resolution, the more detail an image has, and the bigger an image file is because it’s denser with data. Different use cases require different image resolutions. For most web uses, 72 PPI is sufficient. However, for high-quality prints, resolutions of 300 PPI or even 600 PPI are often recommended to ensure crisp detail.
The "Image Size" Dialog: Your Primary Tool for Resolution Adjustment
The cornerstone of resolution manipulation in Photoshop is the "Image Size" dialog box. Accessible via Image > Image Size, this powerful panel provides comprehensive control over an image's dimensions and resolution.
To begin, familiarize yourself with the pixel dimensions and the resolution fields. You can change your unit of measurement for width and height by clicking the drop-down menu next to them. This allows you to work in inches, centimeters, pixels, or other units.
A crucial element within this dialog is the "Resample" checkbox. When checked, it indicates that Photoshop will alter the actual pixel data of the image. This means that if you increase the dimensions or resolution, Photoshop will add new pixels (upsampling), and if you decrease them, it will remove pixels (downsampling).
If you keep the Resample box checked as you resize the image in Photoshop, the software will change the amount of pixel data inside of it. This process involves choosing an interpolation method, which specifies how Photoshop calculates the color values for these new or modified pixels. Common methods include Bicubic Smoother (best for enlargements) and Bicubic Sharper (best for reductions). Understanding what pixel resampling, upsampling, and downsampling mean and how they can affect the look of your photo is vital.
To create a new, smaller file and keep the original size file intact, simply click File > Export As. This is a fundamental technique for resizing pictures in Photoshop without losing quality when preparing files for web or specific output needs.
Adjusting Resolution Without Changing Pixel Count
A common misconception is that changing resolution always involves altering the image's pixel dimensions. However, you can change an image’s resolution by clicking Image > Image Size without necessarily changing the number of pixels. To achieve this, you must deselect the "Resample" checkbox.
When "Resample" is unchecked, Photoshop understands that you do not want to add or subtract any pixels to the photo. Instead, you are only changing how many of those existing pixels will be displayed per inch. This is critical for print preparation. For example, if you have an image with pixel dimensions of 3000 x 2000 pixels and a resolution of 72 PPI, its document size might be quite large. If you then go into Image Size, deselect Resample, and change the Resolution to 300 PPI, Photoshop will automatically adjust the Document Width and Height fields to maintain the same pixel count. This means the physical print size will become smaller, but the image will be much sharper at that smaller size.
Imagine you and a friend each having a bucket full of 5000 seeds to plant in a field. You must use all 5000 of your seeds by planting them in 1 inch squares in a field. Now imagine that you are allowed to plant only 150 of your seeds per inch and your friend is allowed to plant 300 seeds per inch. The friend's field will appear more densely planted and detailed. Similarly, changing the resolution in Photoshop without resampling adjusts the "density" of the pixels within a given physical space.
Let's illustrate with an example: You have an image with a 300 PPI resolution. You want to print this image in a professional publication, and the image needs to be at least 600 PPI. By going to Image Size, deselecting Resample, and changing the Resolution to 600 PPI, the Pixel Dimensions will stay the same because you did not add or subtract any pixels to the image. However, the Document Width and Height will decrease by half when the Resolution doubled. Conversely, if you halve the Resolution, your Document Width and Height will double. The pixel dimensions never change in this scenario; you started with an image at 3000 x 2000 pixels (px) and ended with the dimensions still being 3000 x 2000 px.
Preserving Proportions and Scaling Effects
When resizing images, maintaining their original aspect ratio is often crucial to avoid distortion. The chain link icon next to the Width and Height fields in the "Image Size" dialog box is designed for this purpose. When this icon is active, it constrains proportions, meaning any adjustment made to the width will automatically correspond to a proportional adjustment in the image’s height, and vice-versa.
For more direct control over image scaling, Photoshop offers the Transform tool. To activate it, press "Ctrl + T" (Windows) or "Cmd + T" (Mac). This brings up a bounding box around your image. You can then drag the corners to resize the image proportionally. To maintain the original aspect ratio precisely while transforming, hold down the Shift key while dragging a corner. Alternatively, you can precisely enter the desired dimensions in the width and height boxes in the options bar that appears when the Transform tool is active.
When an image has layers with styles applied to them (like drop shadows or bevels), scaling the entire image can sometimes lead to undesirable results for these effects. To address this, select the relevant layer in the Layers panel. Then, choose Layer > Layer Style > Scale Effects, or right-click the layer's FX icon and choose Scale Effects. You can then enter an appropriate percentage or drag a slider to scale the layer styles independently of the layer content. In some cases, converting layers to a Smart Object before transforming can offer more flexibility, allowing for non-destructive scaling and re-scaling without losing quality. You can then use the Transform tool (Ctrl+T or Cmd+T) or select Edit > Free Transform.
Advanced Techniques: AI and Batch Processing
The realm of image editing has been significantly advanced by Artificial Intelligence (AI) and Machine Learning (ML). These technologies offer powerful solutions for enhancing image resolution, particularly when dealing with low-quality originals or when precise enlargement is required.
Super Resolution in Adobe Lightroom and Photoshop is a prime example. It's not just movie magic; it's a sophisticated application of AI. Every digital image has a certain number of pixels. The more pixels an image starts with, the higher the resolution. Decreasing the number of pixels is called downsampling, which removes data from your image. Increasing the number of pixels is called upsampling, which adds data to the image. Super Resolution uses AI and ML to analyze the context of an image and intelligently add pixels, effectively doubling the image's linear dimensions and quadrupling the pixel count. This is particularly useful when you need to crop a section of a photo and increase its size for a headshot, for instance, where traditional upsampling would typically lead to major pixelation.
In Lightroom, Super Resolution is a straightforward process. You can increase your image resolution and save it as a new DNG file. It automatically chooses the best-looking pixels to add, doubling the image in size and quadrupling the pixel count without manual intervention.
For even more control, Super Resolution in Photoshop offers a similar AI-powered enhancement. However, when you need to make a significant change to the size of your original image or add a specific number of new pixels, traditional resampling methods within Photoshop remain a valuable choice.
Batch Resizing with Image Processor
For users who need to process a series of images, Photoshop offers a convenient solution: the "Image Processor" script. This script allows you to batch resize images, and you can even specify the desired size for the output images. To use it, navigate to File > Scripts > Image Processor. This is an invaluable tool for efficiently managing multiple files that require consistent resizing or resolution adjustments.
How to Batch Resize Images in Photoshop
Interpolation Methods: Fine-Tuning Resampling
When you choose to resample an image (i.e., add or remove pixels), the selection of an appropriate interpolation method becomes critical. This method dictates how Photoshop calculates the color values for the newly generated pixels.
- Preserve Details (Enlargement): This is often the best choice for enlarging images, as it aims to maintain as much detail as possible.
- Bicubic Smoother (Enlargement): Another good option for enlargements, producing smoother results.
- Bicubic Sharper (Reduction): This method is designed for reducing image size and helps to retain sharpness.
- Bicubic (Smooth Gradients): A general-purpose method that provides a good balance.
- Nearest Neighbor (Hard Edges): This is the fastest method but can result in jagged edges and is generally not recommended for photographic images.
Experimenting with these interpolation methods can help you achieve the best possible quality when upsampling or downsampling your images, minimizing unwanted pixelation and preserving visual integrity.
Considerations for Printing and Web Use
The resolution requirements for web and print differ significantly. For web use, images are typically viewed on screens, and file size is a major consideration for fast loading times. A resolution of 72 PPI is generally considered sufficient for most web graphics, as screens rarely display images at resolutions much higher than this. When preparing images for the web, using File > Export As and selecting formats like JPEG or PNG, while optimizing compression, is key.
For high-quality prints, a much higher resolution is necessary. A common standard is 300 PPI, which ensures that the pixels are densely packed enough to appear sharp and detailed when printed at a given size. For very large prints or when extreme detail is required, 600 PPI might be beneficial. When preparing an image for print, it's often advisable to:
- Go to Image > Image Size.
- Ensure the Resample box is checked if you need to change the pixel dimensions.
- Set your desired print dimensions (e.g., inches or centimeters) and the target resolution (e.g., 300 PPI).
- Choose an appropriate interpolation method.
- Click "OK."
- Crucially, before making these irreversible changes, go to File > Save As to create a new version of your photo, preserving the original.
If you are unsure about the print quality, you can experiment with adjusting only the dimension or resolution without changing the pixel count. Photoshop will automatically change the other value for you, keeping the aspect ratio and number of pixels the same. This allows you to see how different resolution settings might affect the potential print size and quality.
Ultimately, the "best" resolution depends entirely on the intended use of your image. By understanding the tools and techniques available in Photoshop, you can effectively manage image resolution to meet diverse professional and creative demands, ensuring your visuals are always presented at their optimal quality.
tags: #photoshop #change #resolution