Photoshop offers a robust set of tools for creating and manipulating vector shapes, fundamental elements for graphic design, illustration, and digital art. Understanding these tools is crucial for any Photoshop user, from beginners to seasoned professionals. This guide will walk you through the process of drawing shapes in Photoshop, focusing on each dedicated shape tool and its unique capabilities.
The Foundation: Selecting and Drawing Shapes
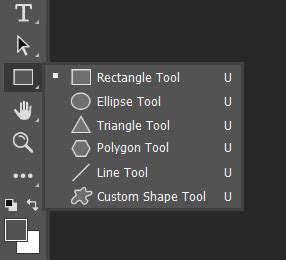
To begin creating shapes in Photoshop, the first step is to select a shape tool from your toolbar. The hotkey 'U' is a convenient shortcut to access the most recently used shape tool. Once a shape tool is active, the process of drawing is straightforward: simply click and drag on your canvas.
There are three primary modes for shape tools, visible in the Options bar at the top of your workspace: Shape, Path, and Pixels.
Shape Mode: This is the default and most commonly used mode for creating vector shapes. Shapes created in this mode are infinitely scalable without loss of quality and can be easily edited later. When using Shape mode, you have options to set fill and stroke colors, as well as stroke width and style, either in the Options bar or the Properties panel (Window > Properties). For instance, you can set a fill color, such as green, and a stroke color, like blue, with a specific width and style, such as a dotted line.
Path Mode: In Path mode, the tool draws a vector path rather than a filled shape. This path can be used for various purposes, such as a guide for selections, for stroking, or for converting into a selection.
Pixels Mode: Selecting Pixels mode creates a raster shape, essentially a filled selection on a selected layer. This means the shape will be composed of pixels and will lose quality if scaled up significantly.
Before delving into individual shape tools, it's beneficial to understand how to outline a shape. This is typically managed through the "Path Options" found by clicking the gear icon in the Options bar.
The Rectangle Tool: Versatile Rectilinear Forms
The Rectangle Tool is your go-to for creating rectangular and square shapes. When using this tool, you'll encounter several options in the Options bar that dictate how your rectangle is drawn:
Unconstrained: This option offers the most freedom, allowing you to draw a rectangle of any size by simply clicking and dragging on the canvas.
Square: Checking this box, in conjunction with Unconstrained, will enable you to easily create a perfect square.
Fixed Size: With this option, you can specify exact Width and Height values for your rectangle, ensuring precise dimensions.
Proportional: This setting maintains the aspect ratio of the shape. When you drag, the width and height will scale proportionally.
From Center: When this option is selected, the shape will be drawn outwards from the center point where you initially clicked.
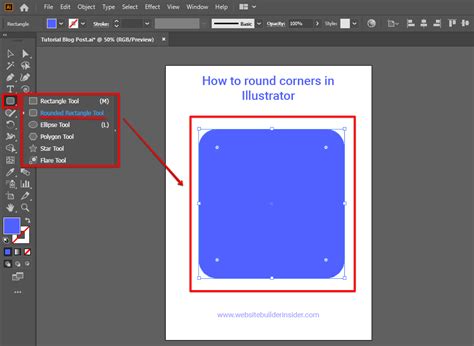
A particularly useful feature of the Rectangle Tool is its ability to create rectangles with rounded corners. Once a rectangle is drawn, you can adjust the roundness in two ways:
- Properties Panel: Navigate to Window > Properties. With your shape layer selected, you'll find options to adjust the "Corner Radius."
- Path Selection Tool: Select the Path Selection Tool (A), then focus on your shape. You will notice small, round icons at each corner. Clicking and dragging one of these icons will visually adjust the roundness of the corners.
To create a rectangle with predefined settings, ensure the Rectangle Tool is selected, then simply click once on your canvas. This action opens the "Create Rectangle" window, where you can precisely set the size, Corner Radius, and choose whether the shape is drawn "From Center."
The Ellipse Tool: Crafting Circles and Ovals
Similar to the Rectangle Tool, the Ellipse Tool provides options for drawing perfect circles and various elliptical shapes. The drawing modes mirror those of the Rectangle Tool:
Unconstrained: Allows for freeform drawing of ellipses of any size.
Circle: This option, when used with Unconstrained, will draw a perfect circle.
Fixed Size: Define precise Width and Height values for your ellipse.
Proportional: Maintains the aspect ratio, ensuring that the ellipse scales proportionately.
From Center: Draws the ellipse outwards from the click point.
To create an ellipse with specific parameters, select the Ellipse Tool and click on the canvas. The "Create Ellipse" window will appear, allowing you to set dimensions, aspect ratios, and whether the shape originates from the center.
How to Draw / Create Unfilled Circles in Adobe Photoshop 2023 (Fast Tutorial)
The Triangle Tool: Constructing Angular Forms
The Triangle Tool enables the creation of triangular shapes with adjustable properties. The available drawing modes are:
Unconstrained: For drawing triangles of any size and proportion.
Equilateral: This option ensures that all sides of the triangle are equal in length, creating an equilateral triangle.
Fixed Size: Allows for the specification of exact dimensions for the triangle.
Proportional: Maintains the aspect ratio of the triangle as you draw.
From Center: The triangle will be drawn outwards from the click point.
The Triangle Tool also supports rounded corners. You can adjust the "Corner Radius" directly in the Options bar before or after drawing. Then, simply click and drag to create a triangle with rounded corners.
For precise triangle creation, select the Triangle Tool, click on the canvas, and the "Create Triangle" window will appear. Here, you can define the size, Corner Radius, and choose the "From Center" option.
The Polygon Tool: Multi-Sided Wonders
The Polygon Tool is designed for creating shapes with any number of sides. Its options include:
Unconstrained: Draw polygons of any size.
Symmetric: Creates polygons where all sides and angles are equal.
Fixed Size: Set specific dimensions for the polygon.
Proportional: Maintains the aspect ratio of the polygon.
From Center: Draws the polygon from the clicked center point.
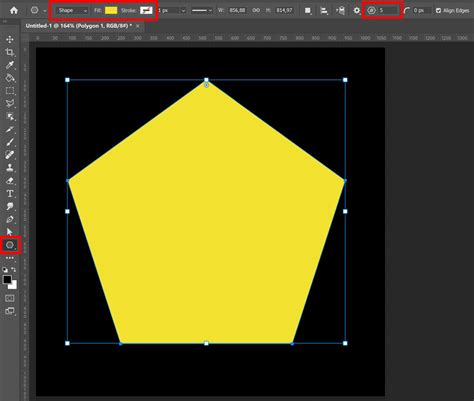
Additional options can be accessed by clicking the gear icon in the Options bar. When you select the Polygon Tool and click on the canvas, the "Create Polygon" window opens. Within this window, you can define:
- Size: The overall dimensions of the polygon.
- Number of Sides: This is a key parameter, allowing you to create shapes from a pentagon (5 sides) up to much more complex figures.
- Corner Radius: To create polygons with rounded corners.
- Star Ratio: This specific setting is used when creating star shapes within the polygon tool, controlling the depth of the star's points.
- Symmetric Box: Ensures symmetry in the polygon.
- Smooth Star Indents: Adds roundness to the inner angles of star shapes.
The Line Tool: Simple Strokes of Defined Thickness
The Line Tool is straightforward, used for drawing straight lines. Its primary adjustable parameter in the Options bar is "Weight," which dictates the thickness of the line. While simple, lines can be foundational elements in many designs, from dividers to graphical elements.
The Custom Shape Tool: Unleashing Creative Potential
The Custom Shape Tool is where the true power of Photoshop's shape system shines. This tool allows you to access a library of pre-made vector shapes, as well as your own saved custom shapes.
To use existing custom shapes, select the Custom Shape Tool from the toolbar. In the Options bar, you'll see a dropdown menu displaying various categories of shapes (e.g., Animals, Music, Arrows, Web). Clicking on a shape in this menu will load it. Then, simply click and drag on your canvas to draw the selected custom shape.
When you click on the canvas with the Custom Shape Tool selected, the "Create Custom Shape" window appears. This window allows you to choose from your installed custom shape libraries.
Creating and Utilizing Custom Shapes:
The ability to create and save your own custom shapes is a significant time-saver and a powerful design technique. This is particularly useful for:
- Branding and Watermarks: Saving logos, sub-marks, or specific symbols to quickly add watermarks or branding elements to images. This is invaluable for photographers and artists looking to protect their work and maintain a consistent brand identity.
- Icons and Repeated Elements: Creating custom icons for social media, business cards, website elements, or any graphic that you use frequently. Saving these as custom shapes ensures they are easily accessible and always scalable.
- Web Design and Social Media Graphics: For designers working on web layouts or social media content, saving frequently used elements like pointers, labels, or unique decorative shapes can dramatically speed up the workflow.
How to Create Custom Shapes from Images:
You can even turn raster images (JPG, PNG) into custom shapes. The process typically involves:
- Selecting an Image: Choose a clear image or graphic element that you want to convert.
- Preparing the Image: Isolate the desired element, often by removing the background and ensuring clean edges.
- Defining the Shape: Use selection tools to create a precise selection of the element.
- Saving as a Custom Shape: Go to Edit > Define Custom Shape. Give your new shape a descriptive name. It will then be added to your Custom Shape Tool library.
This technique allows you to incorporate unique graphic elements into your designs as scalable vector shapes. Concept artists, like Josh Durham, utilize custom shapes extensively to speed up their workflow and generate new ideas rapidly. By creating custom shapes based on real photography, artists can quickly build scenes and explore early-stage concepts.
Combining Shapes and Text:
Beyond drawing basic shapes, Photoshop allows for advanced manipulation, including combining shapes and text. You can:
- Turn Text into a Shape: Select your text layer, right-click, and choose "Convert to Shape." This transforms editable text into a vector shape that can be manipulated with the shape tools.
- Combine Text with Other Shapes: Once text is converted to a shape, or by using multiple shape layers, you can combine them to create intricate custom graphics. This is achieved through layer blending modes and boolean operations available within the shape tool options (often found in the Properties panel when multiple vector layers are selected).
Advanced Customization and Workflow:
For those not always working with an internet connection, relying on cloud-based solutions like CC Libraries can be problematic. Keeping your most important custom shapes saved directly within Photoshop ensures immediate access, regardless of connectivity. This is especially beneficial when needing to complete tasks quickly.
Tutorial projects, like those found on blogs and design platforms, are invaluable for mastering these functionalities. By breaking down complex features into manageable steps, designers can gradually learn and implement the most powerful aspects of the software. While specific interface elements might vary slightly between Photoshop versions (e.g., Photoshop CC 2020 versus older versions), the core principles of shape creation and manipulation remain consistent.
Mastering Photoshop's shape tools opens up a world of creative possibilities. From basic geometric forms to complex custom graphics derived from images and text, these tools are fundamental to efficient and high-quality design work. Experimenting with each tool and its various options will build confidence and proficiency, enabling you to bring your design visions to life with precision and flexibility. Resources like Envato Elements offer a vast collection of design assets and inspiration, perfect for taking your skills to the next level once you've grasped the fundamentals of shape creation in Photoshop.