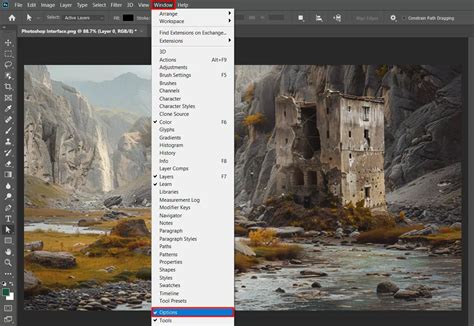
Clouds, those ephemeral canvases painted across our skies, hold a profound power to shape the visual narrative of an image. Whether under the bright embrace of the daylight sun or the ethereal glow of moonlight, their presence can imbue a scene with depth, a sense of majesty, and profoundly influence the overall ambiance. Adobe Photoshop, a powerhouse of digital artistry, offers a versatile toolkit for artists to craft and integrate these atmospheric elements with remarkable realism. This guide delves into the core techniques for generating and manipulating clouds within Photoshop, from fundamental filter applications to advanced brushwork and sky replacement.
The Foundation: Setting Up Your Canvas for Cloud Creation
Before embarking on the journey of cloud generation, establishing the right working environment in Photoshop is paramount. The initial step involves creating a new document, and the dimensions are often dictated by the intended use of the final artwork. While any size will do, for many illustrative purposes, a canvas of approximately 1500x1500 pixels provides ample space to work with without overwhelming system resources.
Crucially, the color mode of your document plays a significant role in how colors are rendered and managed. For most digital imagery, including illustrations intended for web or screen display, setting the color mode to RGB is the standard. To achieve this, navigate to the "Image" menu in your menu bar, then select "Modes" from the submenu, and finally choose "RGB Color." This ensures that your colors are represented accurately across digital platforms.
Resolution is another aspect that is a matter of preference and project requirements. However, for detailed work where precision is key, opting for a higher resolution, or working at a closer zoom level, will allow for greater control and finer detail in your cloud manipulations.
Generating the Base: Photoshop's Render Clouds Filters
Photoshop provides built-in filters that serve as excellent starting points for creating cloud textures. The most fundamental of these is the "Clouds" filter. To apply this, you’ll typically begin by creating a new, blank layer. This layer will serve as the landing zone for the component parts of your cloud layer, keeping your original image or background intact.
From the main menu bar, the path to this tool is straightforward: Filter → Render → Clouds. Upon applying this filter, Photoshop will fill the selected layer with a grayscale cloud-like pattern. This initial output is often quite abstract and may not immediately resemble natural clouds, but it forms the essential base for further refinement.
For a more nuanced and often more realistic starting point, Photoshop offers the "Difference Clouds" filter. This filter works by adjusting and inverting portions of the existing photo or layer to create a cloud effect. To access it, follow a similar path from the main menu bar: Filter → Render → Difference Clouds. The "Difference Clouds" filter can be particularly effective when applied multiple times or in conjunction with other layers and blending modes, as it introduces more complex variations and organic-looking textures. Applying the "Difference Clouds" filter from the "Filter" and "Render" submenu is a common technique to introduce a more realistic touch to your generated clouds.
Refining the Clouds: Levels, Masks, and Blending Modes
The raw output from the "Clouds" or "Difference Clouds" filters is rarely the final step. To sculpt these abstract patterns into believable atmospheric phenomena, a range of adjustment and manipulation tools come into play.
Levels Adjustment: The Levels dialog box is an indispensable tool for controlling the tonal range of your cloud layer. To make the Levels dialog box appear, you can type in the shortcut Ctrl+L (Windows) or ⌘ Cmd+L (Mac). Within the Levels dialog box, you can adjust the black, white, and gray sliders to fine-tune the contrast and brightness of your clouds. This allows you to deepen shadows, brighten highlights, and effectively push the clouds forward or recede them into the background.
Quick Mask Mode: For precise editing and selective adjustments, Photoshop's Quick Mask Mode offers a powerful workflow. This mode acts similarly to a stencil, allowing you to add or subtract from unprotected areas of your image. To enter Quick Mask Mode, double-click the Quick Mask icon in the toolbar (a dotted rectangle) or press the Q key. When in Quick Mask Mode, you can use painting tools like the Brush Tool to paint with black or white. Painting with white adds to the selection (or "masks" out areas), while painting with black removes from the selection (revealing areas). This is particularly useful for isolating specific cloud formations or blending them seamlessly with other elements in your composition. Once you've finished making your selections or adjustments in Quick Mask Mode, you can exit it by pressing Q again or double-clicking the Quick Mask icon. Now that you've closed Quick Mask Mode, running lines will appear (sometimes referred to as marching ants), indicating your active selection. This mode is best suited for quick editing, and is used to add or subtract from your image to make a "mask," like a digital stencil.
Blending Options: Once you have a cloud layer that's beginning to take shape, applying blending options can further integrate it into your scene. You can access blending options by double-clicking the layer in the Layers panel or by right-clicking the layer and selecting "Blending Options." This allows you to control how the cloud layer interacts with the layers below it. Modes like "Screen," "Overlay," or "Soft Light" can be effective for subtly enhancing or integrating clouds. The "Difference Clouds" filter itself can be applied as a filter to the layer by going to your blending options, further enhancing its utility.
Advanced Cloud Creation: Custom Brushes and Sky Replacement
While Photoshop's built-in filters are a great starting point, artists often seek more control and unique textures. This is where custom brushes and the Sky Replacement feature come into play.
Custom Brushes: Photoshop brushes are incredibly versatile tools that can mimic a vast array of textures and effects, including clouds. You can create your own cloud brushes from scratch by painting cloud-like patterns and then defining them as a brush preset (Edit → Define Brush Preset). Alternatively, many third-party developers offer digital brushes, some of which may cost money, but there are many free digital brushes available through artistic communities. Photoshop brushes utilize the file extension ".abr".
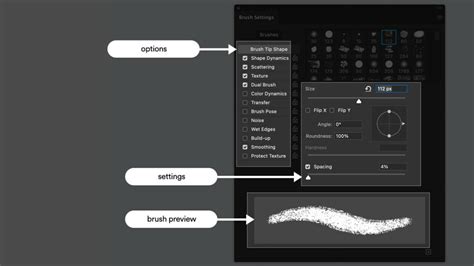
To utilize a downloaded brush, you first need to install it. This typically involves placing the ".abr" file into Photoshop's "Brush Presets" folder. Once installed, you can load your brushes through the Brush Settings panel. You can quickly open Brush Settings by pressing the F5 key. You should see a variety of options in your Brush Palette, most notably a grid of default thicknesses for your brush tool. You can access more options through a drop-down menu by clicking the triangle in the upper right corner.
When using brushes to paint clouds, it's essential to experiment with different brush sizes, opacities, and flow settings. Using the selection tool, choose a sample from your cloud image that you would like your brush to imitate. This allows you to sample textures and apply them dynamically. Think about the kind of clouds you will want in your scene - wispy cirrus, dramatic cumulonimbus, or soft stratus - and select or create brushes that can best achieve those forms.
Sky Replacement: For a more direct and often dramatic approach to adding or altering skies, Photoshop's Sky Replacement feature is a game-changer. This intelligent tool allows you to seamlessly swap out the existing sky in your photograph with a new one from a pre-loaded library or your own custom images.
To utilize Sky Replacement, head to the Select menu and hit Sky. Then, go to the Edit menu and choose Sky Replacement. This will open a dedicated workspace where you can preview various sky options. You can adjust parameters like the sky's shift, scale, and color adjustments to ensure a natural integration with your foreground. This feature is particularly useful for quickly enhancing landscapes or establishing a specific mood for a scene.
How to Use Sky Replacements in Photoshop | Adobe Photoshop
Layering and Compositing for Depth and Realism
The true power of Photoshop lies in its ability to layer and composite elements. When creating clouds, this means combining multiple cloud layers, using different generation methods, and carefully blending them together.
Copying and Pasting Layers: Speed this process by pressing Ctrl+V (Windows) or ⌘ Cmd+V (Mac) to paste in Windows or on Mac. Copying a cloud layer (Ctrl+J or ⌘ Cmd+J) allows you to create variations or duplicate existing cloud formations. You can then apply different filters, adjustments, or blending modes to these duplicated layers, creating a richer and more complex cloudscape.
Gradient Tool for Base Tones: While not directly for rendering clouds, the Gradient Tool is instrumental in setting up the base tonal values of your sky, which in turn influences how the rendered clouds will appear. Gradient controls are represented by an icon shaped like a box with color fading from black to white. Applying a gradient to a new layer can establish the foundational color and light of your sky before you even generate clouds. Apply a gradient to your new layer by using your gradient tool again. This provides a base upon which your cloud layers can be composited.
Advanced Techniques and Considerations
Beyond the core methods, several advanced techniques can elevate your cloud creations.
Grayscale to Color Conversion: Sometimes, you might want to apply color to grayscale cloud layers. One way to quickly change your image from color to grayscale, and vice versa, can be found under the "Image" heading on the menu bar. This is one of several ways to quickly change your image from color to grayscale. While direct coloring of cloud layers can be complex, understanding color modes and using adjustment layers like Hue/Saturation or Color Balance can help you tint your clouds to match the lighting and mood of your scene.
Resolution and Detail: As mentioned earlier, resolution is a matter of preference, but a closer view will allow for greater precision. When working with intricate cloud details, zooming in and utilizing high-resolution source material or brushes is crucial. This ensures that your clouds maintain their detail even when viewed at larger sizes or when printed.
Experimentation is Key: The provided information outlines several methods, but the true mastery of cloud creation in Photoshop comes through experimentation. Think about the kind of clouds you will want in your scene. Consider the direction of light, the atmospheric perspective, and how the clouds interact with each other. Try combining the "Clouds" and "Difference Clouds" filters, applying them to different layers, and experimenting with various blending modes and opacity settings.
By understanding and applying these techniques, artists can transform flat digital canvases into breathtaking skies, adding unparalleled depth, realism, and emotional resonance to their Photoshop illustrations. The journey from a blank layer to a majestic cloudscape is a testament to the creative power and flexibility of Adobe Photoshop.