Creating a new document in Adobe Photoshop is the foundational step for any digital imaging project. The process involves understanding and configuring specific settings within the "New Document" dialog box, which dictates the parameters of your canvas. Whether you're preparing an image for high-resolution print in a magazine or for vibrant display on a web screen, the choices you make here have a profound impact on the final outcome. This guide will delve into the essential settings, explore various presets, and discuss the implications of different file types, ensuring you can confidently set up your Photoshop workspace for any purpose.
Accessing the New Document Dialog Box
There are several convenient ways to initiate the creation of a new Photoshop document. The most direct method is by using a keyboard shortcut: Cmd + N on a Mac or Ctrl + N on a Windows operating system. Alternatively, from Photoshop’s Home or Start screen, you can simply click on the prominent "New…" button. Both of these actions will open the crucial New Document dialog box, where all your initial document specifications will be entered.
Understanding Presets for Efficiency
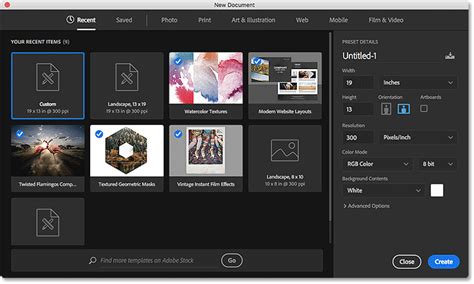
A key feature designed to streamline the creation of new files is the use of presets. A preset is essentially a pre-configured set of dimensions and settings that you can quickly apply. When you open the New Document dialog box, the "Recent" category is typically selected by default. This displays a grid of document sizes you have used previously, acting as a handy time-saver for recurring projects.
To leverage presets effectively, you first need to identify the intended use of your document. Along the top of the dialog box, you'll find categories such as "Web and Screen," "Print," and "Photo." Clicking on one of these category names will present a set of relevant presets in the dialog box. For example, under the "Print" category, you'll find an extra bunch of thumbnails representing various print-specific sizes. If you're working on a project that requires a standard paper size, you might click on an "A5" preset, which will instantly populate the width, height, and other relevant fields with the correct values.
Customizing Your Document Dimensions and Color Mode
Sometimes, the available presets may not perfectly match your specific requirements. In such cases, you can create a custom document size. To do this, navigate to File > New in the Menu Bar. Once the New Document dialog box appears, focus on the "Preset Details" section on the right-hand side. Here, you can manually input precise values for the Width and Height of your document. For instance, if you need a document that is 10 inches wide and 3 inches high, you would type these values into the respective fields.
Crucially, you also need to select the appropriate Colour Mode. The choice of color mode is dictated by the intended output of your image. For digital displays, such as websites or screens, RGB (Red, Green, Blue) is the standard. RGB mode uses light to create colors, making it ideal for anything that will be viewed on a monitor. For print, however, CMYK (Cyan, Magenta, Yellow, Key/Black) is the preferred color mode. CMYK uses inks to create colors, and these four inks are the basis for most professional printing processes.
For web use, a common setting involves an RGB color mode and a resolution of 72 Pixels/Inch. Conversely, for print use, the standard is a CMYK color mode and a resolution of 300 Pixels/Inch. Higher resolutions are necessary for print to ensure that fine details are captured and the image appears sharp when reproduced on paper.
Saving Custom Presets for Future Use
If you find yourself frequently creating documents with specific custom dimensions and settings, you can save these as your own presets. After entering your desired values for width, height, color mode, and resolution, you can give your custom setting a name. In the Preset name field at the top of the "Preset Details" section (it will initially say something like "Untitled"), type in a descriptive name that will help you easily identify this preset later, such as "Magazine Ad - 2023" or "Web Banner - Social Media." Once saved, this new custom preset will appear in the "Saved" category within the New Document dialog box, ready for quick selection on future projects. This not only saves time but also ensures consistency across your work.
NEW! Save Adjustment Layer PRESETS in Photoshop
Understanding Resolution: Print vs. Screen
The Resolution setting is a critical component of new document setup, measured in pixels per inch (ppi). This value determines the density of pixels within your image.
Screen Resolution: For documents intended for display on screens (web, digital presentations, social media), a resolution of 72 ppi is generally considered sufficient. While higher resolutions can be used, they often result in larger file sizes without a noticeable improvement in visual quality on most displays, which have their own pixel density limitations. The primary goal for screen is often a balance between visual fidelity and efficient file size for fast loading times.
Print Resolution: For images destined for print, such as in magazines or books, a significantly higher resolution is required. The industry standard for high-quality print is 300 ppi. This density ensures that the printed image is sharp, detailed, and free from visible pixelation. When preparing images for professional printing, it is crucial to set the resolution correctly from the outset to avoid the need for upscaling later, which can degrade image quality.
Navigating Photoshop Elements Preferences
While the core principles of new document creation are consistent across Adobe's Photoshop family, specific applications like Photoshop Elements may offer additional preferences that can influence your workflow. Within Photoshop Elements' Preferences Panel, you might find toggles for UI mode switching, rich tool tips, and other interface customizations. For instance, the "Type" options allow you to fine-tune how text is handled and displayed, including the Font Preview Size. Adjusting this setting can make it easier to quickly identify and select desired fonts by providing a better visual reference.
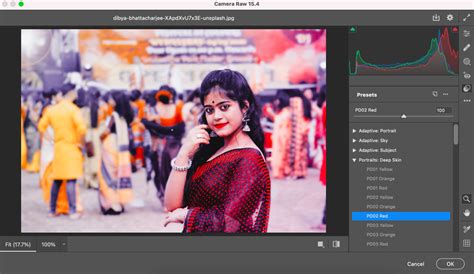
Another relevant preference, particularly when dealing with images from digital cameras, is the option to "Ignore Camera Data (EXIF) Profiles." EXIF data contains information embedded within image files, such as camera settings and color profiles. By enabling this option, Photoshop Elements will disregard this embedded color profile information, allowing you to have more control over how the color profile is applied or managed during the import and editing process. This can be important for ensuring color consistency across different devices and applications.
Furthermore, Photoshop Elements may offer settings related to geographical location, which can sometimes influence default behaviors or regional settings.
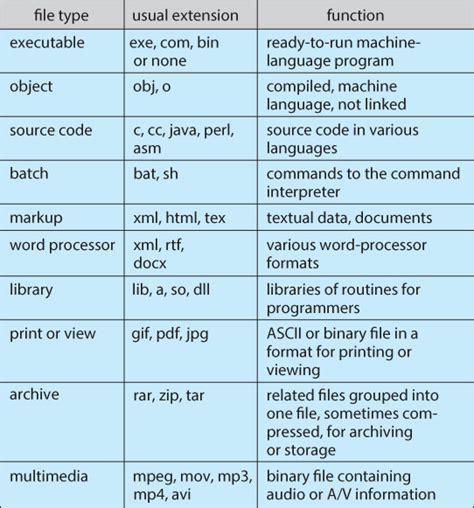
File Types: Choosing the Right Format for Your Needs
The choice of file format when saving your work is as important as the initial document settings. Different file types serve distinct purposes and have varying characteristics regarding quality, file size, and editability.
Photoshop Document (.PSD)
The Photoshop Document (PSD) format is Photoshop's native file type. It offers the most comprehensive editing capabilities without any loss of quality. PSD files preserve all layers, channels, text, masks, and other editable elements that you have worked on. This makes it the ideal format for saving your original, in-progress work. It allows you to return to your project at any time and make further edits without compromising the integrity of your design. Because it stores all this information, PSD files can be quite large. It is most commonly saved as your original file from which any final edits should be made.
Tagged Image File Format (.TIFF or .TIF)
Tagged Image File Format (TIFF) is another high-quality file format that is very similar to PSD in its ability to retain full editing capabilities. Images saved as TIFFs are stored at the highest quality, meaning there is no loss of quality over time or with repeated opening and saving. This makes TIFF a preferred file type when sending images to print. For professional printing workflows, it is often recommended to work on your original PSD file and then save a flattened (no layers) TIFF file when it's time for printing. This provides the print service with a high-quality, ready-to-print file.
Joint Photographic Expert Group (.JPEG or .JPG)
The Joint Photographic Expert Group (JPEG) format is ubiquitous, especially for web use and sharing photos. JPEGs are flattened files, meaning they do not save layers, channels, or other editable elements. This significantly reduces file size, making them convenient for storage and quick transfer. However, JPEGs are considered a lossy file format. This means that some image data is discarded during compression to achieve smaller file sizes. Consequently, JPEGs do not maintain quality and lose quality over time with each edit and save. Every time you open and re-save a JPEG, further quality degradation occurs, akin to repeatedly copying an image on a copy machine. Therefore, it is always best to have an original file, such as a PSD or TIFF, to revert to for maintained quality. Most often, digital cameras save image files as a JPEG/JPG.
Graphics Interchange Format (.GIF)
The Graphics Interchange Format (GIF) is a file type primarily used for the web, accessible through the 'Save for Web' menu. GIFs are known for their small file sizes, achieved by reducing the number of colors in the document. This characteristic promotes fast download times for web pages, and GIFs are compatible with all internet browsers. However, GIFs are an even lower quality file type in comparison to JPEGs and are limited to a palette of 256 colors. They are best suited for simple graphics, logos, or animations where color fidelity is not paramount.
Portable Network Graphics (.PNG)
Portable Network Graphics (PNG) was developed as a successor to GIF, aiming to overcome its limitations. PNGs support transparency, just like GIFs, but they maintain image quality and can contain a much wider range of colors. This makes PNG a superior file type to both GIF and JPEG for digital images when quality is a priority. Unlike JPEGs, PNGs do not lose quality regardless of how many times they are opened and saved. The primary downsides of PNG are that it does not support the CMYK color mode, meaning it cannot be used directly for printing, and it does not support animation. Additionally, because it is less widely used than JPEG, some older internet browsers may not support it. Tip: When choosing to save digital images for on-screen use, opt for a PNG over a JPEG to maintain image quality.
Portable Document Format (.PDF)
The Portable Document Format (PDF) is a versatile file type widely used for file sharing, viewing, and printing. Images can be saved as PDF files in Photoshop, which allows for the preservation of many file features, including layers. You can choose to save a PDF with JPEG compression or as a ZIP file to prevent loss of quality. One significant advantage of saving images as PDFs is the ability to utilize spot colors. Spot colors are specific, pre-mixed inks used in the printing industry, offering precise color control for projects like one-color prints. By far the greatest advantage of saving in PDF format is its accessibility. Anyone can open a PDF file on any computer, provided they have Adobe Reader installed, which is a free software available from Adobe and installed on the majority of computers worldwide. This broad compatibility makes PDFs an excellent choice for distributing finalized artwork.
By understanding these settings and file types, you can ensure that your Photoshop documents are optimally configured for their intended purpose, leading to professional and high-quality results whether for print or digital media.