As winter bids adieu and the promise of spring fills the air, it's a natural time to reflect on the artistic endeavors that have brightened the season. Mrs. Filmore, a dedicated art educator, has shared a vibrant collection of student artwork and engaging lesson plans that capture the spirit of creativity and skill development. From the intricate details of painted cardinals to the imaginative flair of superhero masks, her classroom has been a hub of artistic exploration. This season's offerings, including a captivating winter Northern Lights project and a cheerful springtime collection on the horizon, highlight a commitment to fostering artistic growth across various age groups and skill levels.
Cardinal Masterpieces: A Four-Day Artistic Journey
One of the standout projects recently concluded in Mrs. Filmore's art classes involved painting cardinals. This lesson, designed for her 4th graders, spanned four 40-minute art sessions, demonstrating a structured approach to artistic creation.
Day 1: Drawing the FoundationThe process began with a demonstration under the document camera, guiding students through the drawing of a cardinal, a branch, and snow. This foundational step involved drawing the cardinal first, followed by the supporting elements of the branch and snow, and finally, the distinct tail feathers. Students were encouraged to add texture to the branch before reinforcing all drawn lines with a sharpie. This meticulous outlining ensures clarity and definition in the subsequent stages of the artwork.
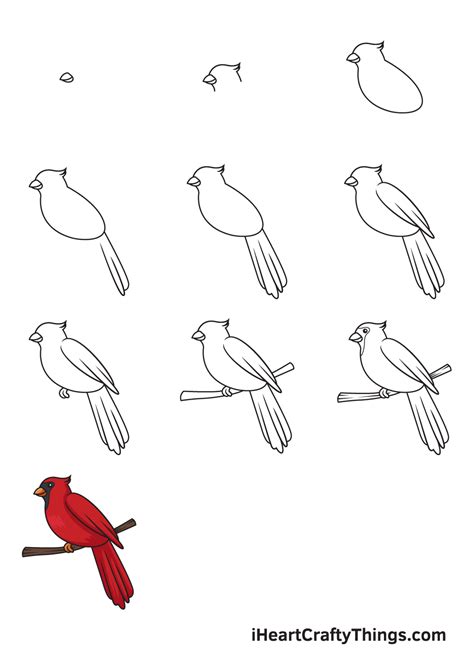
Day 2: Bringing Color to LifeThe second day focused on the application of color. Students utilized colored pencils to bring their cardinals, branches, and snow to life. A key instruction was to press down firmly while coloring the bird red, a technique intended to make the color "pop" and appear more vibrant. For the cardinal's eye, a lighter touch was advised to preserve the detail and prevent the black from overpowering the finer features. The beak was colored orange, the feet black, and the branch was rendered with colored pencils. A subtle yet impactful detail was added to the snow: a gradient of blue along the bottom edge. Students were instructed to press hard with a blue colored pencil where the snow met the branch, gradually lightening the pressure as they moved upwards, creating a sense of depth and form in the snow. While this effect was clearly intended, the photographic evidence suggests it might not have been as pronounced in all finished pieces.
Day 3: Shading, Outlining, and Resist TechniquesDay three introduced the concepts of shading and the crayon-resist technique. Mrs. Filmore demonstrated how to add shading to the cardinal using a black colored pencil, emphasizing the importance of pressing harder along the edges and gradually lightening the pressure towards the center. Overlapping lines were also highlighted as a crucial element for achieving smooth, blended shading. Following this, students outlined the bird, branch, and snow with a black crayon, pressing down firmly. This step serves a critical purpose: creating a wax barrier that prevents watercolor paint from seeping into these areas. Sharpened crayon tips were recommended for precision. The lesson then incorporated the crayon-resist technique by having students add falling snow using a white crayon, again with firm pressure. Mrs. Filmore explained that while white on white paper might seem invisible, tilting the paper can reveal the waxy sheen left by the crayon, a precursor to the watercolor resist effect.
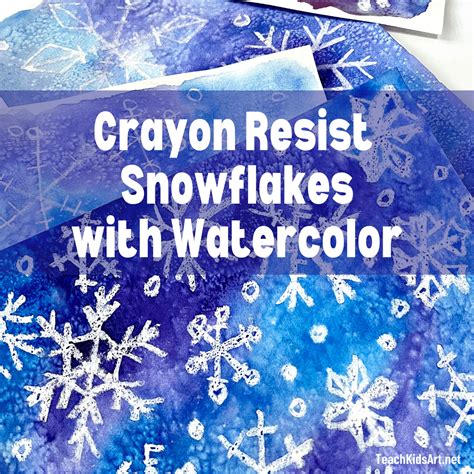
Day 4: The Watercolor RevealThe culmination of the cardinal lesson occurred on the fourth day with the application of watercolor. Students used turquoise liquid watercolors, slightly diluted, to paint the sky. This step dramatically revealed the white crayon-drawn snowflakes, showcasing the effectiveness of the crayon-wax resist technique. Mrs. Filmore noted her preference for Sax brand liquid watercolors for this particular lesson, appreciating their vibrancy and consistency. The artwork produced demonstrates a thoughtful progression from basic drawing to the nuanced application of color, shading, and resist techniques, resulting in a rich and textured final piece.
Unleashing Superheroes: Mask Design for Second Graders
In parallel with the more involved cardinal painting, Mrs. Filmore also shared a dynamic project with her second graders: the creation of superhero masks. This lesson, described as a "super fun one-day lesson," emphasizes quick engagement and imaginative expression.
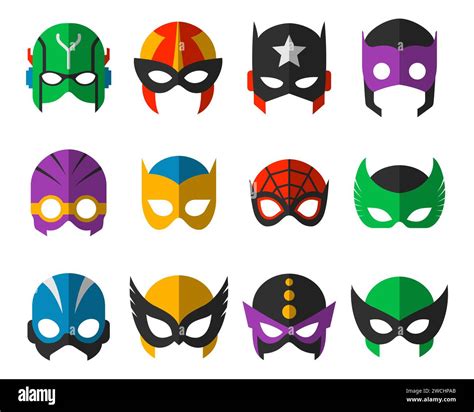
The process began with Mrs. Filmore drawing four distinct mask shapes on sheets of 9x12” super heavy-weight tag board paper. These initial drawings were then photocopied, providing students with a base for their designs. Students were given the freedom to design their masks as they envisioned, starting with pencil sketches and then coloring them in using markers, crayons, or colored pencils. Demonstrating a further layer of creativity, some students extended their designs beyond the mask's boundaries, adding elements like rabbit ears or other embellishments above the mask line, transforming their creations into unique character representations.
To ensure a proper fit, Mrs. Filmore prepared straps by cutting 9" x 2" strips from the same heavy-weight tag board paper. Each mask was designed to accommodate two such straps. Beyond the mask creation itself, the lesson offered an integrated literacy component. Mrs. Filmore suggested that after completing their masks, students could draw their own superheroes, devise superhero names, describe their powers, articulate the greater good they fight for, and even detail their superhero's dwelling. This extension transforms the art project into a multi-faceted activity that connects visual arts with creative writing and storytelling, making it an engaging project for all ages.
Winter Northern Lights: A Mesmerizing Chalk Pastel Landscape
Adding to the winter art curriculum, Mrs. Filmore introduced a new and exciting lesson: "Winter Northern Lights." This project, created on December 17th of an unspecified year, quickly became a cherished addition to her curriculum, with students enthusiastically embracing the creative process. The lesson is designed to be completed over four 40-minute art classes and can be implemented throughout the winter months, from December through March.
Day 1: Laying the Chalky FoundationThe initial step involves using a pencil to draw five random wavy lines across a sheet of 12x18” white drawing paper. This creates a template for the northern lights. The template paper is then placed on top of a 12x18” black paper, aligning the edges. Using various colored chalk pastels, students draw along the edge where the white paper meets the black paper, creating thick, vibrant lines and generating a significant amount of chalk dust. A variety of colors are encouraged, with students switching colors as they move along the edge and overlapping them where they meet.
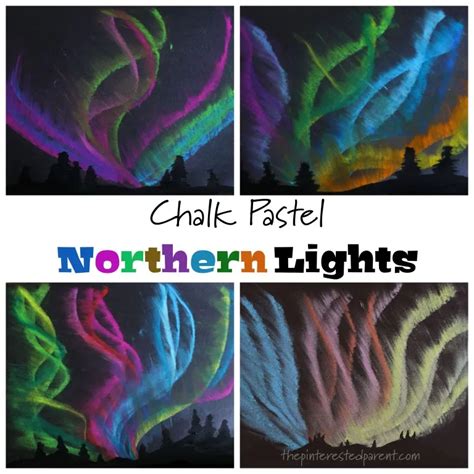
Day 1 (Continued): Smudging and LayeringOnce the entire edge is colored, students use their fingers to smudge the chalk upwards from the white paper onto the black paper. To achieve cleaner color transitions, it’s suggested to use a different finger for each color, though some blending is acceptable and often enhances the effect. After smudging, students blow gently on the paper to remove any residual chalk dust. The process then repeats: the top section of the white paper is cut off, the remaining white paper is realigned with the black paper, and chalk is applied and smudged along the new edge. This layering and smudging technique is repeated until the black paper is filled, creating the luminous effect of the aurora borealis.
Day 2: Adding Stars and Finishing TouchesOn the second day, students may need to finish applying chalk pastels to their northern lights. The next step involves creating stars in the night sky. This is achieved by dipping a toothbrush into white tempera paint (Crayola Tempera Premier is recommended) and then flicking the bristles over the black paper. The instruction is to use a moderate amount of paint on the toothbrush and to rub a finger along the bristles to spread the paint evenly before flicking. This technique effectively scatters small dots of white paint, resembling stars or falling snow, depending on the viewer's interpretation.
Day 3: Crafting the Winter ForestThe third day is dedicated to creating the foreground elements of the artwork: trees. Students each receive a sheet of black paper cut to 6” x 18”. Using white chalk pastel, they draw trees without any initial pencil sketching. The technique involves drawing an upside-down "v" shape for the top of each tree, and then drawing the trees from left to right along the bottom of the paper. Once the trees are drawn, they are cut out as a single piece, ensuring a small border of black paper (about 1/2 inch) is left around each tree. These tree cutouts are then placed along the bottom of the main northern lights paper, with their edges aligned. It's crucial to ensure the paper is oriented correctly so the northern lights appear to be trailing upwards.
This detailed, multi-day approach allows for a deep exploration of chalk pastel techniques, color blending, and composition, resulting in a visually striking and atmospheric piece of art.
A Glimpse into Other Artistic Explorations
Beyond these detailed project descriptions, Mrs. Filmore's contributions hint at a broader range of artistic activities and resources available through her platform. These include:
- Springtime Art Lessons: A forthcoming collection of lessons specifically themed around spring, suggesting a continuation of seasonal art education.
- 4th Grade Art Lessons: Mention of specific lessons for this age group, including the cardinal painting and potential projects involving clay flowers and mixed media.
- Special Education Art Projects: Several art lessons are noted as being particularly suitable for or adapted for special education students, emphasizing inclusivity and diverse learning needs. Examples include "Hand Holding Flowers" and "Mixed-Media Hearts."
- Kindergarten and First Grade Activities: Projects like "Love is in the Air" (for 1st grade, adaptable for Kindergarten) and "Snowy Owl Collages" (for Kindergarten) demonstrate a curriculum tailored for younger learners, focusing on foundational art concepts and engaging themes.
- Resource Downloads: Mrs. Filmore offers a variety of downloadable resources through her Teachers Pay Teachers (TpT) store, enhancing her lesson plans. These include:
- Superhero Mask Templates: Four hand-drawn mask styles for immediate creative use.
- Paintbrushes Resource Handout: A double-sided PDF for students to reference when drawing paintbrushes.
- Snow Globe Template: A versatile template for various winter art projects, encouraging creative interpretation.
- "I Am" Statements Resource Sheet: Positive affirmations and descriptive words for self-portrait and SEL-focused art lessons.
- Mixing Primary Colors Sheet: A foundational tool for young learners to understand color theory.
- Artist Statement / Reflection Sheet: Encouraging critical thinking and reflection on artistic processes.
- Sandra Silberzweig Art Lesson Resource: Step-by-step instructions for abstract portraiture.
- Leaf Templates / Tracers: For fall-themed art lessons.
- Airplane Drawing Template: For various mixed-media projects.
- Woodland Creatures Step-by-Step Drawing Sheets: To aid in drawing animals for landscape art.
- Art "Word Search" Sheets: Engaging activities for early finishers.
- Victorian Architecture Resource Packet: Detailed drawing instructions for architectural elements.
- 3D Water Lily Tracing Template: For a Monet-inspired lesson.
- Springtime Bear Cub Templates / Springtime Bunny and Bear Art Lesson Template: Free downloadable templates for spring-themed art.
- The What Should I Draw Jar Drawing Ideas: A fun list of prompts for free draw sessions.
- Victorian Architecture Lesson-4th Grade: A PowerPoint presentation for a detailed architectural art lesson.
Snowflake Crayon Resist Art | Easy Winter Craft for Kids
The breadth of these resources and lessons underscores Mrs. Filmore's commitment to providing a comprehensive and inspiring art education. Her approach, which integrates drawing, painting, chalk pastels, and mixed media, alongside literacy and SEL connections, ensures that students not only develop technical skills but also cultivate their creativity, critical thinking, and self-expression. The anticipation for her upcoming "Springtime Art Lessons" collection further emphasizes her dedication to providing fresh and engaging artistic experiences throughout the academic year.