Adobe Photoshop, a powerhouse in digital imaging, offers a suite of tools designed to streamline creative processes and enhance productivity. Among these, Photoshop Actions stand out as a remarkable feature for automating repetitive tasks. Whether you're a seasoned professional or a budding enthusiast, understanding and utilizing Photoshop Actions can significantly elevate your workflow, transforming tedious "grunt work" into a series of effortless clicks. This comprehensive guide delves into the intricacies of Photoshop Actions, from their fundamental concepts to advanced recording and editing techniques, empowering you to unlock their full potential.
What are Photoshop Actions?
At their core, Photoshop Actions are predefined sequences of commands and tasks that can be executed automatically. Think of them as a digital script that Photoshop follows, performing a set of operations on a single file or a batch of files without requiring your manual intervention for each step. These actions can encompass a wide range of operations, including menu commands, panel options, and tool actions. For instance, you can use actions to resize images to specific dimensions, apply a complex series of filters and adjustments to achieve a particular artistic effect, or save files in a desired format and location. The primary goal of actions is to save you time and ensure consistency across your projects, especially when dealing with repetitive editing procedures.
The concept of actions might seem daunting initially, but their purpose is straightforward: to simplify your life. Many users, even those with extensive experience in Photoshop, shy away from actions due to a perceived complexity or fear of making mistakes. However, the reality is that actions are designed to be an aid, not a source of stress. They are not essential for using Photoshop, but much like a car facilitates travel, they drastically reduce the time and effort required to reach your destination. Imagine having to manually resize a hundred photos for a website or add a copyright watermark to a thousand images. While possible through manual effort and keyboard shortcuts, it would be an incredibly time-consuming endeavor. With actions, you can perform the task once, record the steps, and then let Photoshop automate the rest, freeing you to focus on more creative aspects of your work.
The Power of Automation: Why Use Photoshop Actions?
The benefits of employing Photoshop Actions are numerous and far-reaching. The most immediate advantage is the significant time savings they offer. By automating repetitive tasks, you can complete in minutes what might have taken hours of manual labor. This efficiency is particularly valuable for professionals who handle large volumes of images or work under tight deadlines.
Beyond speed, actions ensure consistency. When you apply the same action to multiple files, you guarantee that each image undergoes the exact same editing process, from color adjustments to filter applications. This uniformity is crucial for maintaining a cohesive look and feel across a series of photographs, brand assets, or marketing materials.
Furthermore, actions democratize complex effects. A sophisticated, multi-step photo effect that might take a seasoned professional considerable time to assemble can be captured as an action and then applied instantly to any other image. This makes advanced editing techniques accessible to users of all skill levels.
Finally, actions foster creativity by liberating you from mundane tasks. When Photoshop handles the repetitive work, you have more mental energy and time to dedicate to creative problem-solving, experimentation, and pushing the boundaries of your artistic vision.
Understanding the Actions Panel
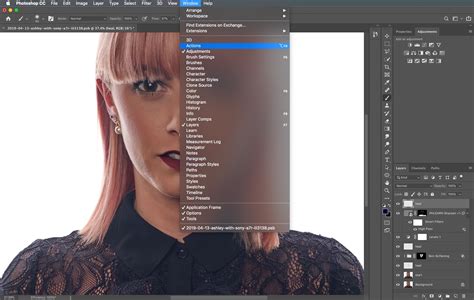
The central hub for all action-related activities in Photoshop is the Actions panel. This panel, typically found alongside the History panel (accessible via Window > Actions), is where you record, play, edit, and organize your actions.

Upon opening the Actions panel, you'll notice a set of default actions that come bundled with Photoshop. These are often categorized into sets like "Default Actions," "Frames," "Image Effects," and "Text Effects." While some of these built-in actions can be useful, you'll likely want to create your own custom actions to suit your specific needs.
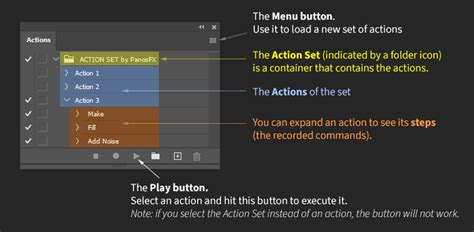
The Actions panel features several key controls, often resembling those found on traditional recording devices:
- Record Button (Red Circle): When clicked, this button initiates the recording of your subsequent actions.
- Stop Button (Yellow Square): This button halts the recording process.
- Play Button (Blue Triangle): This button executes a selected action.
- New Action Set Icon (Folder): Allows you to create a new folder to organize your actions.
- New Action Icon (Page): Used to create a new individual action.
- Delete Icon (Trash Can): Removes selected actions or action sets.
Each action and action set in the panel has a triangle icon next to it. Clicking this icon expands or collapses the set or action, revealing or hiding the individual steps within it. This hierarchical structure is essential for managing and understanding your recorded workflows.
The Actions panel also has a fly-out menu (accessed by clicking the icon in the top-right corner, which may appear as a small stack of lines or a right-pointing arrow depending on your Photoshop version). This menu provides access to a broader range of commands, including loading, saving, replacing, resetting, and clearing actions, as well as options for editing individual steps.
Recording Your First Action: A Step-by-Step Approach
The process of creating an action involves demonstrating the steps you want Photoshop to automate. It's crucial to understand that Photoshop does not record actions in real-time. You can take your time between steps, pause, and even leave your computer; Photoshop will only record the commands you execute, not the duration it took to execute them. This non-real-time recording is a key aspect that alleviates the panic many users experience.
Let's walk through recording a simple action to resize an image for web use.
- Open an Image: Start by opening a sample image in Photoshop.
- Open the Actions Panel: If it's not already visible, go to
Window > Actions. - Create a New Action Set (Optional but Recommended): Click the "Create new set" icon (folder) at the bottom of the Actions panel. Name it something descriptive, like "My Web Resizing."
- Create a New Action: With your new set selected, click the "Create new action" icon (page). A dialog box will appear.
- Name: Give your action a clear name, such as "Resize for Web 800px."
- Set: Ensure it's assigned to your "My Web Resizing" set.
- Function Key (Optional): You can assign a keyboard shortcut for quicker playback.
- Color (Optional): Assign a color to the action for visual identification in the panel.
- Click "Record." The record button in the Actions panel will turn red, indicating that recording has begun.
Perform the Desired Steps: Now, execute the editing steps you want to automate. For this example:
- Go to
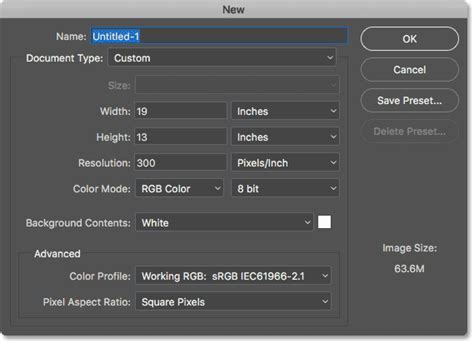
Image > Image Size.... - In the Image Size dialog, ensure "Resample" is checked.
- Change the "Width" to 800 pixels (or your desired dimension). Photoshop will automatically adjust the height proportionally.
- Click "OK."
- Go to
File > Save As.... - Choose a location and file format (e.g., JPEG).
- Set your desired JPEG quality.
- Click "Save."
- Go to
File > Close.
- Go to
Stop Recording: Click the "Stop" button (yellow square) in the Actions panel.
You have now recorded your first action! You can find it listed under your "My Web Resizing" set.
Playing and Editing Actions
To play an action, simply select it in the Actions panel and click the "Play" button (blue triangle). Photoshop will then execute all the recorded steps on your currently open document.
The true power of actions lies in their editability. Mistakes happen, and your workflow needs may change. The Actions panel allows you to meticulously edit each recorded step.
- Deleting Steps: If you accidentally included an unnecessary step, simply drag it to the trash can icon at the bottom of the Actions panel.
- Reordering Steps: You can drag and drop steps within an action to change their order.
- Editing Step Parameters: To modify the settings of a specific step (e.g., change the resize dimension or JPEG quality), click on the step. Then, you might see a "Set" or "Edit" option, or you can click the empty square to the left of the step to toggle its dialog box on or off during playback. If you click the empty square next to a step that has a dialog box associated with it, the action will pause at that step during playback, allowing you to adjust the settings for the current image. This is incredibly useful for actions that require variable input.
- Inserting New Steps: You can insert new commands or stops into an existing action using the fly-out menu options like "Insert Menu Item" or "Insert Stop." "Insert Stop" allows you to add a pause in the action's execution, prompting you to perform a manual step or make a decision before continuing.
Previewing Actions
A valuable feature for understanding and troubleshooting actions is the preview function. Mouse over an action in the Actions panel, and if the preview icon is enabled, Photoshop will offer suggestions or show you what the action will do without committing changes to your document's history. This allows you to see the potential outcome before fully committing to playing the action.

Advanced Techniques and Considerations
Batch Processing with Actions
One of the most powerful applications of Photoshop Actions is batch processing. This allows you to apply an action to an entire folder of images.
- Go to
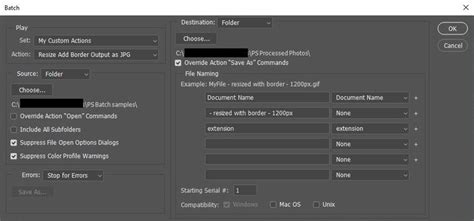
File > Automate > Batch.... - In the Batch dialog box:
- Set: Choose the action set containing your desired action.
- Action: Select the specific action to apply.
- Source: Choose the folder containing the images you want to process. You can also choose to process currently open files.
- Destination: Specify where the processed files should be saved. You can choose to save them in the same folder, a different folder, or suppress the file save command within the action itself if you're handling saving within the recorded action.
- File Naming: Configure how the processed files will be named.
- Click "OK." Photoshop will then iterate through your selected images, applying the action to each one.
Handling Errors and Compatibility
While actions are generally robust, compatibility issues can arise. An action recorded in a newer version of Photoshop that uses features not present in an older version might fail when run in that older version. For example, if you record an action using a tool or filter introduced in Photoshop CS6 and try to run it in Photoshop CS5, it will likely not work. The general rule of thumb is to use features that are common across the versions you intend to use the action with. If you're creating actions for a team using different Photoshop versions, it's wise to stick to core functionalities.
When recording actions, especially those involving user input or variable results, using the "Insert Stop" command or enabling the dialog box for specific steps (by clicking the empty square next to the step) is crucial. This allows for dynamic adjustments during playback.
Importing and Exporting Actions
Actions can be easily shared with others or backed up by exporting them.
- Exporting: To save an action or a set of actions, select the action or set in the Actions panel, then go to the fly-out menu and choose "Save Actions." This will create a
.atnfile, which is the standard Photoshop Action format. - Importing: To load an action file, go to the Actions panel's fly-out menu and select "Load Actions." Navigate to the
.atnfile on your computer and click "Load."
Beyond Basic Editing: Creative Applications
The utility of Photoshop Actions extends far beyond simple resizing or file format conversions. They are instrumental in creating complex artistic effects:
- Photo Retouching Workflows: Automate steps like skin smoothing, color correction, and sharpening for portraits.
- Artistic Filters: Apply sequences of filters to achieve painterly, vintage, or stylized looks. For instance, creating a "moody, saturated photo" effect can be achieved by adjusting Hue/Saturation and Vibrance.
- Graphic Design Elements: Generate consistent graphic styles, such as applying a specific border or text effect to multiple design elements.
- Web Design Assets: Automate the process of slicing images, optimizing them for the web, and exporting them in various formats.
How to create actions in photoshop
Consider the example of transforming a summer landscape into an autumn mood photo. This could involve steps like adjusting the hue and saturation of greens and yellows, increasing vibrance, and perhaps adding a subtle vignette or a warm overlay. By recording these steps, you can instantly imbue any similar photograph with the desired autumnal feel.
Conclusion: Embrace the Power of Automation
Photoshop Actions are an indispensable tool for anyone looking to enhance their efficiency and creative output within Adobe Photoshop. By understanding the fundamentals of recording, playing, and editing actions, and by leveraging features like batch processing, you can automate repetitive tasks, ensure consistency, and unlock sophisticated creative effects with ease. Don't let the initial learning curve deter you; the time and effort invested in mastering Photoshop Actions will undoubtedly pay dividends in your ongoing digital imaging endeavors. Start experimenting, record your first action, and discover how much time and creative freedom you can gain by letting Photoshop do the heavy lifting.