Adobe Photoshop has long been the industry standard for image editing, and with the introduction of Generative Fill, it has once again redefined the boundaries of what's possible. This revolutionary AI-powered feature, integrated into the latest versions of Photoshop, allows users to effortlessly add, remove, or modify image elements with unprecedented ease and realism. Generative Fill is not merely an update; it represents a significant leap forward, transforming complex editing tasks into simple, intuitive processes. This tutorial delves into the core functionalities, advanced techniques, and practical applications of Generative Fill, empowering both novice and experienced users to harness its full potential.
Understanding the Core of Generative Fill
At its heart, Generative Fill is a powerful tool that leverages machine learning AI to analyze and understand image content. It meticulously examines each pixel, considering factors such as lighting, perspective, color, and shadows, to generate new content that seamlessly integrates with the existing image. This sophisticated analysis results in remarkably realistic composite photos, often created in a fraction of the time it would take using traditional methods.
One of the most significant advantages of Generative Fill is its non-destructive nature. Every generated element is placed on its own dedicated layer, complete with a layer mask. This ensures that your original image remains untouched, allowing for easy reversions and modifications. Furthermore, these generated elements can be further enhanced and refined using any of Photoshop's other powerful tools, including blending modes and filter effects, offering unparalleled flexibility in the creative process.
The primary driver behind the excitement surrounding Generative Fill is its immense time-saving capability. Previously, tasks like adding or removing elements, matching surrounding pixels, or ensuring correct lighting and shadows were time-consuming and required significant manual effort. Generative Fill automates these complex steps, delivering flawless results with just a few clicks. Beyond efficiency, this feature also presents a compelling alternative to expensive stock photography subscriptions, enabling users to generate custom imagery on demand.
Key Capabilities of Generative Fill
Generative Fill opens up a vast new realm of creative possibilities, offering versatile applications that streamline design tasks and elevate image quality. Its core functionalities can be broadly categorized as follows:
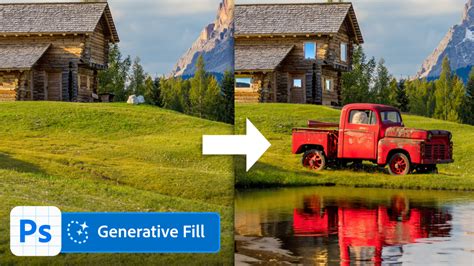
- Generate Objects: Select any area within your image and describe the object or element you envision adding or replacing through a text prompt. The AI will then create this element, seamlessly integrating it into the scene.
- Generate Backgrounds: Choose the background area behind your subject and utilize a text prompt to describe a new scene. Generative Fill will then create an entirely new background that complements your subject.
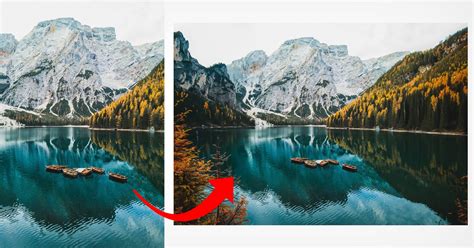
- Extend Images: Expand the canvas of your image by increasing its width or height. By selecting the empty region, Generative Fill can intelligently create new content to fill the expanded space, effectively extending the original scene.
- Remove Objects: Don't let unwanted elements detract from a perfect shot. Simply select the object you wish to remove, and Generative Fill will work its magic to seamlessly replace it with content that blends with the surrounding image.
Getting Started with Generative Fill
To begin harnessing the power of Generative Fill, you'll need access to the latest version of Adobe Photoshop. The feature is available through a subscription to Adobe's Creative Cloud platform. While a standalone Photoshop subscription is available for approximately $21 per month, users can also explore its capabilities through Adobe's Firefly web app for experimentation. A 7-day free trial of Photoshop AI is offered, providing full access to its features.
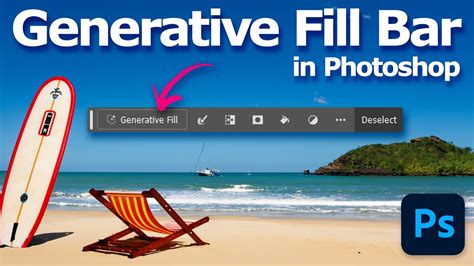
Once Photoshop is installed, familiarize yourself with the Generative Fill contextual taskbar. This intuitive interface provides quick access to the tool's settings and options.
Essential Tools and Setup
Before diving into Generative Fill, ensuring your Photoshop environment is optimized can significantly enhance your workflow.
- Hardware Specifications: Ensure your system meets or exceeds the recommended hardware specifications for Adobe Photoshop for optimal performance.
- Performance Settings: Within Photoshop's Preferences, adjust the Performance Settings to allocate more memory to the application. This can lead to faster processing and smoother operation.
- Interface Customization: Customize the interface by hiding unnecessary panels and keeping only the essential ones visible. This declutters your workspace and improves efficiency.
- Graphics Tablet (Optional but Recommended): While not strictly necessary, a good graphics tablet can greatly enhance control over selections and edits, especially for intricate tasks.
The Generative Fill Workflow
The workflow for using Generative Fill is designed to be user-friendly and efficient:
- Open or Create an Image: Start by opening an existing image or creating a new document in Photoshop.
- Select the Target Area: Use any of Photoshop's selection tools - such as the Marquee tools, Lasso tools, Object Selection tool, Quick Selection tool, or Magic Wand tool - to mark the specific area of your image you intend to modify. The "Select Subject" button can also be used to quickly select the main subject of your photo.
- Access Generative Fill: Once a selection is made, the Contextual Task Bar will appear. Click the "Generative Fill" button within this bar.
- Enter a Text Prompt (or leave blank): A text-entry prompt box will appear. Describe the object, scene, or modification you wish to generate in English. For tasks like object removal or extending an image based on surrounding content, you can leave the prompt box empty.
- Generate Content: Click the "Generate" button. Photoshop will process your request and present you with three variations of the generated content in the Properties panel.
- Review and Refine: Examine the generated variations. You can cycle through them using the left and right arrows in the Contextual Task Bar, or click "Generate" again to produce three new variations.
- Apply or Further Edit: Once you are satisfied with a variation, you can accept it. The generated content will appear on a new "Generative layer" above your original image, complete with a layer mask. This allows for further editing using other Photoshop tools, such as adjusting opacity, blending modes, or applying filter effects.
Practical Applications and Advanced Techniques
Generative Fill's versatility extends far beyond simple object insertion. Its ability to understand context and generate plausible content makes it invaluable for a wide range of creative and practical tasks.
Extending Images Beyond Their Borders
One of the most impressive applications of Generative Fill is its ability to extend the canvas of an image. This is particularly useful for reframing a shot or creating a wider aspect ratio.
- Use the Crop Tool: Select the Crop Tool and use its handles to expand the canvas size, creating empty space around your original image.
- Make a Selection: Select the empty region you wish to fill.
- Generate Content: Click the Generative Fill button. If you want Photoshop to intelligently fill the space based on the surrounding content, leave the prompt empty and click "Generate." Alternatively, you can use a text prompt to guide the generation.
- Review Variations: Photoshop will provide multiple variations for the extended area. Choose the one that best matches your vision.
This process is highly effective for adding more space on the sides of a subject, allowing them to "look into" the frame, or for transforming a portrait shot into a more expansive landscape. The AI is remarkably adept at matching the lighting, shadows, perspective, and even the depth of field of the original photo, resulting in a seamless extension.
Extend Image Background in Adobe Photoshop Tutorial for beginners
Replacing Backgrounds with Ease
Generative Fill revolutionizes background replacement, transforming a once-tedious process into a quick and effective operation.
- Select Your Subject: Use a selection tool to carefully select the subject of your image.
- Invert the Selection: Invert the selection to target the background area.
- Apply Generative Fill: With the background selected, click the Generative Fill button and enter a text prompt describing the new background you envision. For example, typing "mountain trail" or "tropical beach" will generate a new scene.
- Refine as Needed: Review the generated backgrounds and select the best option. You can further refine the result by making adjustments to the generated layer.
Modifying and Replacing Existing Elements
Generative Fill excels at altering specific elements within an image, providing a powerful alternative to traditional cloning and healing techniques.
- Changing Clothing: Select an item of clothing, such as a jacket, and use a prompt like "puffer jacket" or "leather jacket" to change its style or material.
- Removing Blemishes or Unwanted Objects: Similar to Content-Aware Fill but with enhanced capabilities, you can select unwanted objects or imperfections and let Generative Fill replace them with seamless, contextually appropriate content. For example, to remove the lower half of a dress, select that area, click Generative Fill, and then generate. Photoshop will replace it with surrounding pixels that match the original image.
Creating Images from Scratch
While Generative Fill performs exceptionally well when modifying existing images, it can also be used to create entirely new images from a blank canvas.
- Set Canvas Dimensions: Start with a blank canvas. For optimal quality, it's recommended to stay within 1024-pixel limits for generated images, though larger canvases can be used with potential quality trade-offs.
- Create Selections and Prompts: Draw selections in different areas of the canvas and use text prompts to generate various elements. For instance, you could generate a "majestic snow-capped mountain range" for the background, followed by prompts for water, trees, or other scenic elements.
- Composite Elements: Combine generated elements to create a complete scene. For example, you could generate a background and then add a person with dogs looking out at the scenery by making specific selections and using targeted prompts.
Tips for Maximizing Generative Fill Effectiveness
To achieve the best possible results with Generative Fill, consider these practical tips:
- Precision in Selections: The shape and size of your selection significantly impact the outcome. For instance, when adding a hat, draw the selection as closely as possible to the desired hat shape. Smaller selections tend to produce smaller design elements, while larger selections result in larger objects.
- Descriptive Prompts: Use clear, descriptive adjectives and nouns in your text prompts. Avoid instructional words like "create," "alter," or "make," as these can lead to unpredictable results. Instead of asking Photoshop to "make the dog bigger," describe the desired outcome, such as "a larger golden retriever."
- Simplicity is Key: In many cases, less is more. Overly complex prompts can confuse the AI. Experiment with concise and direct descriptions.
- Leverage Empty Prompts for Removal/Extension: When removing an object or extending an image based on surrounding content, simply click Generative Fill and then "Generate" without entering any text. This instructs Photoshop to fill the selection using contextually relevant pixels.
- Utilize the Remove Tool for Cleanup: If the AI-generated content has minor imperfections or distractions, use Photoshop's Remove Tool (found nested with healing tools) on a separate layer to clean them up. This allows for precise touch-ups without directly editing the Generative layer.
- Generate Separately for Complex Edits: When extending an image on multiple sides, consider generating each side separately. This provides more control and allows you to refine each extension independently.
- Combine with Other Tools: Generative Fill works harmoniously with other Photoshop features. For instance, using layer masks allows for selective application of generated content. Combining it with Content-Aware Fill for initial edits can also establish a strong foundation.
- Experiment with Variations: Don't hesitate to click "Generate" multiple times to explore different variations. You can always revert to previous results if needed.
Understanding Limitations and Future Potential
While Generative Fill is a groundbreaking tool, it's important to acknowledge its current limitations to manage expectations and guide its effective use.
- Image Size Limitations: Photoshop struggles with generating high-quality images or complex elements on canvases larger than 1024 pixels. While it can extend larger images, optimal results for newly generated content are often achieved within this resolution.
- Faces, Hands, and Animals: While AI has made significant strides, generating photorealistic faces, hands, and animals can still present challenges. These areas often require more refinement and manual touch-ups.
- Instructional Prompting: As mentioned, Generative Fill performs best with descriptive prompts rather than direct commands.
Despite these limitations, the rapid advancement of AI technology suggests that these challenges will likely be addressed in future updates. Adobe is continuously developing its AI systems, with ongoing projects like transforming 3D models to images, sketches to images, and generating patterns and vectors from text.
Usage Rights and Commercial Use
A significant development regarding Generative Fill is the clarification of usage rights. Initially, there were concerns about the commercial use of AI-generated content. However, Adobe has confirmed that any images created using Photoshop's Generative Fill can now be used commercially. This is because Adobe has trained its generative AI model exclusively on licensed Adobe Stock images, ensuring that there are no copyright infringement concerns.
The Future of AI in Image Editing
Generative Fill represents a pivotal moment in image editing, democratizing advanced creative capabilities and empowering a broader range of users. Tools like Generative Fill, along with Neural Filters and Adobe Sensei, are transforming Photoshop into an even more powerful and intuitive creative suite.
Beyond Generative Fill, Adobe is integrating AI across its Creative Cloud applications through Adobe Firefly, its generative AI system. This includes developing tools for 3D to image generation, sketch to image, text to pattern, and text to vector. The ongoing evolution of AI in image editing promises even more exciting possibilities, enabling users to push the boundaries of their creativity and efficiency.
For those looking to deepen their understanding and master these advanced techniques, comprehensive courses like "Photoshop Generative AI Mastery: From Novice to Pro" and resources such as Adobe's official tutorials, documentation, and online communities offer invaluable guidance. By embracing these new tools and continuously exploring their potential, users can stay at the forefront of digital artistry and unlock new levels of creative expression.
tags: #adobe #photoshop #with #generative #fill