Adobe Photoshop offers a robust suite of tools for graphic design and image manipulation, and one of its most versatile features is the ability to import and utilize patterns. Patterns can add depth, texture, and visual interest to your designs, ranging from subtle backgrounds to intricate decorative elements. Whether you're a seasoned professional or just beginning your journey with Photoshop, understanding how to effectively import and apply patterns is a fundamental skill that can significantly enhance your creative output. This guide will delve into the various methods of pattern import, customization, and application, drawing upon the core functionalities of Photoshop to empower your design process.
Understanding Photoshop Patterns
At its core, a Photoshop pattern is a repeating image or texture that can be tiled across a selected area or an entire layer. These patterns can be anything from abstract geometric shapes and natural textures like wood or fabric to complex illustrations. Photoshop comes with a built-in library of patterns, but the true power lies in its flexibility to import custom patterns and even create your own. Saving patterns allows you to easily use a pattern in multiple images, ensuring consistency and streamlining your workflow.
Importing Pre-existing Pattern Libraries
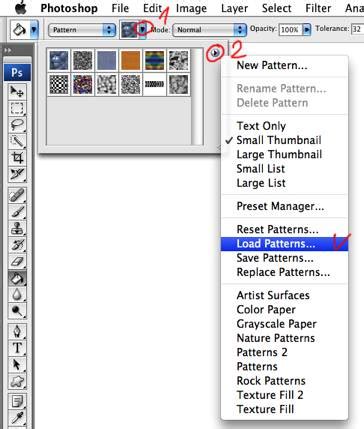
Photoshop provides several pre-installed pattern libraries that offer a diverse range of styles. To access these, you can navigate to the Pattern Picker, which is typically found within the Tool Options bar when certain tools are active, such as the Paint Bucket Tool or the Pattern Stamp Tool.
Accessing the Pattern Picker: When you select a tool that utilizes patterns, look for the Pattern dropdown menu in the Tool Options bar at the top of your Photoshop workspace. Clicking on this dropdown will reveal a preview of currently loaded patterns.
Loading Additional Libraries: At the top right corner of the Pattern Picker panel, you'll find a small gear icon or a similar menu button. Clicking this will open a menu with options to load more pattern libraries. You can select from the default Photoshop libraries or load custom libraries that you may have downloaded or created.
Applying a Loaded Pattern: Once a library is loaded, the patterns within it will appear in your Pattern Picker. Simply click on the desired pattern to select it. You can then use tools like the Paint Bucket Tool to fill a selected area or an entire layer with the chosen pattern.
Creating and Saving Your Own Patterns
The true creative potential of Photoshop patterns is unlocked when you begin creating your own. This process involves defining a specific area of your image as a repeatable tile.
Defining a Pattern Area:
- Open the image or create a canvas containing the design element you wish to turn into a pattern.
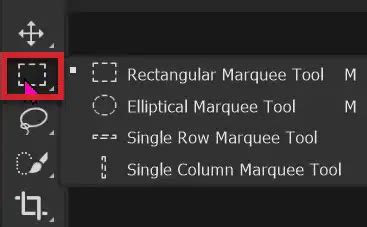
- Use a selection tool, such as the Rectangular Marquee Tool, to make a precise selection of the area you want to define as your pattern. It is crucial to make a rectangular selection with Feather set to 0 pixels to ensure clean, tileable edges.
- Ensure that the selection encompasses the entire repeatable unit of your design.
Saving the Pattern:
- With your selection active, go to the Edit menu and choose Define Pattern….
- A dialog box will appear, prompting you to name your new pattern. Choose a descriptive name that will help you identify it later.
- Click OK. Your custom pattern is now saved and will appear in your Pattern Picker, ready for use.
Utilizing the Pattern Stamp Tool
The Pattern Stamp Tool offers a more nuanced approach to applying patterns directly onto your image, allowing for greater control over placement and blending.
Selecting the Tool: Choose the Pattern Stamp Tool from the Photoshop toolbar. It often shares a spot with the Clone Stamp Tool.
Configuring Tool Options: The Tool Options bar provides several critical settings:
- Brush: This allows you to select a specific brush tip. The shape and size of the brush will influence how the pattern is "stamped." You can choose from various brush thumbnails.
- Size: This setting controls the size of the brush tip in pixels. A larger brush will apply the pattern over a wider area with each stroke.
- Opacity: This slider determines the transparency of the applied pattern. A lower opacity allows pixels in the image to show through the pattern, creating a subtle overlay effect. This setting allows pixels under a pattern stroke to show through.
- Mode: This dropdown menu controls how the pattern interacts with the underlying pixels. Options like "Normal," "Multiply," "Screen," and "Overlay" offer different blending effects.
- Aligned: When this checkbox is enabled, the pattern is aligned from one paint stroke to the next. This means that the tiling of the pattern will be continuous across multiple strokes, maintaining a uniform design. If unchecked, the pattern will reset its starting point each time you begin a new stroke, which can be useful for creating textured effects. The pattern repeats the pattern as a contiguous, uniform design.
Applying the Pattern:
- Select the pattern you wish to use from the Pattern Picker.
- Click and drag on your canvas with the Pattern Stamp Tool to apply the pattern. The pattern will be applied according to the brush shape, size, and opacity settings. The setting allows pixels under a pattern stroke to show through.
Turn Any Texture Into Seamless Pattern in Photoshop!
Advanced Pattern Application Techniques
Beyond basic filling and stamping, Photoshop offers more sophisticated ways to integrate patterns into your designs.
Pattern Overlays and Layer Styles
One of the most common and flexible methods is using the Layer Style feature. This allows you to apply a pattern as an overlay to any layer without permanently altering the layer's pixels.
Accessing Layer Styles: Double-click on the layer in the Layers panel that you want to apply a pattern to. Alternatively, right-click the layer and select "Blending Options…" or go to Layer > Layer Style > Pattern Overlay.
Configuring Pattern Overlay:
- In the Layer Style dialog box, select "Pattern Overlay" from the list on the left.
- Click on the pattern swatch to open the Pattern Picker and choose your desired pattern.
- Scale: Adjust the scale of the pattern to make it larger or smaller relative to the layer.
- Opacity: Control the overall transparency of the pattern overlay.
- Blend Mode: Choose a blend mode to dictate how the pattern interacts with the underlying layer content.
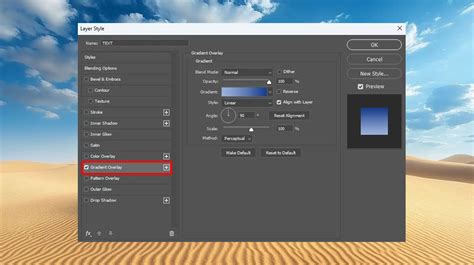
This method is non-destructive, meaning you can easily edit, disable, or remove the pattern overlay at any time without affecting the original layer content.
Using Patterns with Masks
Layer masks provide an even more precise way to control where a pattern is applied. You can use a pattern to reveal or conceal parts of a layer, or even use it as a mask itself.
Create a Layer Mask: Select the layer you want to apply a pattern to and click the "Add Layer Mask" icon at the bottom of the Layers panel.
Apply Pattern to the Mask:
- Select the layer mask thumbnail in the Layers panel.
- Use the Paint Bucket Tool to fill the entire mask with a pattern. Black areas on the mask will hide the layer content, white areas will reveal it, and shades of gray will create transparency.
- Alternatively, you can use the Pattern Stamp Tool to "paint" the pattern onto the mask, giving you fine-grained control over its placement and density.
Refining the Mask: You can further refine the pattern's appearance on the mask by adjusting its opacity, using blend modes, or even applying filters to the mask itself.
Creating Seamless Patterns from Selections
When defining a pattern, ensuring its seamlessness is paramount for tiling. If your initial selection isn't perfectly tileable, you might notice visible seams when the pattern is repeated.
Offset Filter: A powerful technique to fix or create seamless patterns is using the Offset Filter (Filter > Other > Offset).
- After making your initial selection and defining it as a pattern, you can apply the Offset filter to the original image area that you used for the pattern.
- Enter horizontal and vertical values to shift the image content. This will bring the edges of the pattern into the center, allowing you to easily see and fix any misalignments.
- Use tools like the Clone Stamp Tool or Healing Brush Tool to blend the displaced edges and create a truly seamless transition.
- Once corrected, redefine the pattern.
Pattern Preview: Photoshop CC 2020 and later versions include a Pattern Preview mode (View > Pattern Preview). This feature allows you to see your pattern repeat in real-time as you edit, making it much easier to create seamless designs.
Understanding Pattern Alignment and Tiling
The concept of tiling is central to how patterns work. A pattern is essentially a small tile that is repeated side-by-side to cover a larger area.
Contiguous Design: When the "Aligned" option is checked with the Pattern Stamp Tool, the pattern's tiling is continuous. This means that if you start painting a stroke, then lift your mouse and start another stroke adjacent to the first, the pattern will continue seamlessly from where the previous stroke ended. This is essential for creating uniform backgrounds or textures. If the pattern is not aligned from one paint stroke to the next, it will reset its tiling origin with each new stroke, which can create a more textured, less uniform effect.
Defining the Tile: The initial rectangular selection you make when defining a pattern dictates the boundaries of that tile. Everything within that rectangle will be repeated. If there are elements that extend beyond the edges of the rectangle, they will be clipped. This is why careful selection and potentially using the Offset filter are crucial for creating well-defined, repeatable units.
Troubleshooting Common Pattern Issues
Visible Seams: As mentioned, the most common issue is visible seams in the repeated pattern. This is usually due to imperfectly aligned elements at the edges of the defined pattern area. Using the Offset filter and careful retouching with the Clone Stamp Tool is the primary solution.
Pattern Not Filling Area: Ensure that you have a selection active or that you are applying the pattern to the correct layer. If using the Paint Bucket Tool, make sure the "Content-Aware" or other fill options are not interfering, and that the layer is not locked.
Pattern Appearing Pixelated: If your pattern was created from a low-resolution image, it may appear pixelated when scaled up. Always start with high-resolution source material when creating custom patterns.
Pattern Not Repeating Correctly: Double-check the "Aligned" setting for the Pattern Stamp Tool. If you intend for the pattern to tile continuously across strokes, ensure "Aligned" is checked.
Conclusion
The ability to import, create, and effectively apply patterns is a cornerstone of proficient Photoshop usage. From leveraging built-in libraries to crafting intricate custom designs, patterns offer endless possibilities for enhancing visual communication. By mastering the tools and techniques discussed, including pattern definition, the Pattern Stamp Tool, layer styles, and layer masks, you can elevate your designs with sophisticated textures and repeating elements, transforming ordinary images into extraordinary visual experiences. Experiment with different patterns, blend modes, and application methods to discover the full potential of this powerful feature.